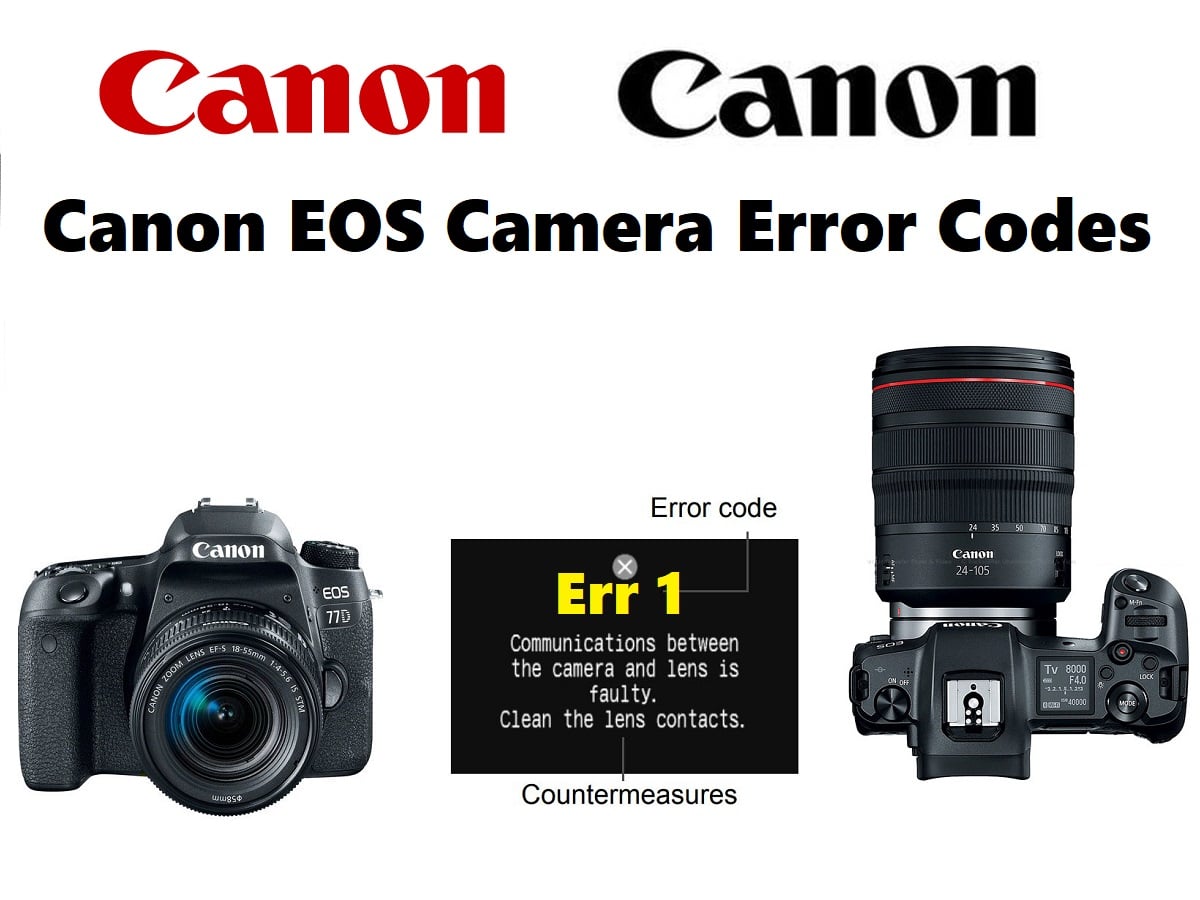
Canon camera error codes provide crucial information for users to monitor the health of their devices. These codes facilitate quick identification of issues and enable troubleshooting, extending the lifespan of cameras while enabling higher-quality shots. Canon camera error codes consist of numerical and alphanumeric codes, each representing different problems. They help users swiftly understand the camera’s status and, when necessary, seek professional assistance to resolve issues.
Canon EOS Codes List
| Error Codes | Solutions |
|---|---|
| Err 01 | The communication between the camera and lens is faulty. Very gently clean the electrical contacts (highlighted in red) on the camera and the lens using a clean and dry cloth. When cleaning the contacts take the following precautions: Do not wipe the contacts with a wet cloth. |
| Err 02 | The camera cannot access the memory card. Remove and re-install the memory card. |
| Err 03 | There are too many folders on the memory card. Replace the memory card with a formatted Compact Flash memory card. |
| Err 04 | Images cannot be saved because the memory card is full. Erase any unnecessary images on the memory card. Format the memory card as described in the user manual. |
| Err 05 | The built-in flash could not be raised. Turn the power switch off and then on again. |
| Err 06 | The sensor cleaning is not possible. Turn the power switch off and then on again. |
| Err 10 | A malfunction with the files on the memory card has been detected. Turn the power off, then remove and re-install the battery. Then turn the power on again. |
| Err 20 | A malfunction with the mechanical mechanism has been detected. Turn the power off, then remove and re-install the battery. Then turn the power on again. |
| Err 30 | A malfunction with the shutter has been detected. Turn the power off, then remove and re-install the battery. Then turn the power on again. |
| Err 40 | A malfunction with the power source has been detected. Turn the power off, then remove and re-install the battery. Then turn the power on again. |
| Err 50 | A malfunction related to the electric control has been detected. Turn the power off, then remove and re-install the battery. Then turn the power on again. |
| Err 60 | An error occurred preventing shooting, the lens movement may be obstructed. Check that the lens is clear from obstructions. Then turn the power switch off and then back on again. |
| Err 70 | A malfunction with the images has been detected. Turn the power off, then remove and re-install the battery. Then turn the power on again. |
| Err 80 | A malfunction with the electric control or images has been detected. Turn the power off, then remove and re-install the battery. Then turn the power on again. |
| Err 99 | This is a general error that can occur because of several different reasons. Turn the power off and remove then re-install the battery. Turn the power on again. Very gently clean the electrical contacts (highlighted in red) on the camera and lens using a clean and dry cloth. Very gently clean the electrical contacts on the camera and flash using a clean and dry cloth. Do not wipe the contacts with a wet cloth. |
| AC | The imaging element corresponds to the film in a film camera. If dirt or foreign matter gets on this imaging element, black spots may be recorded on the corresponding part of the image. If this happens, clean the imaging element. When performing the required cleaning, always connect the EOS camera to a household power outlet using the DC coupler. |
| CardErr | If the folder number reaches 999 and the file number reaches 9999, this error message appears even if there is space remaining on the card. Remove and re-insert the memory card. Try using a different memory card. |
| FullCF | No images can be shot or recorded. If the Compact Flash memory card is full, erase any unnecessary images. If erasing images has not resolved the error, please replace with a new Compact Flash memory card. |
| CardFull | No images can be shot or recorded. If the Compact Flash memory card is full, erase any unnecessary images. If erasing images has not resolved the error, please replace with a new Compact Flash memory card. |
| No CF | This message can be displayed for the following reasons: If there is no Compact Flash memory card installed and you press the shutter button. If there is no Compact Flash memory card installed and you start the camera. Insert a Compact Flash memory card. |
| No CF Card | This message can be displayed for the following reasons: If there is no Compact Flash memory card installed and you press the shutter button. If there is no Compact Flash memory card installed and you start the camera. Insert a Compact Flash memory card. |
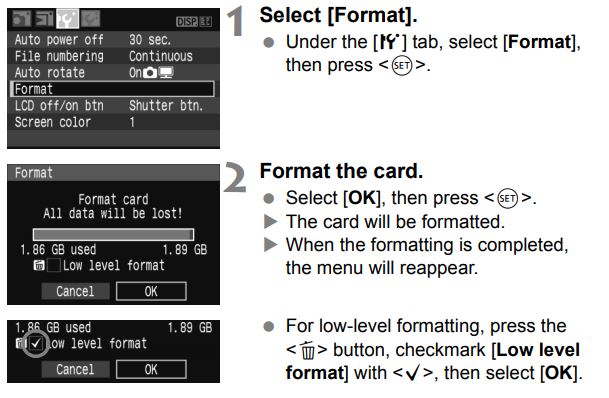
How to Format a Memory Card for a Canon Camera?
If the card is new or was previously formatted by another camera or personal computer, format the card with the camera.
Formatting the card will erase everything in the card. Even protected images will be erased, so make sure there is nothing you need to keep. If necessary, transfer the images to a personal computer before formatting the card.

When the card is formatted, only the file management information is changed. The actual data is not completely erased. Be aware of this when selling or discarding the card. When discarding the card, execute low-level formatting or destroy the card physically to prevent the data from being leaked.
The card’s capacity displayed on the format screen may be lower than the capacity indicated on the card.
Error Messages Meanings
The messages displayed on the LCD monitor are as follows.
| Error Message | Description |
|---|---|
| Busy | The camera is either processing the data or writing the captured image onto the CF card. Wait until it is finished. |
| Loading image... | The camera is reading the image in the CF card. Wait until it is finished. |
| No Image | The CF card has no displayable images. Either take a shot and save it or replace the CF card with one that has images. |
| Image too large | The image is not displayable because it is larger than 4064 x 2704 pixels. |
| Incompatible JPEG format | The JPEG image is not displayable because it is incompatible. |
| Corrupted data | The image data cannot be displayed because it is damaged. |
| Cannot rotate | The image cannot be rotated because it was captured by another camera, captured in a different format, or edited with a personal computer. |
| Unidentified Image | The image is not displayable because it was captured in an unknown format (recording format of another camera manufacturer, etc.). |
| Protected! | The image cannot be erased because it is erase-protected. To delete the image, first disable the erase protection. |
| Unselectable image | Printing of a non-JPEG image was attempted. Printing is not possible. Specification of an image captured by another camera or an image edited with a personal computer was attempted with Custom WB image selection. The white balance data cannot be loaded. |
| Too many marks | The printing specification was too many. The printing cannot be specified above this number. |
| Cannot complete! | The printing specification could not be saved. |
| Cannot magnify! | The image could not be magnified because it was captured by another camera or it is in an incompatible format or it has been edited with a personal computer. |
| Change the battery pack | There is not enough battery power for shooting or image playback. Replace the battery. |
| CCDRAW | The image is not displayable because it is a CCDRAW image captured by another camera. |
| Set Date/Time | The date/time has not been set. Captured images will not have the correct image capture date/time. |
| Turn off the camera after sensor cleaning | Atter cleaning the image sensor, turn the -switch to-OFF- |
| Battery level is too low. Cannot clean sensor | If there is insufficient battery power, the shutter may close during the cleaning of the image sensor and the shutter curtains and image sensor might be damaged. To prevent this, either use a tully-charged battery or a household power outlet before starting to clean the image sensor |
| Folder number full | Keep a new CF card on hand. Since the 999Canon folder has been created, the current CF card will soon become full. ( When 'IMG_9999' is created, 'FULL CF' will be displayed.) |
| No paper | The paper cassette has not been inserted properly or there is no paper in the cassette. Or there is a problem with the paper teed operation. |
| No ink | There is no ink cassette or the ink cassette has no ink. |
| Incompatible paper size | The wrong—size paper has been loaded in the printer. Printing is not possible with paper of this size. |
| Incompatible ink size | The wrong ink cassette has been loaded in the printer. |
| Ink cassette error | Printing is not possible with this ink cassette. |
| Paper and ink do not match | The paper and ink do not match each other. |
| Paper jam | The paper jammed during printing. |
| Paper has been changed | The paper size was changed prior to printing. |
| Recharge the printer battery | The printer’s battery is exhausted. |
| Communication error | Communication error occurred. |
| Readiust trimming | Printing was attempted with a style different from the trimming setting. |
| Cannot print! | The image was captured by another camera or in an incompatible tormat. Or the image has been edited with a personal computer. |
| Could not print ** image | The image was captured by another camera or it has been edited with a personal computer and printing was attempted in accordance with the DPOF setting for ” prints. |
| ** images remaining | Since the printing with the DPOF setting was interrupted, ” prints still remain to be printed. |
| Cannot trim | The image was captured by another camera or it is in an incompatible tormat. Or the image has been edited with a personal computer. Such images cannot be trimmed. |
| Battery level is too loww | Direct printing was not possible, because the camera battery level is too low. |
| Printer in use | Printing from the personal computer or the memory card in the printer is in progress. When the printing ends, the images in the camera’s CF card will start printing automatically. |
| Printer warming up | The printer is preparing for printing. When the printer is ready, printing will start automatically. |
| Media type error | Paper that the printer cannot use has been selected. Select a paper that can be used with the [Style] setting on the camera’s direct printing screen. |
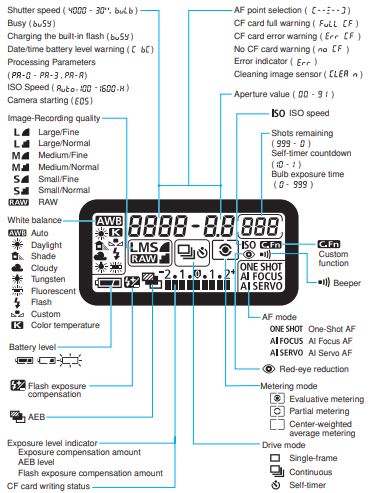
LCD Panel Definition

Troubleshooting
If there is a problem, first refer to this Troubleshooting Guide. If this Troubleshooting Guide does not resolve the problem, contact your dealer or nearest Canon Service Center.
| Trouble | Cause |
|---|---|
| The access lamp still blinks even when the power switch is set to | If the power is cut off while an image is being recorded to the card, the access lamp will light/blink for a few sec. After the image is recorded to the card, the camera turns off automatically |
| The camera does not operate even when the power switch is set to | The battery is not properly installed in the camera. |
| Recharge the battery. | |
| Make sure the battery compartment cover is closed. | |
| Make sure the card slot cover is closed. | |
| Press the | |
| The battery becomes exhausted quickly | Use a fully-charged battery. |
| The rechargeable battery will degrade after repeated use. Purchase a new one. | |
| The camera turns off by itself | Auto power off is in effect. If you do not want auto power off to take effect, set the [ Auto power off] menu to [Off]. |
| Even if [ Auto power off] has been set to [Off], the LCD monitor will turn off after the camera is idle for 30 min. Press the | |
| No images can be shot or recorded | The card is not properly inserted. |
| If the card is full, replace the card or delete unnecessary images to make room. | |
| If you try to focus in the One-Shot AF mode while the focus confirmation light | |
| Slide the card’s write-protect switch to the Write/Erase setting. | |
| The LCD monitor does not display a clear image | If dust is adhering to the LCD monitor, wipe with a lens cloth or soft cloth. |
| In low or high temperatures, the LCD monitor display may seem slow or it might look black. It will return to normal at room temperature. | |
| The image is out of focus | Set the lens focus mode switch to |
| To prevent camera shake, hold the camera still and press the shutter button gently. | |
| The camera makes a noise when it is shaken. | The built-in flash’s pop-up mechanism moves slightly. This is normal. |
| The built-in flash does not fire. | If you shoot continuously with the built-in flash at short intervals, the flash might stop operating to protect the flash unit. |
| The image cannot be erased | If the image has been erase-protected, it cannot be erased |
| The shooting date and time displayed is incorrect | The correct date and time has not been set. |
| No image appears on the TV screen. | Make sure the video cable plug is connected all the way in. |
| Set the video OUT format (NTSC/PAL) to the same video format as the TV. | |
| Use the video cable that came with the camera. |

