Hisense oven error codes are essential for users as they provide quick insights into the appliance’s operational status. Each code can help identify potential issues with your oven, making it crucial for Hisense oven owners. In this article, we will explore Hisense oven error codes and explain how to troubleshoot them.
Most Common Codes
| Error Code | Meaning |
|---|---|
| Err 001 | Oven temperature sensor failure. Disconnect PT1000 probe.Error is displayed when it is detected, all the oven functions stop and user cannot use the appliance until the error is cleared. |
| Err 002 | Oven meat probe failure. Short on meat probe. Error is displayed when it is detected and meat probe function cannot be used until the error is cleared. |
| Err 003 | Communication failure between user interface and power board. Error is displayed when it is detected, all the oven functions stop and user cannot use the appliance until the error is cleared. |
| Err 004 | Touch sensor failure on user interface. Damaged foil connectors on UI board. Error is displayed only when user press on failed touch sensor. Disconnect one or both touch connectors from UI board. |
| Err 005 | Overheating of user interface. Error is displayed only when user tries to activate Self Clean function. Until the error is cleared Self Clean is disabled, but user can use any other functions. When error is cleared user can again use Self Clean function. Unplug power connector from door lock motor. |
| Err 006 | Self Clean door lock failure. Error is displayed only when user tries to activate Self Clean function. Until the error is cleared Self Clean is disabled, but user can use any other functions. When error is cleared user can again use Self Clean function. Unplug power connector from door lock motor. |
| Err 007 | Failure of power board relay supply. Error is displayed when it is detected, all of the oven functions stop and user cannot use the appliance. Replace Power Board. |
| Err 008 | Overheating of power board. Error is displayed and all the oven functions must stop. When error is cleared user can again can the appliance. With a heating gun heat resistor R100 and resistor R145. |
| Err 010 | Self-clean heat up fail. Self Clean set temperature not reached in sufficient time. Error is displayed and Self Clean function must stop. When error is cleared user can again can the appliance and Self Clean function. Pull out PT1000 sensor from oven. Leave it at ambient temperature. Run Self clean function. |
| Err 014 | Cooktop activation during active Self Clean function. SW must sense error when it is detected. When Error 14 is detected, Self Clean function must stop and error is displayed on UI. Activate Cooktop switches 1-5. |
| Err 015 | Zero cross failure on power board. Error is displayed when it is detected, all oven function stop and user cannot use the appliance until the error is cleared. Disconnect OP1 pin 4 from power board. For additional ZC tests. |
| E0 | 1. The temperature sensor PT100 may be damaged and circuit. 2. Poor contact between the connector of the temperature sensor PT100 and the CN20 position of the circuit board. 3. The IC at the IC5 position of the circuit board may be damaged. |
| E1 | 1. The door status detection switch may be damaged. 2. The door detection switch wire group plug and the connector at the CN16 position of the circuit board may be in poor connection. 3. The circuit and components of the circuit board may be damaged. |
| E2 | 1. The display board is broken. 2. The power board is broken. 3. Poor contact between the plug of the wire set and the connector at the CN18 position of the power board. 4. The plug of the wire set and the connector at the CN2 position of the display board are in poor contact. |
| E3 | 1. The door detection switch S1 is broken. 2. The circuit board is broken. |
| E4 | 1. The circuit and components of the main control circuit board are damaged. 2. The cooling fan is broken. 3. The terminals of the wire group and the connector at the position of CN3 on the circuit board are loose or have poor contact. 4. The thermal protector K2 or K3 is broken. 5. The terminals of the wire group and the connector on the CN7 position of the circuit board are loose or have poor contact. |
| E5 | 1. The electronic components of the main control circuit board are broken. 2. The heating tube is broken. 3. AC: 240V without electricity. 4. The thermal protector K2 or K3 is broken. |
| E6 | 1. The electronic components of the circuit board are broken. 2. The heating tube is broken. 3. The oven door switch is broken, causing the circuit to misjudge that the door is open, so it causes the oven to stop heating. |
| E7 | 1. The electronic components of the circuit board are broken. 2. The heating tube is broken. 3. The oven door switch is broken, causing the circuit to misjudge that the door is open, so it causes the oven to stop heating. |
| E8 | 1. The electronic components of the circuit board are broken. 2. The latch motor is broken. 3. If it is in the unlocking process, the micro switch at the latch S2 position is broken. 4. If the door is being locked, the micro switch at the latch S3 position is broken. |
| E9 | 1. The electronic components of the circuit board are broken. 2. Abnormality of local AC power 120V/240V frequency 50Hz/60Hz. |
| E10 | The main control chip SH79F326 is broken internally. Replace the circuit board. |
| E11 | The NTC thermistor on the main control. Replace the circuit board.broken. |
| E12 | 1. The indoor ambient temperature is too high, resulting in excessive temperature rise. 2. NTC thermistor aging failure, resulting in inaccurate temperature. |
– Error code ErrX is displayed. In case of a double-digit error code, ErXX will be displayed: There is an error in the electronic module operation. Disconnect the appliance from the power mains for a few minutes. If the error is still indicated, call a service technician.
-When E5, E6, E7 appears, you can press Cancel to cancel.
– E9 is the power supply frequency monitoring: the power supply frequency range is between (38Hz~75Hz), each monitoring time is 5 minutes, if the frequency continuously exceeds the range within 5 minutes, it is a fault; if there is no AC signal for 5S continuously, the fault.
-In the event of E1, E3, E8 failure, you can long press the (START+Num9) key 3S to enter the door lock reset action: the door lock motor turns 3S to stop 2S, and stops after 12 consecutive times, press the Cancel button to stop.
Control Panel

Troubleshooting
| Problem | Cause |
|---|---|
| The oven lighting does not work. | The process of changing the light bulb in the oven is described in the chapter Replacing the bulb. |
| Control unit is not responding, the screen is frozen. | Disconnect the appliance from the power mains for a few minutes (undo the fuse or switch off the main switch); then, reconnect the appliance and switch it on. |
| There is no response of the sensors; the display is frozen. | Disconnect the appliance from the power mains for a few minutes (undo the fuse or switch off the main switch); then, reconnect the appliance and switch it on. |
| The pastry is underdone. | Did you choose the right temperature and heating system? Is the oven door closed? |
Maintenance and Cleaning
Using the steam clean function to clean the oven
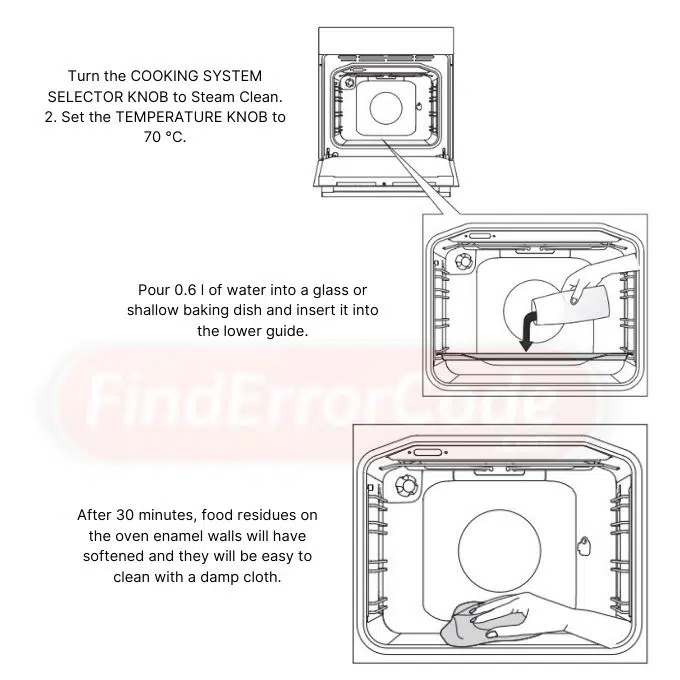
1. Turn the Cooking System Selector Knob to Steam Clean. 2. Set the Temperature Knob to 70 °C.
2. Pour 0.6 l of water into a glass or shallow baking dish and insert it into the lower guide.
3. After 30 minutes, food residues on the oven enamel walls will have softened and they will be easy to clean with a damp cloth.
Removing and inserting the oven door glass panel
Oven door glass pane can be cleaned from the inside, but it has to be removed first. Remove the oven door.
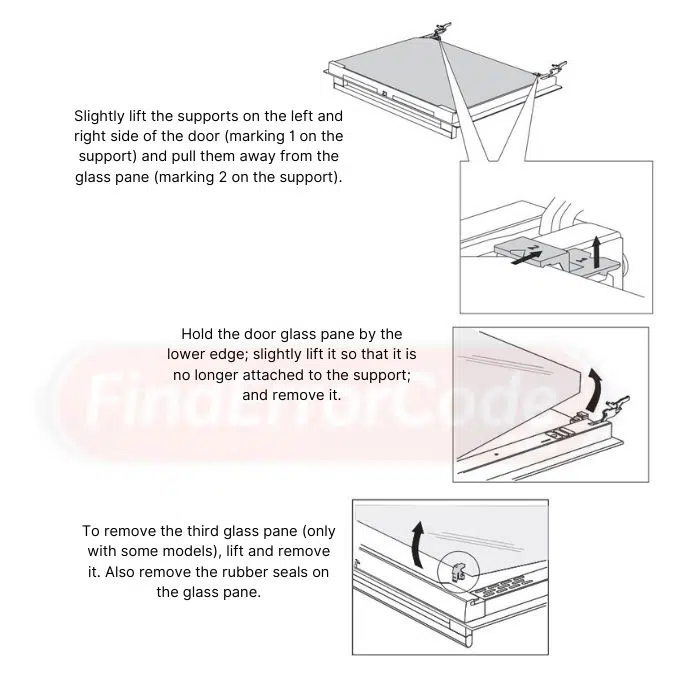
1. Slightly lift the supports on the left and right side of the door (marking 1 on the support) and pull them away from the glass pane (marking 2 on the support).
2. Hold the door glass pane by the lower edge; slightly lift it so that it is no longer attached to the support; and remove it.
3. To remove the third glass pane (only with some models), lift and remove it. Also remove the rubber seals on the glass pane.
To replace the glass pane, observe the reverse order. The markings (semi-circle) on the door and the glass pane should overlap.
Symbols Meaning

Manual
Detailed Instructions For Use Of The Electric Oven Manual PDF
source: global.hisense.com/oven