Samsung ovens, providing a modern kitchen experience to users, may encounter occasional malfunction codes, disrupting their functionality. Therefore, understanding the frequently occurring malfunction codes in Samsung ovens is crucial. These codes assist users in identifying the specific issue the oven is facing. Understanding these codes empowers users to swiftly and effectively resolve problems, ensuring a seamless cooking experience. Here is what you need to know about Samsung oven malfunction codes.
Codes List
Built-In Electric and Digital Display Single Wall Oven
| Error Code | Solution |
|---|---|
| C-d0 | This code occurs if the control key is short for 1 minute. Clean the buttons and make sure there is no water on/around them. Turn off the oven and try again. If the problem continues, contact a local Samsung service center |
| C-d1 | This code occurs if the door lock is mispositioned. Touch OVEN OFF, and then restart the oven. If the problem persists, disconnect all power to the oven for at least 30 seconds and then reconnect the power. |
| C-F0 | This code occurs if communication between the Main and Sub PBA is interrupted. Touch OVEN OFF, and then restart the oven. If the problem persists, disconnect all power to the oven for at least 30 seconds and then reconnect the power. |
| C-F2 | This code occurs if communication between the Main and Touch is interrupted. Touch OVEN OFF, and then restart the oven. If the problem persists, disconnect all power to the oven for at least 30 seconds and then reconnect the power. |
| C-10 | The cooking sensor is open when the microwave is operating. The cooking sensor is short when the microwave is operating. Touch OVEN OFF, and then restart the oven. If the problem persists, disconnect all power to the oven for at least 30 seconds and then reconnect the power. |
| C-20 | The oven sensor is open when the oven is operating. The oven sensor is short when the oven is operating. Touch OVEN OFF, and then restart the oven. If the problem persists, disconnect all power to the oven for at least 30 seconds and then reconnect the power. |
| C-21 | This code occurs if the internal temperature rises abnormally high. Touch OVEN OFF, and then restart the oven. If the problem persists, disconnect all power to the oven for at least 30 seconds and then reconnect the power. |
| C-23 | The temp probe sensor is short when the oven is operating. Press OFF, and then restart the oven. If the problem persists, disconnect all power to the oven for at least 30 seconds and then reconnect the power |
| C-30 | The PCB sensor is open when the oven is operating. The PCB sensor is short when the oven is operating. Touch OVEN OFF, and then restart the oven. If the problem persists, disconnect all power to the oven for at least 30 seconds and then reconnect the power. |
| C-31 | This code occurs if the PCB temperature rises abnormally high. |
| C-70 | The steam sensor is open when the oven is operating. The steam sensor is short when the oven is operating. Press OFF, and then restart the oven. If the problem presists, disconnect all power to the oven for at least 30 seconds and then reconnect the power. |
| C-72 | There are drain system-related problems.Press OFF, and then restart the oven. If the problem presists, disconnect all power to the oven for at least 30 seconds and then reconnect the power. |
| C-A2 | The cooling motor is operating abnormally. |
| dC | This code appears if the divider is inserted or removed while the oven is operating. Make sure the divider is inserted properly, and then restart the oven. If the problem persists, disconnect all power to the oven for at least 30 seconds and then reconnect the power. |
| bAd LinE | This code occurs if the power connection is plugged in improperly. Reconnect the power connection properly, and the message disappears. |
| E-01 | Open Error |
| E-02 | Cooking Time Setting Over Error (Microwave) |
| E-03 | Cooking Time Setting Over Error (Grill) |
| E-04 | Cooking Time Setting Over Error (Convection) |
| E-05 | Cooking Time Setting Over Error (Combination) |
| E-06 | Swing Heater Error |
| E-11 | Open Gas Sensor Error |
| E-12 | Short Gas Sensor Error |
| E-13 | T1 Max Time Gas Sensor Error |
| E-14 | Dry Up / No Load Gas Sensor Error |
| E-21 | Open Temp Sensor Error |
| E-22 | Short Temp Sensor Error |
| E-23 | T1 Max Time Error |
| E-24 | Over Temperature Error |
| E-25 | Micro Cook Abnormal Temperature Error |
| E-26 | Temperature Not Over AD Error |
| E-31 | Open Gas Sensor Error |
| E-32 | Short Gas Sensor Error |
| E-33 | Under Weight Error |
| E-34 | Over Weight Error |
| E-35 | Invalid Weight Error |
| E-36 | Door Open Error |
| E-41 | Open Easy/PH Sensor Error |
| E-42 | Short Easy/PH Sensor Error |
| E-43 | T1 Max Time Easy/PH Sensor Error |
| E-44 | Dry Up Easy/PH Sensor Error |
| E-45 | Cooling Error |
| E-46 | Primary Open Error |
| E-47 | Door Open Error |
| E-51 | Sense Failure |
| E-52 | EEPROM Short Error |
| E-53 | Read/Write Error |
| E-54 | Zero Error |
| E-61 | Open Humidity Sensor Error |
| E-62 | Short Humidity Sensor Error |
| E-63 | T1 Max Time Humidity Sensor Error |
| E-71 | Steam Sensor Open Error |
| E-72 | Steam Sensor Short Error |
| E-81 | Communication Open Error |
| E-82 | Communication Short Error |
| E-83 | Communication Error |
| E-X1 | Additional Open Error |
| E-X2 | Additional Short Error |
| SE | Key Short Error |
| TE | Touch Communication Error |
| Hot | Make sure the panel isn't hot. If the oven is currently too hot for the electronics in the panel to operate, it will display Hot when you try to perform a function. When the oven is a little cooler, this may only happen when certain buttons are touched (like Self Clean) because the oven is still too hot to perform that particular function. The interior lamp will also not function during extreme heat conditions such as a Self Clean cycle, so its button may appear to do nothing in that situation as well. |
| Loc | Make sure the panel isn't locked. The appearance of Control Lock varies between models, but it will usually be displayed as a padlock icon or as the code Loc, or both. Instructions for turning off Control Lock are written on the panel. |
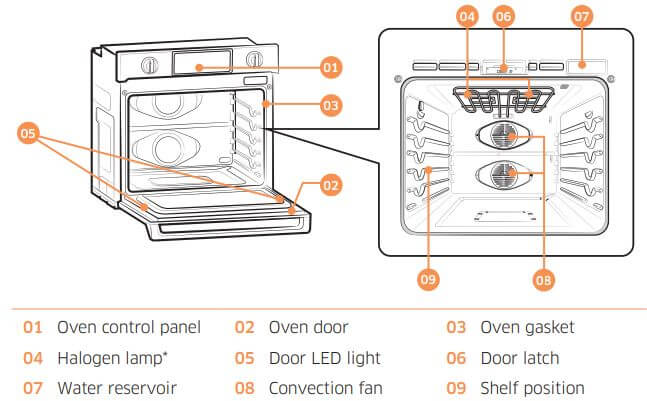
Part Name

Troubleshooting
Samsung works hard to ensure that you don’t have problems with your new electric oven. If you run into unexpected trouble, look first for a solution in the tables below.
| Trouble | Possible Cause |
|---|---|
| The display goes blank. | A fuse in your home may be blown or the circuit breaker tripped. Replace the fuse or reset the circuit breaker. |
| The buttons cannot be pressed properly. | There is foreign matter caught between the buttons. Remove the foreign matter and try again. |
| The oven will not turn on. | The oven is not completely plugged into the electrical outlet. Make sure the electrical plug is inserted into a live, properly grounded outlet. |
| The oven light will not turn on. | he light is loose or defective. Tighten or replace the lamp. |
| The oven smokes excessively during broiling. | The oven controls have not been set properly. The meat has been placed too close to the element. The meat has not been properly prepared. Grease has built up on oven surfaces. |
| Food does not bake or roast properly. | The oven controls have not been set correctly. The oven rack has been positioned incorrectly or is not level. Incorrect cookware or cookware of improper size is being used. The oven thermistor needs to be adjusted. |
| Food does not broil properly. | The serving size may not be appropriate. The rack has not been properly positioned. The cookware is not suited for broiling. In some areas, the power (voltage) may be low. |
| The oven temperature is too hot or too cold. | The oven sensor needs to be adjusted. |
| The oven will not self-clean. | The oven temperature is too high to start a self-clean operation. Allow the oven to cool and then reset the controls. |
| Excessive smoking during a self-cleaning cycle. | There is excessive soiling in the oven. Touch OVEN OFF. Open the windows to rid the room of smoke. Wait until the selfcleaning cycle is cancelled. Wipe up the excessive soil and then start the selfcleaning cycle again. |
| The oven door will not open after a selfcleaning cycle. | The oven is too hot. Allow the oven to cool. |
| The oven is not clean after a self-cleaning cycle. | The oven controls were not set correctly. The oven was heavily soiled. |
| Steam is coming out of the vent. | As the number of racks or amount of food being cooked increases, the amount of visible steam will increase. This is normal operation and not a system failure. Use the oven as usual. |
| A burning or oily odor is coming from the vent. | This is normal for a new oven and will disappear in time. |
| Strong odor. | An odor coming from the insulation around the inside of the oven is normal for the first few times the oven is used. Operate the oven empty on the bake setting at 400 °F for 1 hour. |
| The oven racks are difficult to slide. | The shiny, silver-colored racks were cleaned in a selfcleaning cycle. Apply a small amount of vegetable oil to a paper towel, and then wipe the edges of the oven racks with the paper towel. |
| The oven door is locked. | The circuit breaker has been tripped or there was a power failure while the oven door was locked. Activate Control Lockout, and then unlock the control. |
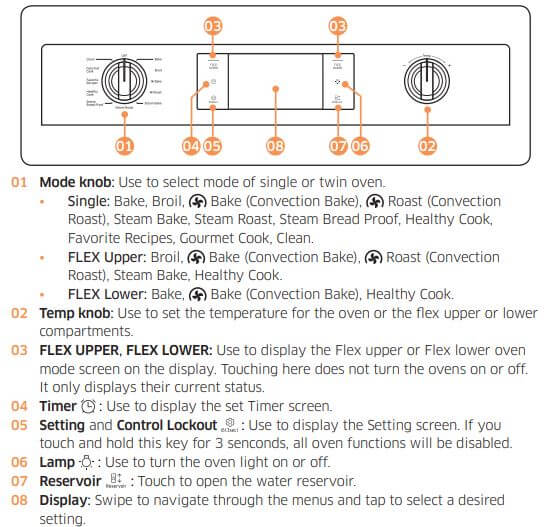
Control Panel

How to set the oven for steam-cleaning?
For light cleaning, the Steam-cleaning function saves time and energy. For heavier duty cleaning, use the self-cleaning function.

- Remove all accessories from the oven.
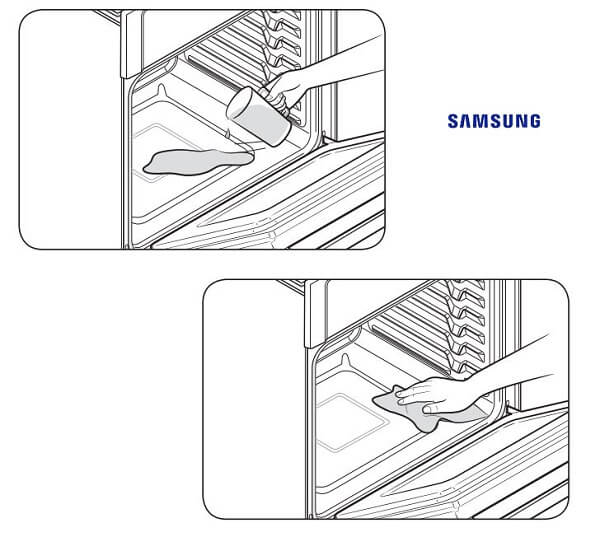
- Pour approximately 10 oz. (300 ml) of water onto the bottom of the empty oven and close the oven door. Use tap water only, not distilled water.
- Press Steam Clean.
- Press START/SET. When the operation is complete, the display will blink and a beep will sound.
- Press OVEN OFF.
- Clean the oven’s interior. There will be a significant amount of water remaining on the bottom of the oven after a steam-cleaning cycle. Remove the residual water with a sponge or soft dry cloth.
When steam-cleaning, use exactly 10 oz. of water since this produces the best results.
If you press Steam Clean when the oven temperature is above 100˚F, Hot will appear in the display. Because these functions produce the best results when started while the oven is cool, we recommend that you wait until the oven has cooled down and Hot disappears from the display.

