SharkNinja Operating LLC is an all-American designed, marketer, and distributor of home appliances and devices. The company is based in Needham, Massachusetts, and offers its products all around the world. The company is a collaboration of two brands and is known to offer you top-of-the-line robot vacuum cleaners. Currently, the company offers you blenders, multi-cookers, air fryers, coffee makers, and other similar small appliances – along with devices that can help you out around the hours. Offering you a complete solution that helps you clean and cooks in an effective and efficient manner. Shark IQ robot vacuum is a great tool to have at home, but when it runs into an error it can be a headache. To help ensure you are able to get to the bottom of the issue and resolve the problem in no time we have listed down the Shark IQ robot vacuum cleaner error codes that can help you out.
Codes List
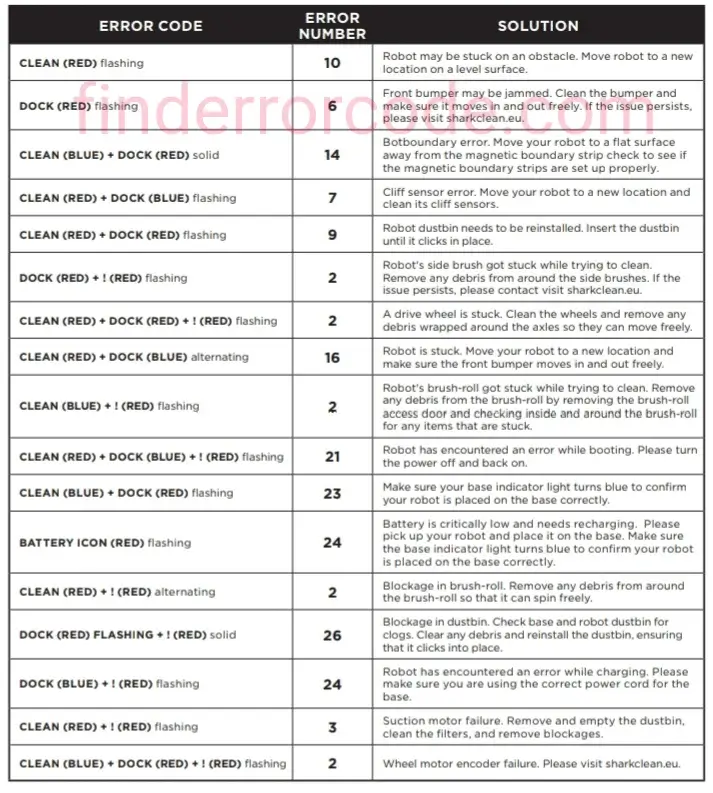
If any error lights are illuminated or flashing on your Shark IQ Robot, see the error code chart below:
- CLEAN (RED) + ! (RED) flashing: Suction motor failure. Remove and empty the dust bin, clean the filters, and remove blockages to ensure nothing is reducing suction.
- CLEAN (RED) flashing: Robot may be stuck on an obstacle. Move robot to a new location on a level surface.
- DOCK (RED) flashing: Front bumper may be jammed. Clean the bumper and make sure it moves in and out freely.
- CLEAN (BLUE) + DOCK (RED) solid: BotBoundary error. Move your robot to a flat surface away from the magnetic boundary strip and try cleaning again.
- CLEAN (RED) + DOCK (BLUE) flashing: Cliff sensor error. Move your robot to a new location and clean its cliff sensors.
- CLEAN (RED) + DOCK (RED) flashing: Robot dustbin has been removed and needs to be reinserted.
- DOCK (RED) + ! (RED) flashing: Side brush is stuck. Remove any debris from around the side brushes.
- CLEAN (RED) + DOCK (RED) + ! (RED) flashing: A drive wheel is stuck. Clean the wheels and remove any debris wrapped around the axles.
- CLEAN (RED) + DOCK (BLUE) alternating: Robot is stuck. Move your robot to a new location and make sure the front bumper moves in and out freely.
- CLEAN (BLUE) + DOCK (RED) + ! (RED) flashing: Wheel motor encoder failure.
- CLEAN (BLUE) + ! (RED) flashing: Blockage in brushroll. Remove any debris from around the brushroll.
- CLEAN (RED) + DOCK (BLUE) + ! (RED) flashing: Robot has encountered an error while booting. Please turn the power off and back on.
- CLEAN (BLUE) + DOCK (RED) flashing: Robot cannot locate dock. Please pick up your robot and place it on the dock.
- BATTERY ICON (RED) flashing: Battery is critically low and needs recharging. Power may be turned off or the battery may need charging.
- CLEAN (RED) + ! (RED) alternating: Blockage in brushroll. Remove any debris from around the brushroll.
- ! (RED) + Wi-Fi indicator (RED Flashing): Wrong password for Wi-Fi.
- ! (Flashing red) + Wi-Fi (RED): SSID cannot be found, try connecting again.
- ! + Wi-Fi (Flashing RED alternately): Wrong user name or password for your Shark account.
- ! + Wi-Fi (Flashing RED at the same time): Cannot connect to Wi-Fi.
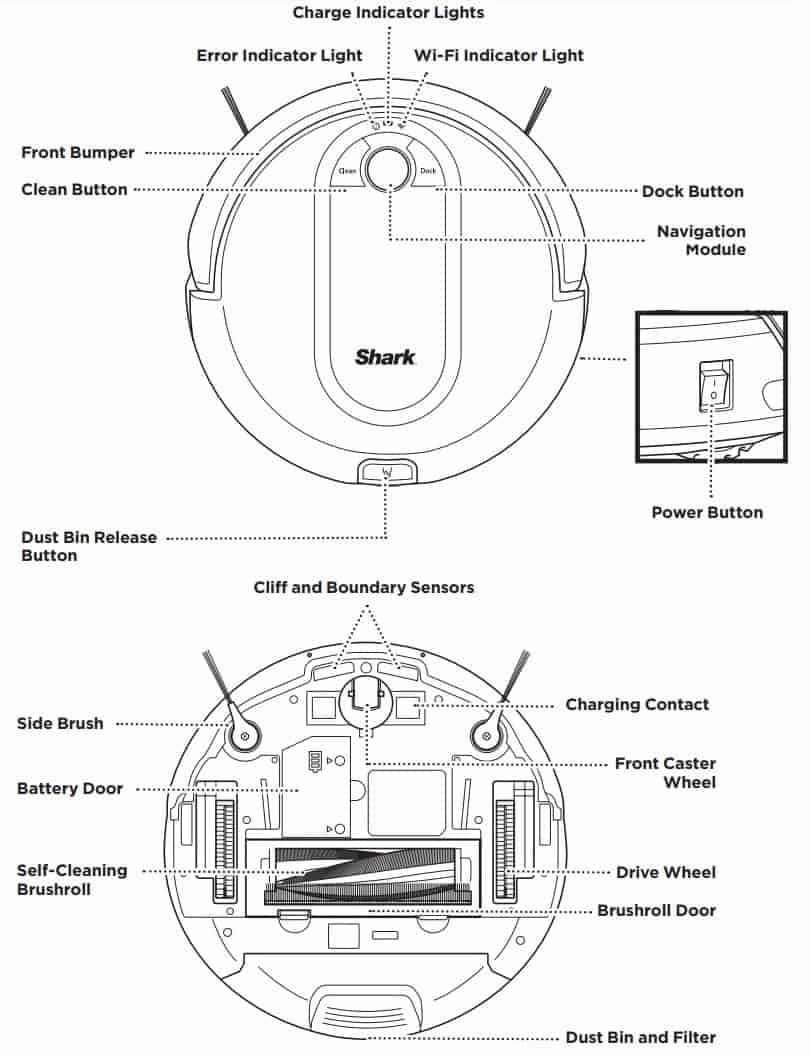
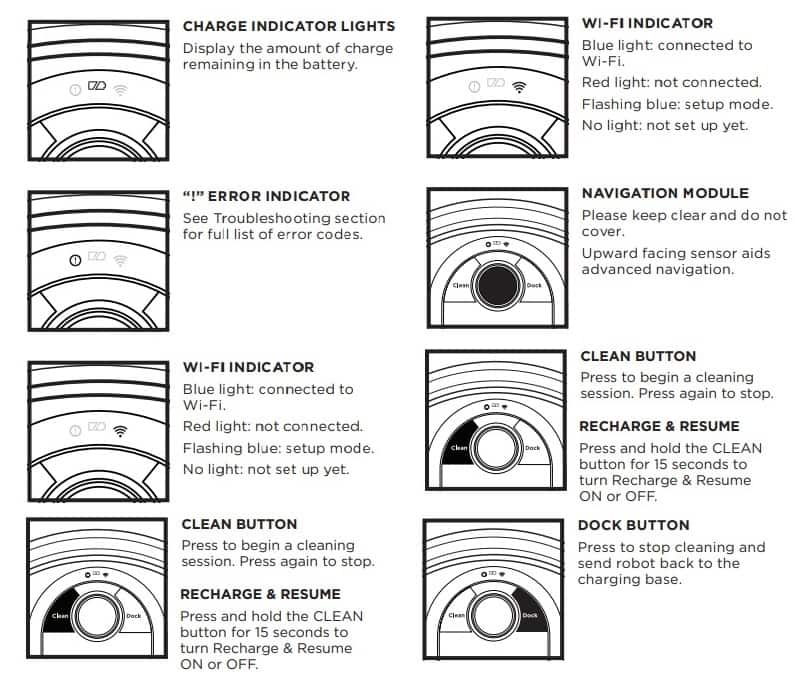
Control Panel and Parts
Emptying The Dust Bin
- Press the Dust Bin Release Tab and slide out the dust bin.
- To avoid spills, be sure to hold the dust bin in an upright position. Use the finger slots to open the lid.
- Empty debris and dust into trash.
- Look between the filter and plastic shield and make sure there is no debris buildup. Remove shield and clear any debris buildup as needed with a dry cloth or soft brush.
Congratulations On Your Shark Robot
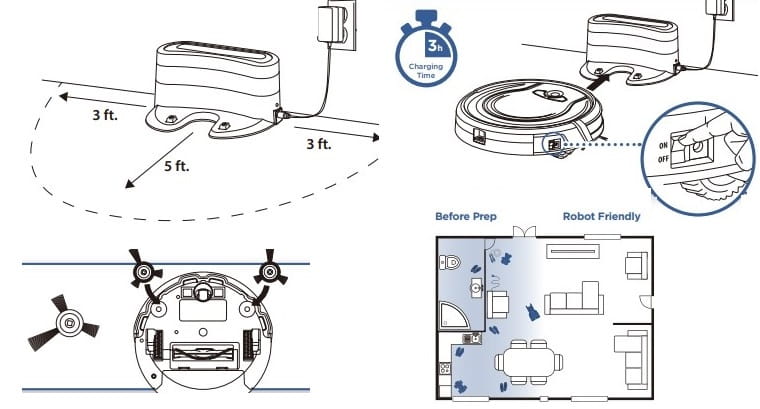
- Set Up Your Charging Dock: Place charging dock on a level surface with its back against a wall, in a space without obstructions, that can easily be accessed by your Shark Robot. Plug dock into a power outlet. Note: Placing your dock in a central location with wide view to your home will improve your robots ability to find home.
- Install The Side Brushes: Flip the robot over and snap on the 2 side brushes included in the box.
- Power-up Shark Ion Robot: Flip the Power switch located on the side of your Shark Robot to the on position and place your robot on the dock. When all 3 lights are solid blue, your robot is fully charged. Simply press Clean to send your robot into action.
- Prep Your Home For Cleaning: With Smart Sensor Technology, your robot cleans all areas of your floors and navigates through tight spaces. To help your robot complete its mission, prep your floor by removing all obstacles, such as loose power cords, clothes, toys, and low-hanging drapes. Use the included BotBoundary™ Strips to easily block on obstacles or areas you don’t want your robot to enter.
- Set Your Robot’s Cleaning Schedule: Use the included remote to set a recurring cleaning schedule for your robot. Simple instructions are located on the back of your remote and in your instruction manual.
Cleaning And Replacing The Filter
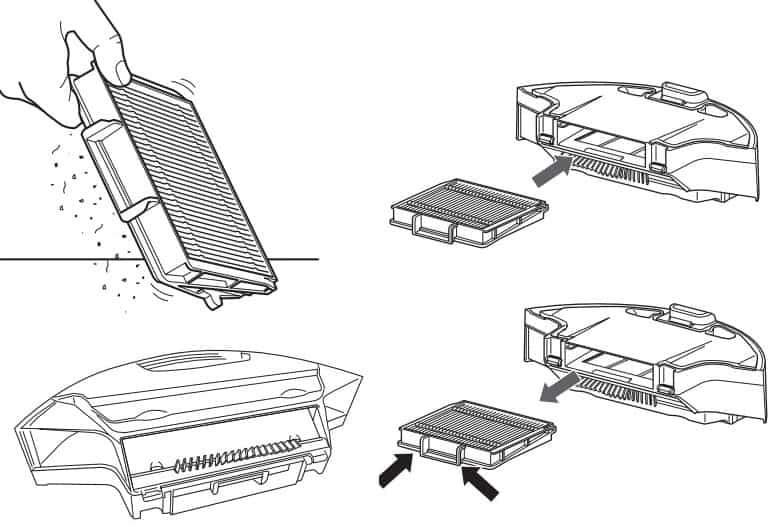
For optimal suction power, regularly clean and replace the filter inside the robot’s dust bin.
- Remove and empty the dust bin. Clean any hair or debris off the Anti-Tangle Comb on the back of the dust bin.
- Pull filter out of the dust bin by the tabs.
- Lightly tap the filter to remove dust and debris.
- Reinsert the filter into the dust bin, then slide the dust bin back into the robot.
Self-Empty Model Codes and Solutions