Danby dehumidifiers may display different error codes to indicate issues. Always refer to your specific Danby dehumidifier model’s manual for accurate information about error codes and troubleshooting steps. If problems persist, contacting Danby customer support is advisable.
Codes List
- AS: Humidity sensor error. Unplug the unit and plug it back in.
- ES: Temperature sensor error. Unplug the unit and plug it back in.
- P1: Normal Feature (defrosting evaporator).
- P2: Bucket is full or the bucket is not in correct position. Empty the bucket and/or adjust it to the proper position.
- CO: Dehumidifier Operation (unit will run non-stop). The unit is set to run continuously.
- EC: Please ensure that the room ambient temperature matches the recommended operating temperature for the unit, 5°C (41F) – 35°C (95F). If the temperature is within this range, call for service.
- E1: Environment Temperature sensor.
- E2: Evaporator Temperature sensor.
- E3: Humidity sensor.
- E4: Water bucket not installed. Install water bucket properly.
- E5: Internal Reservoir Full. Pump / Drain hose Float Switch. Check pump to see if it is pumping may have crack or drain hose may be clogged.
- E6: Top bucket full.
- E7: Front cover not on properly. Reinstall front cover properly.
Control Panel Symbols Meaning
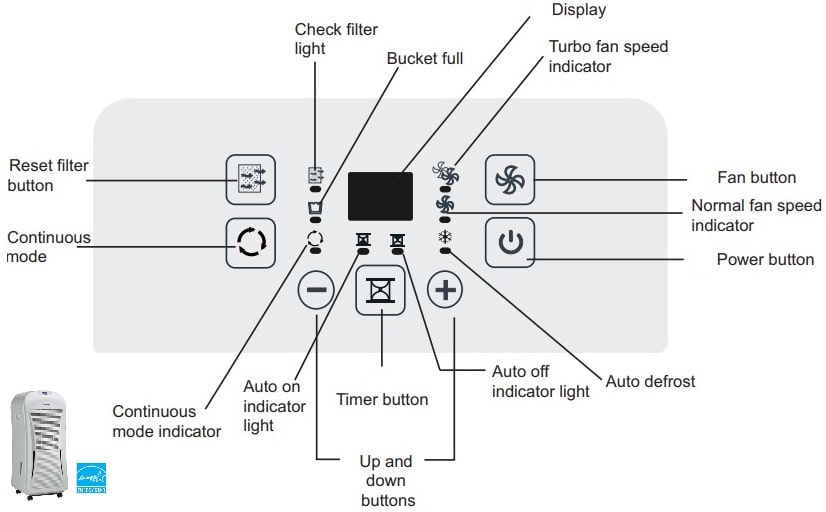

Indicator Light Functions
- Memory Setting: Each time the unit is disconnected/re-connected and/or in the event of a power failure, the electronic circuit board automatically defaults to the last program setting that was used. After the unit has stopped, it may take several minutes before operating conditions resume.
- Auto-Restart: If the unit shuts off unexpectedly due to a power outage, it will restart with the previous function settings automatically when the power resumes.
- Bucket Full Indicator Light: When the bucket is full and/or incorrectly positioned inside the cabinet, the bucket full light will turn on and remain on until the bucket is emptied and/or correctly re-positioned. This condition will result in the immediate shut down of the dehumidifying system (both compressor and fan motor operation are terminated). This is a safety feature. When the bucket is emptied and/or correctly re-positioned, the dehumidifi er will resume operation automatically. NOTE: It may take several minutes before operating conditions resume.
- Auto-Defrost: When frost builds up on the evaporator coils, the compressor will cycle off and the fan will continue to run until the frost disappears.
Troubleshooting
| Problem | Possible Cause |
|---|---|
| Dehumidifier does not start. | The dehumidifier is unplugged. Make sure the dehumidifier’s plug is pushed completely into the outlet. |
| The fuse is blown/circuit breaker is tripped. Check the house fuse/circuit breaker box and replace the fuse or reset the breaker. | |
| Dehumidifier has reached its preset level or bucket is full. The dehumidifier automatically turns off when either condition occurs. Change to a lower setting or empty the bucket and replace properly. | |
| Bucket is not in the proper position. The bucket must be in place and securely seated for the dehumidifier to operate. | |
| Power Failure. There is a protective time delay (up to 3 minutes) to prevent tripping of the compressor overload. For this reason, the unit may not start normal dehumidifying for 3 minutes after it is turned back on. | |
| Dehumidifier does not dry the air as it should. | Did not allow enough time to remove the moisture. When first installed, allow at least 24 hours to maintain the desired dryness. |
| Airflow is restricted. Make sure there are no curtains, blinds or furniture blocking the front or back of the dehumidifier. | |
| Dirty filter. | |
| The Humidity Control may not be set low enough. For drier air, press the - pad and set to a lower percent value % or at CO (continuous) for maximum dehumidification. | |
| Doors and windows may not be closed tightly. Check that all doors, windows and other openings are securely closed. | |
| Clothes dryer may be blowing moisture-laden air into the room. Install the dehumidifier away from the dryer. The dryer should be vented to the outside. | |
| Room temperature is too low. Moisture removal is best at higher room temperatures. Lower room temperatures will reduce the moisture removal rate. Models are designed to be operated at temperatures above 41 F (5 C). | |
| Dehumidifier runs too much. | Area to be dehumidified is too large. The capacity of your dehumidifier may not be adequate. |
| Doors and windows are open. Close all doors and windows to the outside. | |
| Frost appears on the coils. | Dehumidifier has been recently turned on, or room temperature is below 41F (5C). This is normal. Frost will usually disappear within 60 minutes. |
| Controls cannot be set. | The compressor will turn off and the fan will automatically continue to run for approximately 3 minutes at a fixed setting. This is normal. Wait approximately 3 minutes and set the fan as desired. |
| Fan noise | Air is moving through the dehumidifier. This is normal. |
| Water on floor | Hose connection may be loose. Check the hose connection. |
| Intend to use the bucket to collect water, but a hose is attached. Disconnect the hose if using the bucket to collect water. |
Care and Maintenance
1. Clean the Grill and Case: Use water and a mild detergent. Do not use bleach or abrasives. Do not splash water directly onto the main unit. Doing so may cause an electrical shock, cause the insulation to deteriorate, or cause the unit to rust. The air intake and outlet grilles become dirty easily, so use a vacuum attachment or brush to clean.
2. Clean the Bucket: Every few weeks, clean the bucket to prevent growth of mold, mildew and bacteria. Partially fi ll the bucket with clean water and add a little mild detergent. Swish it around in the bucket, empty and rinse. NOTE: Do not use a dishwasher to clean the bucket. After cleaning, the bucket must be in place and properly positioned for the dehumidifi er to operate.
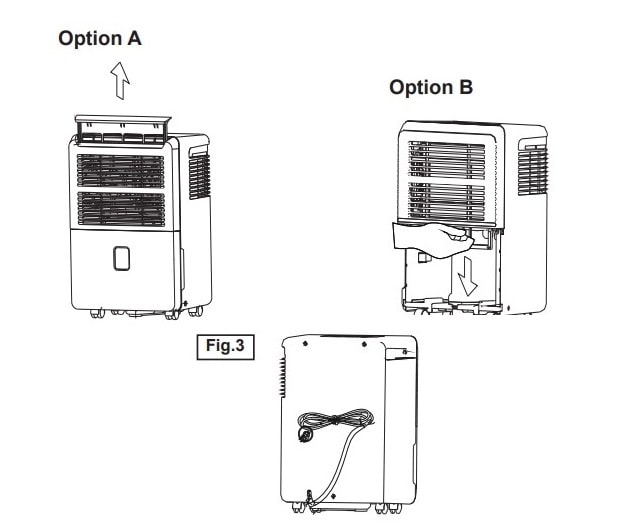
3. Clean the Air Filter Remove and clean the filter every two weeks based on normal operating conditions. Remove the filter from the top of the unit (Option A), or you can choose to remove the bucket and then pull the filter downwards (Option B). Wash the filter with clean water, then dry. Re-install the filter, replace bucket (if using Option B.) Press the “reset filter” button.
4. When Not Using the Unit for Long Periods of Time After turning off the unit, wait one day before emptying the bucket. Clean the main unit, water bucket and air filter. Cover the unit with a plastic bag. Wrap the cord and bundle it with the band (as shown to the left – Fig.3). Store the unit upright in a dry, well-ventilated place.
NOTE: Turn the dehumidifier off and remove the plug from the wall outlet before cleaning.
Manual Pdf
Danby Premiere Portable Dehumidifier DDR60A4GP User Manual PDF