Fisher and Paykel range cooker error codes provide instant information about the appliance’s status. These codes ensure quick and effective troubleshooting, enhancing the user experience.
Codes Table
Before calling the customer service, check whether you can rectify the fault yourself by means of the following table. You can solve common appliance problems easily, saving you the coast of possible service call.
Erxx or Ex: 1 Switch off the cooker and disconnect it from the mains. 2 Wait for about 1 minute, then reconnect the cooker and turn on the cooking zones. 3 Wait for about 1 minute and if the error message does not appear again the cooking zones can be used. 4 If the error message does not disappear repeat step from 1 to 3. 5 If the problem continues do not use the induction cooktop (only use the oven) and contact your Authorised Service Centre.
E2 or EH: ‘E’ and ‘2’ alternating for one or more cooking zones. This indicates an overheating of the cooking zone/s. 1 Switch off the cooking zone/s and leave to cool. 2 If the problem continues do not use the induction cooktop (only use the oven) and contact your Authorised Service Centre.
E6 or display not operative: The cooker has been incorrectly connected. The appliance should be connected to the appropriate power supply by a qualified technician.
P: P flashes in the display when you are trying to set PowerBoost. PowerBoost is temporarily unavailable because the cooktop needs to protect itself from overheating. Allow the cooktop to cool down.
Symbol as per side figure: This indicates an incorrect operation of one or more cooking zone control dial. 1 Turn the cooking zone control dials to the ‘0’ (Off ) position, then switch off the cooker and disconnect it from the mains. 2 Wait for about 1 minute, then reconnect the cooker and turn on the cooking zones. 3 Wait for about 1 minute and if the error message does not appear again the cooking zones can be used. 4 If the error message does not disappear repeat step from 1 to 3. 5 If the problem continues do not use the induction cooktop (only use the oven) and contact your Authorised Service Centre.
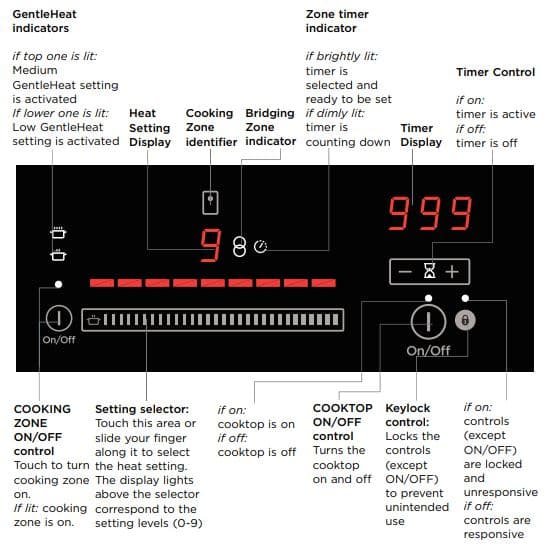
Control Panel

Removing and replacing the door glass panes for cleaning.
Make sure you follow the precautions and instructions below very carefully. Replacing the glass panes and the door incorrectly may result in damage to the oven and may void your warranty. Your oven door has 3 panes of glass. The inner and middle panes may be removed for cleaning.
- Switch the oven off at the wall before removing the door.
- Take care, the oven door is heavy. If you have any doubts, do not attempt to remove the door. Make sure the oven and all its parts have cooled down. Do not attempt to handle the parts of a hot oven.
- Take extreme care when handling the glass panes. Avoid the edges of the glass bumping against any surface. This may result in the glass shattering.
- Don’t use oven cleaners or any other harsh/abrasive cleaners, cloths, scouring pads, steel wool or sharp metal scrapers to clean the glass surfaces. These scratch the glass and may damage its special coating, which in turn could result in the glass cracking or shattering.
- If you notice any sign of damage on any of the glass panes (such as chipping or cracks), do not use the oven. Call your Authorised Repairer or Customer Care.
- Make sure you replace all the glass panes correctly. Do not use the oven without all glass panes correctly in place.
- If the glass panes feel difficult to remove or replace, do not force them. Call your Authorised Repairer or Customer Care for help. Note: service visits providing assistance with using or maintaining the oven are no covered by your warranty.
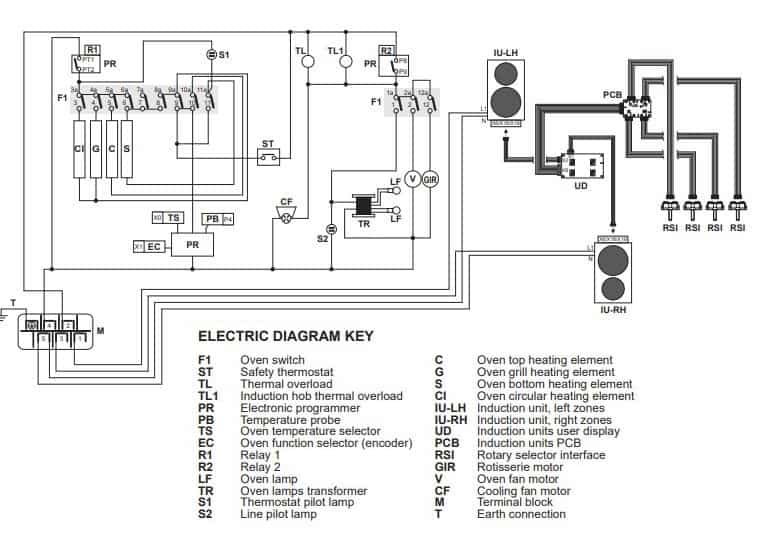
Wiring Diagram

Troubleshooting
| Trouble | Possible Causes |
|---|---|
| Some pans make crackling or clicking noises. | This may be caused by the construction of your cookware (layers of different metals vibrating differently). This is normal for induction cookware and does not indicate a fault. |
| The cooktop makes a low humming noise when used on a high heat setting (especially PowerBoost). | This is caused by the technology of induction cooking. This is normal, but the noise should quieten down or disappear completely when you decrease the heat setting. |
| Fan noise coming from the cooktop. | A cooling fan built into your cooktop has come on to prevent the electronics from overheating. It may continue to run even after you’ve turned the cooktop off. This is normal and needs no action. Do not switch the power to the cooktop off at the wall while the fan is running. |
| I have locked the control panel while two cooking zones are bridged and the cooktop has not turned off. | This is normal. The cooking zones will remain inactive, but the indicator lights will remain on. Unlock the controls, deactivate the bridging zones (by touching the two setting selectors simultaneously) and then lock the cooktop again. |
| The cooktop cannot be turned on. | No power. Make sure the cooker is connected to the power supply and that it is switched on at the wall. Check whether there is a power outage in your home or area. If you’ve checked everything and the problem persists, call your Authorised Service Centre or Customer Care. |
| The glass is being scratched. | Rough-edged cookware. Unsuitable, abrasive scourer or cleaning products being used. Use cookware with flat and smooth bases. |
| Some pans make crackling or clicking noises. | This may be caused by the construction of your cookware (layers of different metals vibrating differently). This is normal for induction cookware and does not indicate a fault. |
| Fan noise coming from the cooktop. | A cooling fan built into your cooktop has come on to prevent the electronics from overheating. It may continue to run even after you’ve turned the cooktop off. This is normal and needs no action. Do not switch the power to the cooktop off at the wall while the fan is running. |
| Pans do not become hot and Y appears in the display. | The cooktop cannot detect the pan because it is not suitable for induction cooking. The cooktop cannot detect the pan because it is too small for the cooking zone or not properly centred on it. |
Cooking Zone Display

Manual Pdf
Installation instructions and User guide – Freestanding cooker – OR90SBDSIX models Manual PDF

