
Indesit hobs may encounter error codes, occasionally affecting their operation. These codes serve to inform users about issues that can impact the appliance’s functionality. The error codes for Indesit hobs help quickly identify the appliance’s status. When users see these codes, they can better understand the problem and take necessary actions, contributing to the longevity of the appliance.
Codes Table
| Error Codes | Solution |
|---|---|
| F01 - 1 | Visual board NTC SC. Replace the Display board. |
| F01 - 2 | Visual board NTC OC. Replace the Display board. |
| F02 - 1 | Comunieation VISUAL <—> cookeyel clipsoeye MODULE. |
| F03 - 1 | Keyboard not operative (all the buttons except for ONIOFF button). Check the correct installation of the Touch-Visual communication Flat. Clean Flat contacts and reconnect them. Wait 3 minutes without energizing the hotplates. If F03 is signalled again, replace the display board. If no fault is notified after 3 minutes, energize the hotplates and wait for 3 minutes. If F03 is signalled, replace the Display Board. If it is not signalled, it is OK. |
| F03 - 2 | Keyboard: ONIOFF button not operative. Check the correct installation of the Touch-Visual communication Flat. Clean Flat contacts and reconnect them. Wait 3 minutes without energizing the hotplates. It F03 is signalled again, replace the display board. If no fault is notified after 3 minutes, energize the hotplates and wait for 3 minutes. It F03 is signalled, replace the Display Board. If it is not signalled, it is OK. |
| F03 - 3 | Communication VISUAL <--> TOUCH. Check the correct installation of the Touch-Visual communication Flat. Clean Flat contacts and reconnect them. Wait 3 minutes without energizing the hotplates. If F03 is signalled again, replace the display board. If no fault is notified after 3 minutes, energize the hotplates and wait for 3 minutes. If F03 is signalled, replace the Display Board. If it is not signalled, it is OK. |
| F04 - 1 | Too high temperature of Visual Board. Check the insulation of Display board housing. Check Display board NTC calibration (only in Dr.) Replace the Display board. |
| F05 - 1 | ISI UART 1 (CN 03): hob NTC SC, small induction hotplate. Check the inductor, verifying that the contacts are well connected and clean. Check NTC ohmic values (it must not be SC or OC) Replace the inductor if NTC is out of calibration. Replace the power board. |
| F05 - 2 | ISI UART 1 (CN 03): hob NTC 0c, small induction hotplate. Check the inductor, verifying that the contacts are well connected and clean. Check NTC ohmic values (it must not be SC or OC) Replace the inductor if NTC is out of calibration. Replace the power board. |
| F05 - 3 | ISI UART 1 (CN 03): small induction hotplate not connected. Check the inductor, verifying that the contacts are well connected and clean. Check NTC ohmic values (it must not be SC or OC) Replace the inductor if NTC is out of calibration. Replace the power board. |
| F06 - 1 | ISI UART 1 (CN 03): hob NTC SC, small induction hotplate. Check the inductor, verifying that the contacts are well connected and clean. Check NTC ohmic values. Replace the inductor if NTC is out of calibration. Replace the power board. |
| F06 - 2 | ISI UART 1 (CN 03): hob NTC OC, small induction hotplate. Check the inductor, verifying that the contacts are well connected and clean. Check NTC ohmic values. Replace the inductor if NTC is out of calibration. Replace the power board. |
| F06 - 3 | ISI UART 1 (CN 03): small induction hotplate not connected. Check the inductor, verifying that the contacts are well connected and clean. Check NTC ohmic values. Replace the inductor if NTC is out of calibration. Replace the power board. |
| F07 - 1 | ISI UART 1 (CN 04): hob NTC OC, large induction hotplate. Check the inductor, verifying that the contacts are well connected and clean. Check NTC ohmic values. Replace the inductor if NTC is out of calibration. Replace the power board. |
| F07 - 2 | ISI UART1 (CM 04): large induction hotplate not connected. Check the inductor, verifying that the contacts are well connected and clean. Check NTC ohmic values. Replace the inductor if NTC is out of calibration. Replace the power board. |
| F07 - 3 | Check the inductor, verifying that the contacts are well connected and clean. Check NTC ohmic values. Replace the inductor if NTC is out of calibration. Replace the power board. |
| F08 - 1 | ISI UART 2 (CN 04): hob NTC SC, small induction hotplate. Check the inductor, verifying that the contacts are well connected and clean. Check NTC ohmic values. Replace the inductor if NTC is out of calibration. Replace the power board. |
| F08 - 2 | ISI UART 1 (CN 04): hob NTC oc, small induction hotplate. Check the inductor, verifying that the contacts are well connected and clean. Check NTC ohmic values. Replace the inductor if NTC is out of calibration. Replace the power board. |
| F08 - 3 | ISI UART 1 (CN 04): small induction hotplate not connected. Check the inductor, verifying that the contacts are well connected and clean. Check NTC ohmic values. Replace the inductor if NTC is out of calibration. Replace the power board. |
| F09 - 1 | Incomplete Power setting file. Program DispIay board again. Replace the Display board. |
| F09 - 2 | Incomplete VISUAL setting file. Program DispIay board again. Replace the Display board. |
| F09 - 3 | Incomplete TOUCH setting file. Program DispIay board again. Replace the Display board. |
| F10 - 1 | ISI UART 1 (CN 03); Heat-sink NTC SC. Replace the corresponding generator board. |
| F10 - 2 | ISI UART 1 (CN 03); Heat-sink NTC OC. Replace the corresponding generator board. |
| F11 - 1 | ISI UART 2 (CN 04); Heat-sink NTC SC. Replace the corresponding generator board. |
| F11 - 2 | ISI UART 2 (CN 04); Heat-sink NTC OC. Replace the corresponding generator board. |
| F12 - 1 | ISI UART1 (CN 03):Too high temperature of the heat-sink. Verify that the fan is correctly wired and that the wiring is intact. Verify that the fan is operative, setting the maximum power. Verify that heat-sink NTC is calibrated. Replace the corresponding generator board. |
| F13 - 1 | ISI UART1 (CN 04):Too high temperature of the heat-sink. Verify that the fan is correctly wired and that the wiring is intact. Verify that the fan is operative, setting the maximum power. Verify that heat-smk NTC Is calibrated. Replace the corresponding generator board. |
| F14 - 1 | ISI UART1 (CN 03): Too high temperature of the large hob. Verify that inductor NTC is calibrated. Replace the inductor. Replace the power board. |
| F15 - 1 | ISI UART1 (CN 03):Too high temperature of the small hob. Verify that inductor NTC is calibrated. Replace the power board. Replace the inductor. |
| F16 - 1 | ISI UART1 (CN 04):Too high temperature of the large hob. Verify that inductor NTC is calibrated. |
| F17 - 1 | ISI UART1 (CN04): Too high temperature of the small hob. Verify that inductor NTC is calibrated. Replace the power board. Replace the inductor. |
| F18 - 1 | Communication VISUAL BOARD UART1 <--> EXTERNAL BOARD. Power off the appliance, wait 3 minutes and power it on. Check the communication wires of the boards. Check continuity of UART1 wire (CN03) Replace the Display board. Replace the power board. Power off the appliance, wait 3 minutes and power it on. |
| F19 - 1 | Communication VISUAL BOARD UART2 <--> EXTERNAL BOARD Remark. Check the communication wires of the boards. Check continuity of UART2 wires (CNO4). Replace the Display board. Replace the power board. |
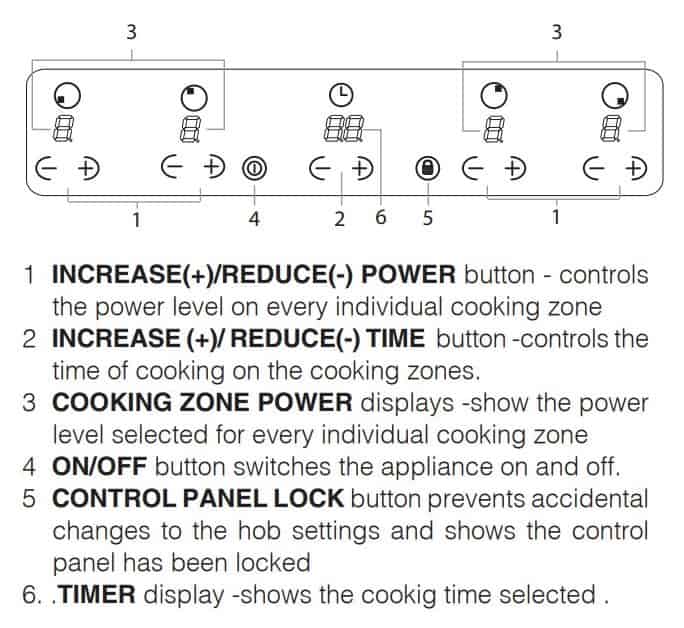
Control Panel
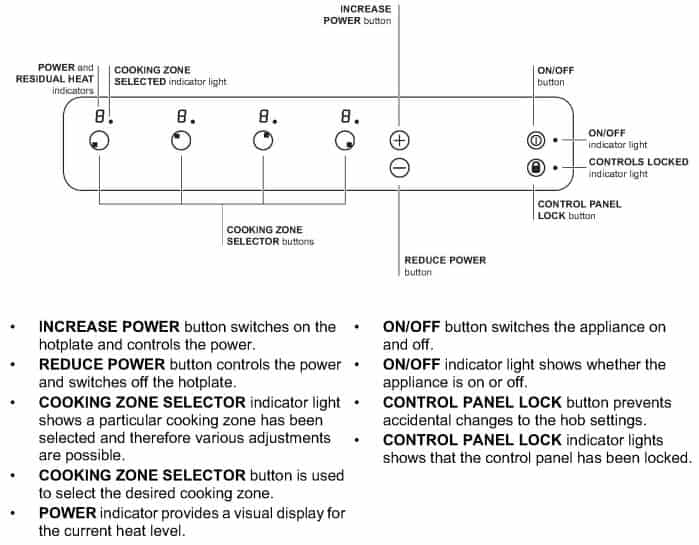
Safety switch: The appliance has a safety switch which automatically switches the cooking zones off after they have been in operation for a certain amount of time at a particular power level. When the safety switch has been triggered, the display shows “0”. For example: the right rear hotplate is set to 5 and will switch off after 5 hours of continuous operation, while the front left hotplate is set to 2 and will switch off after 8 hours. When one or more keys are activated for more than 10 sec. the touch control. switches off A warning beep sounds is emitted every 10 sec., while the key/s is/are activated. With all heaters at zero power during 10 sec. the Cooktop is switched off. If the switching off is due to an accidental activation of keys, the touch control actuates as above.
Control panel lock: When the hob is switched on, it is possible to lock the oven controls in order to avoid accidental changes being made to the settings (by children, during cleaning, etc.). Press the (lock) button to lock the control panel: the icon will illuminate and an audible beep sound will be emmited. To use any of the controls (e.g. to stop cooking), you must switch off this function. Press the (lock) button for a few moments, the icon will stop illuminating and the lock function will be removed.
Switching on the hob: When power is initially applied to the Cooktop, the touch control conducts a calibration process for the touch keys, which requires a low level of ambient light in the area of the touch keys. If excessive ambient lighting is detected, the User Interface displays „FL” error and the calibration is suspended. The error will disappear when satisfactory ambient lighting is detected and the touch control calibration procedure will now complete satisfactorily.
Initial Light Conditions: When power is initially applied to the Cooktop, the touch control conducts a calibration process for the touch keys, which requires a low level of ambient light in the area of the touch keys. If during this calibration process excessive ambient lighting is detected the User Interface displays „FL” (Infrared Ambient Light Error) and the control calibration process is suspended. In order to rectify the process any lighting that could effect the calibration process should be switched off (e.g. halogen cooker hood lighting). The error will disappear when satisfactory ambient lighting is detected and the touch control calibration procedure will now complete satisfactorily.
Induction Hob Codes (VIX644CE)
| Hob Status Codes | Fault Description |
|---|---|
| r | Power increment not allowed (hob in Eco Mode) Power management activated, no fault |
| u | No pan or not suitable pan over the heater. |
| H | Residual heat |
| c | Induction generator overtemperature |
| C | Induction heater overtemperature. Wait until induction heater cools down (the user has probably let a pan overheat). |
| F / 0 | User interface microcontroller fault |
| F / 1 | Induction heater temperature sensor (NTC) error |
| F / 2 | Induction heater temperature sensor (NTC) error |
| F / 3 | Induction generator heatsink temperature sensor (NTC) error |
| F / 4 | Induction generator heatsink temperature sensor (NTC) error |
| F / 5 | Communication error |
| F / 6 | Mains zero crossing loss |
| F / 7 | Induction heater temperature sensor (NTC) error |
| F / 8 | Induction heater temperature sensor (NTC) error |
| F / 9 | Heater overvoltage fault |
| F / A | Safety key error. Ask the user to switch the power off and on (try to reset the system). If fault persists, service visit required. Change user interface. |
| F / C | Safety key error. Ask the user to switch the power off and on (try to reset the system). If fault persists, service visit required. Change user interface. |
| F / c | User interface overtemperature. Advice the user not to put hot pans on control area. Wait until the system cools down. |
| F / E | User interface temperature sensor (NTC) error |
| F / H | EEPROM error |
| F / J | Safety key error |
| F / L | Light condition error (keyboard error) |
| F / t | User interface temperature sensor (NTC) error |
| F / U | Safety key error |
Cleaning The Appliance
Do not use abrasive or corrosive detergents (for example, products in spray cans for cleaning barbecues and ovens), stain removers, anti-rust products, powder detergents or sponges with abrasive surfaces: these may scratch the surface beyond repair. Never use steam cleaners or pressure cleaners on the appliance.
- It is usually sufficient simply to wash the hob using a damp sponge and dry it with absorbent kitchen towel.
- If the hob is particularly dirty, rub it with a special glass ceramic cleaning product, then rinse well and dry thoroughly.
- To remove more stubborn dirt, use a suitable scraper. Remove spills as soon as possible, without waiting for the appliance to cool, to avoid residues forming crusty deposits. You can achieve excellent results by using a rust-proof steel wire sponge – specifically designed for glass ceramic surfaces – soaked in soapy water.
- If any plastic or sugary substances are accidentally melted on the hob, remove them immediately with the scraper, while the surface is still hot.
Manual
Indesit Induction Hob Manual PDF
Source: https://www.indesit.co.uk