
Coffee machines use specific codes to indicate malfunction situations, helping users quickly identify potential issues. In this article where we explain Keurig coffee machine error codes, you will find information to help you understand what type of problem your machine might be encountering.
Codes List
| Error Codes | Message Display and Probable Cause |
|---|---|
| 1 | TCO high open. Brew Tank TCO is Open (no Heater on brew tank): Likely Causes: Draining and forgetting to refill. Or Bad Triac. |
| 2 | TCO low open. Preheat Tank TCO is Open (no Heater on preheat tank): Likely Causes: Draining and forgetting to refill. Or Bad Triac. |
| 3 | Descale now.. Brewer must be descaled now: 3 dispense cycles in a row exceed the dispense timeout limit minus 5 seconds, followed by one brew that causes a dispense timeout. this error message lets the user know damage may occur if they do not descale now. |
| 4 | Check water supply. The float switch not sensed high while the CWT inlet valve is open and a time limit is exceeded. Likely Causes: Inlet water disconnected. Or low water pressure. Or Inlet Valve not opening. Or CWT level sensor stuck low. Or Leaks |
| 5 | Runaway fill. The float switch not sensed low during a brew cycle. The inlet valve might be stuck open, and the Float Switch is now preventing flooding. Likely Causes: Leaky/Stuck Inlet Valve. Or CWT level sensor stuck high. |
| 6 | Low tank frozen. The Preheat Tank thermistor is reading <37°F. Heater will not be turned on until it reads above this threshold to protect against damage. Likely Causes: Brewer just stored at cold temperature. Or bad Thermistor |
| 7 | High tank frozen. Same as above for brew tank |
| 8 | Low tank hi temp. Thermistor in the preheat tank is reading > 240°f likely causes: problems with thermistor. or heater triac, |
| 9 | High tank hi temp. Same as above for brew tank |
| 10 | Coin Jam. Modules: Coin Mech. |
| 1r | Water reservoir is empty and needs to be refilled. Make sure that the water reservoir is seated properly in the base. |
| fr | Appliance is cold |
Cleaning and Maintenance

Regular cleaning of the Brewer’s external components is recommended.
- Never immerse the Brewer in water or other liquids. The Housing and other external components may be cleaned with a soapy, damp, non-abrasive cloth.
- The Drip Tray can accumulate up to 12 ounces of overflow. The Drip Tray and Drip Tray Plate should be periodically inspected and rinsed clean. To remove the Drip Tray Assembly, simply slide it toward you, keeping it level at all times to avoid spilling. The Drip Tray and Drip Tray Plate should not be placed in the dishwasher. They should be cleaned with a damp, soapy, non-abrasive cloth and rinsed thoroughly.
Cleaning the K-Cup Holder Assembly
- Cleaning the Parts – The K-Cup Holder Assembly can be placed onto the top shelf of a dishwasher. NOTE: Use low temperature cycles in the dishwasher. To remove from the Brewer, open the cover by lifting the Handle. Grasp the top of the K-Cup Holder with one hand while pushing up on the bottom of the K-Cup Holder from underneath with the other until it releases (fig. 1). After cleaning, align the K-Cup Holder with the opening using the two front ribs as a guide, and snap into place from the top.
- Cleaning the Funnel – The Funnel can be removed from the K-Cup Holder by pulling on it until it pops off (fig. 2). The Funnel is dishwasher safe. To replace it, just snap it back onto the K-Cup Holder Assembly.
- Cleaning the Exit Needle – The Exit Needle is located on the inside bottom of the K-Cup Holder Assembly. Should a clog arise due to coffee grinds, it can be cleaned using a paper clip or similar tool. Remove K-Cup Holder assembly and detach Funnel. Insert the paper clip (as shown in fig. 2) into the Needle to loosen the clog and push it out. The K-Cup Holder is dishwasher safe.
Cleaning the Water Reservoir & Water Reservoir Lid
The Water Reservoir Lid and Water Reservoir should be periodically inspected and cleaned.
- Rinse the filter screen with the strong force of water from your faucet.
- If you have a sprayer, aim the water spray at the filter screen.
- Fill the Water Reservoir with approximately two inches of clean water and agitate (shake) the Water Reservoir.
De-Scaling Your Brewer
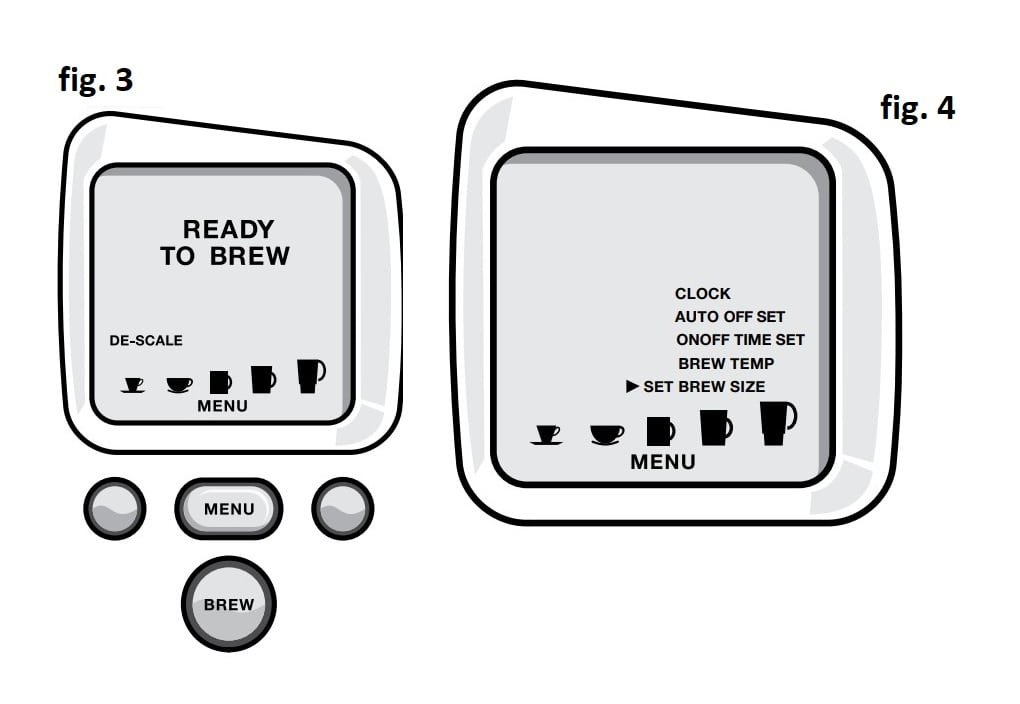
You should promptly de-scale if “DE-SCALE” is displayed on the LCD Control Center (fig. 3). However, even if “DE-SCALE” is not displayed, you should continue to de-scale your brewer every 3-6 months.
Prepare:
- To begin, you will need the following: At least 48 ounces of undiluted white vinegar Access to an empty sink A large ceramic mug (do not use a paper cup)
- Empty the water in the Water Reservoir.
- Disable “Auto Off” features.
Fill and Clean:
- Pour approximately 48 ounces of the vinegar into the Water Reservoir.
- Place a large mug on the Drip Tray Plate and run a brew cycle.
- Repeat the brew process without a K-Cup until “ADD WATER” is indicated.
- Now let the Brewer stand for at least 4 hours while still on.
- Discard any residual vinegar and rinse the Water Reservoir thoroughly.
Rinse:
- Ensure the Water Reservoir is filled with fresh water.
- Place a large mug on the Drip Tray Plate and run a water brew cycle. Pour the contents of the large mug into the sink.
- Repeat brew process until “ADD WATER” is indicated.
- You may need to perform additional water brew cycles if you notice any residual taste.
If “DE-SCALE” is still displayed after completing the procedure, repeat the de-scaling procedure above.
Troubleshooting
| Situation | Solution |
|---|---|
| Brewer does not have power | • Plug Brewer into an independent outlet. • Check to be sure that it is plugged in securely. • Plug into a different outlet. • Reset your home’s circuit breaker if necessary. • Make sure that the Power Switch has been turned on and LCD lights are illuminated. |
| Brewer will not brew | • After placing the K-Cup® in the K-Cup® Holder, make sure the Handle is pushed down securely and the LCD Control Center reads “READY TO BREW” with the Left, Right and BREW Buttons flashing, then press the Left, Right or BREW Button. • If the LCD Control Center indicates “ADD WATER”, add water to the Water Reservoir or make sure the Water Reservoir is seated properly in its base. • If the LCD Control Center indicates “ADD WATER” even after refilling. • The Exit Needle may be clogged. • If the LCD Control Center indicates “PRIME” and the blue light in the Water Reservoir is flashing, see below. |
| LCD Control Center indicates “PRIME” and the blue light in the Water Reservoir is flashing | • Completely remove the Water Reservoir and thoroughly clean (refer to page 14). Ensure the Water Reservoir is fully filled with water. Return it to the Brewer and ensure it is seated properly • If you have completed the above procedure two times and this situation persists. |
| Brewing a partial cup | • The Exit Needle may be clogged. • Clean the K-Cup® Holder Assembly if necessary and rinse under faucet. • The Water Reservoir may have been removed during brewing. Replace the Water Reservoir and perform a water brew without a K-Cup®. • “De-Scale” the Brewer. • If you have repeated the de-scale procedure on your Brewer two times and it is still only brewing a partial cup. |
| The time is not displayed on the LCD Control Center | The time will not be displayed on the LCD unless you have set it. |
| Brewer shuts off or turns on automatically | Check to make sure that the Auto Off timer and/or On/Off time features have not been set. To do this, press the MENU Button below “MENU” and scroll through the programming options. “OFF” should be displayed for Auto Off timer and On/Off. If “OFF” is not displayed, follow directions on page 10 to reset. |
| The blue light in Water Reservoir is flashing | • The water level is low and a full cup cannot be brewed. Add water to Water Reservoir. • If the LCD Control Center indicates “PRIME”, please see situation to the left (LCD Control Center indicates “PRIME” and the blue light in the Water Reservoir is flashing). |