Modern appliances like Kitchenaid range come equipped with advanced technology to make cooking convenient. However, encountering error codes can be frustrating. In this article, we’ll delve into Kitchenaid range error codes, what they mean, and how you can troubleshoot and resolve them efficiently.
Codes Table
| Error Codes | Solutions |
|---|---|
| F1 E0 | Fault eeprom, eeprom read fault (silent fault, not displayed) |
| F1 E1 | Eeprom checksum, error eeprom checksum does not match at start key (silent fault, not displayed) |
| F1 E3 | Config jumpers no match, configuration jumper change, freestand, electric switches ,or p9 (pin 6 to 7) changed since power up |
| F1 E4 | Q8 shorted |
| F1 E9 | Stack overflow, stack overflow, highest priority |
| F2 E0 | Cancel key too low, cancel key level too low (open) |
| F2 E2 | Cancel key channel, cancel key loop test failed |
| F2 E3 | Key down too long, key held down too long or keyboard short |
| F2 E4 | Keys unsettled, keys unsettled probably due to noise |
| F3 E0 | Open plat, plat sensor open |
| F3 E1 | Shorted plat, plat sensor shorted |
| F3 E2 | Oven temp too high, oven temp too high (runaway) |
| F4 E1 | Shorted meat probe, heat probe shorted (less than 1500 ohms) |
| F5 E1 | Self-clean latch will not make, self-clean latch will not make after 30-seconds |
| F5 E3 | Loss of gnd l1 n reverse, loss of 120 vac across l1 to ground, or q19 circuit error |
| F5 E5 | Self clean temp not satisfied, self-clean temperature not satisfied after 30-minutes |
| F5 E6 | Door open and locked, door locked with door open |
| F5 E7 | Door will not unlatch, door unlocked and will not unlatch |
| F6 E0 | Ambient over temp, ambient sensor opened (too hot) |
| F7 E0 | Input switch error, input switches will not follow their strobe level (shorted to ground) |
| PF | Power failure (not a failure of control. Press cancel) |
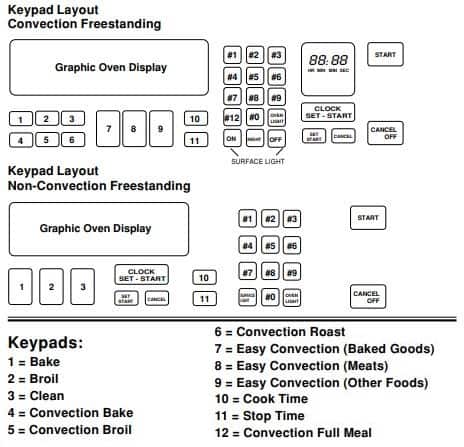
Keypad Layout
Care
Allow the oven to cool to room temperature before using the Clean cycle. If your oven cavity is above 200°F (93°C), “Oven Cooling” will appear in the display, and the Clean cycle will not be activated until the oven cavity cools down.
To Clean:
- Remove all racks and accessories from the oven cavity and wipe excess soil. Use a plastic scraper to remove easilyremoved soils.
- Pour 2 cups (16 oz [500 mL]) of distilled or filtered water onto the bottom of the empty oven and close the oven door.
- Press AQUALIFT SELF CLEAN and then START on the oven control panel.
- Allow 40 minutes for cleaning and cool down. A beep will sound when the Clean cycle is complete.
- Press OFF at the end of the cycle. Off may be pressed at any time to stop the Clean cycle.
- Remove the residual water and loosened soils with a sponge or cloth immediately after the Clean cycle is complete. Much of the initial 2 cups (16 oz [500 mL]) of water will remain in the oven after the cycle is completed. If additional soils remain, leave a small amount of water in the oven bottom to assist with the cleaning.
- If any soils remain, remove them with a non-scratch scrubbing sponge or plastic scraper. Additional Clean cycles may be run to help remove the stubborn soils.
Parts Meaning

Troubleshooting
First try the solutions suggested here. If you need further assistance or more recommendations that may help you avoid a service call, refer to the warranty page in this manual and scan the code there with your mobile device, or visit http://kitchenaid.custhelp.com.
| Trouble | Possible Causes And Solutions |
|---|---|
| Nothing will operate | Power supply cord is unplugged - Plug into a grounded outlet. |
| Energy Save is active, and the display is blank - Press any key on the control to display the time of day. | |
| Household fuse is blown, or a circuit breaker is tripped - Replace the fuse or reset the circuit breaker. If the problem continues, call an electrician. | |
| The control displays an F9 or F9 E0 error code - The electrical outlet in the home may be miswired. Contact a qualified electrician to verify the electrical supply. | |
| Cooktop will not operate | The control knob is not set correctly - Push in knob before turning to a setting. |
| On ceramic glass models, the oven control lockout is set | |
| Excessive heat around cookware on cooktop | Cookware is not the proper size - Use cookware about the same size as the surface cooking area, element or surface burner. Cookware should not extend more than ¹⁄₂" (1.3 cm) outside the cooking area. |
| Cooktop cooking results not what expected | Control knob set to incorrect heat level |
| Range is not level - Level the range. | |
| Cooktop element cycles on and off on High setting | Element cycling due to a temperature limiter - This is normal operation. The element may cycle on and off to keep the cooktop from overheating. |
| Oven will not operate | Delay Start is set |
| Control Lock is on - Press and hold the “0” key for 3 seconds to unlock | |
| Control is in Demo Mode - Demo Mode is used for display models in a showroom. | |
| Electronic oven control set incorrectly | |
| Oven temperature too high or too low | Oven temperature needs adjustment |
| Oven indicator lights flash | Power to range is turned on or restored |
| Display shows messages | Power failure (display shows flashing time) - Press OFF to clear the display. On some models, reset the clock, if needed. |
| Error code (display shows letter followed by number) - Depending on your model, press OFF to clear the display. | |
| Clean cycle did not work on all spills | Several cooking cycles between Clean cycles or spills on oven walls and doors - Run additional Clean cycles. Use the AquaLift® Technology Cleaning Kit. affresh® Kitchen and Appliance Cleaner or affresh® Cooktop Cleaner can be used for stubborn soils. |
| Mineral deposits are left on the oven bottom after the Clean cycle | Tap water was used in the Clean cycle - Use distilled or filtered water in the Clean cycle. |
| Range is not level - Mineral deposits will collect on dry areas of the oven bottom during the Clean cycle. Level the range. | |
| Oven cooking results not what expected | Range is not level - Level the range. |
| The set temperature was incorrect - Double-check the recipe in a reliable cookbook. | |
| Racks were positioned improperly | |
| Rack is too close to bake burner, making baked items too brown on bottom - Move rack to higher position in the oven. |
Display

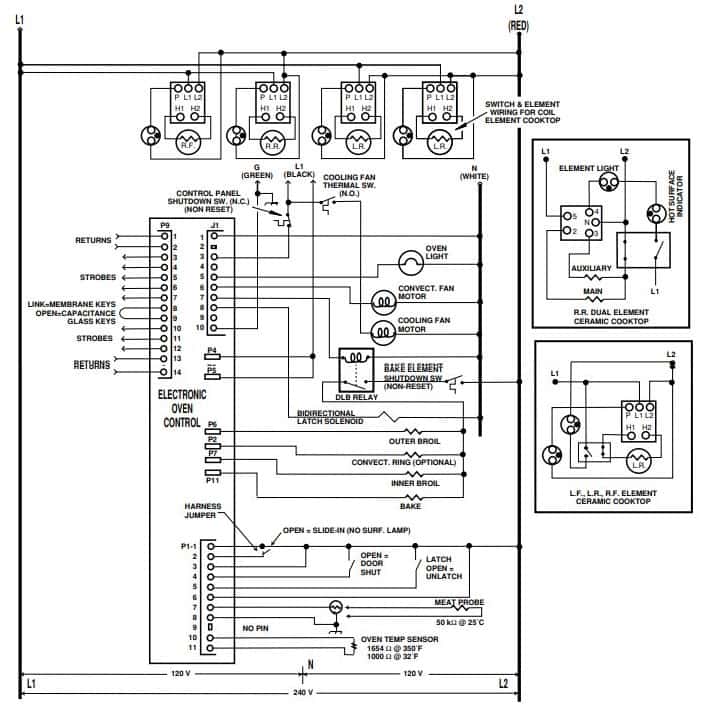
Wiring Diagram