KitchenAid is an American-based home appliance corporation that came into being in 1919. The company was started by Hobart manufacturing company and had a solid run until it was purchased by Whirlpool corporation. There was a point in time when the company offered a single product that was a table mixed. The large appliance was considered a household favorite and offered users a chance to ensure effective and efficient workings in the kitchen. For years the company only offered two models of the mixer, and it was not until a good few years that they decided to add dishwashers to the mix.
Today, KitchenAid offers a wide range of appliances that are designed to help you in the kitchen. Offering you top-of-the-line uses that ensure quick and breezy working. All of that is with a solid foundation that ensures quality in every single product the company has to offer. Making it one of the few companies Whirlpool manufactures and supplies for.
Kitchenaid might be a high-ranking company, but from time to time customers have complained about system errors. Fortunately, most of these errors can be fixed on your own. So rather than ignoring the error codes, your appliance is showing its time to note down the KitchenAid refrigerator error code and get to the bottom of the problem. To help you out we have listed down the most common error codes of KitchenAid refrigerators.
Codes List
| Error Codes | Solution |
|---|---|
| PO | When power has been restored, “PO” repeatedly flashes on the control panel display. All other control and dispenser functions are disabled and “PO” will continue to blink until you acknowledge the power outage. Press the MEASURED FILL button to confirm. The Power Outage icon “PO” will disappear, and the control panel will return to the Normal screen. |
| 1E | FZ Sensor Error. The sensor is read as open or shorted. Check the wiring connections. |
| 2E | R Sensor Error. The sensor is read as open or shorted. Check the wiring connections. |
| 4E | FZ DEF Sensor Error. The sensor is read as open or shorted. Check the wiring connections. |
| 5E | R DEF Sensor Error. The sensor is read as open or shorted. Check the wiring connections. |
| 6E | Ambient Sensor Error. The sensor is read as open or shorted. Check the wiring connections. |
| 7E | Flex Sensor Error. The sensor is read as open or shorted. Check the wiring connections. |
| 13E | Humidity Sensor Error. The Humidity sensor is read as open or shorted. Check the wiring connections. |
| 14E | IM Sensor Error. The sensor is read as open or shorted. Check the wiring connections. |
| 15E | ICE RM Sensor Error. The sensor is read as open or shorted. Check the wiring connections. |
| 21E | FZ Fan Error. The freezer fan motor is read as not connected or the fan has stopped. Check the wiring connections. |
| 22E | R Fan Error. The Ref fan motor is read as not connected or the fan has stopped. Check the wiring connections. |
| 23E | C Fan Error. The Comp. fan motor is read as not connected or the fan has stopped. Check the wiring connections. |
| 24E | FZ Def Function Error. The freezer defrost heater is read as open or the heater has been heating continuously for more then 80 mins. |
| 25E | R Def Function Error. The refrigerator defrost heater is read as open or the heater has been heating continuously for more then 80 mins. |
| 39E | IM Function Error. The ice maker release heater reads as open circuit. |
| Back and 1 Cup | Press and hold the OPTIONS and LOCK buttons at the same time for 3 seconds. The words “Back” and “1 Cup” will appear on the display screen. Also, the Calibrate Measured Fill icon will illuminate and remain lit while the Measured Fill feature is being calibrated. |
| Door Ajar Alarm | The Door Ajar Alarm feature sounds an alarm when the refrigerator door(s) or freezer drawer is open for 5 minutes and cooling is turned on. The alarm will repeat every 2 minutes. Close all doors and drawer to turn it off. The feature then resets and will reactivate when either door is left open again for 5 minutes. |
| Locked | The dispenser can be disabled for easy cleaning or to avoid unintentional dispensing by small children and pets. NOTE: The lock feature does not shut off power to the refrigerator, to the ice maker, or to the dispenser light. It simply deactivates the controls and dispenser levers. To turn off the ice maker, see “Ice Maker and Storage Bin.” Press and hold LOCK for 3 seconds to lock the dispenser. |
Parts Meaning
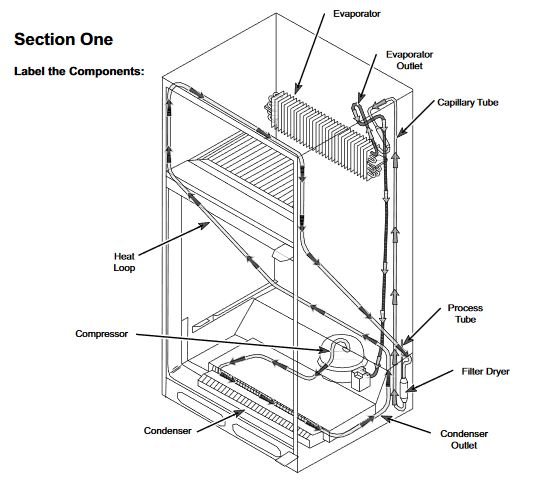
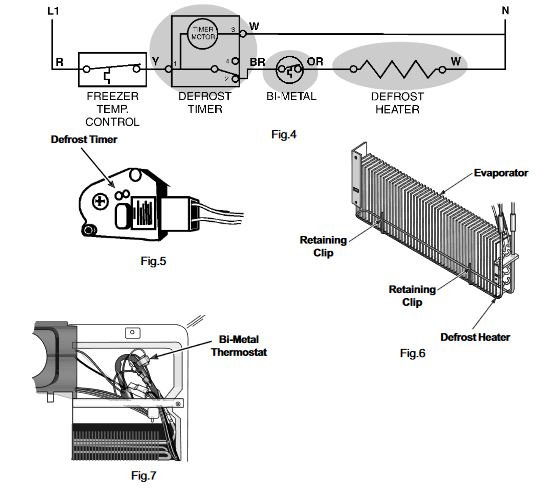
Defrost System
Automatic defrost after every eight hours of compressor run time is accomplished by utilizing a defrost timer thermostat in the control box, a defrost bi-metal thermostat attached to the outlet of the evaporator and a radiant electric heater suspended beneath the evaporator. (Fig. 4)
The bi-metal thermostat is attached to the outlet side of the evaporator coil tubing (Fig. 7) and opens at48°F to terminate the defrost heating. About 33 minutes from the start of the defrost cycle, the timer restores operation to the compressor circuit. (Fig. 5) The bi-metal thermostat contacts close at 13°F,enabling the defrost heater to operate during the next defrost cycle.
The defrost heater is suspended on the right side and across the bottom of the evaporator. The defrost heater also provides warming to the defrost drain area to keep it clear during the defrost cycle. (Fig.6)
Cleaning
Both the refrigerator and freezer sections defrost automatically. However, clean both sections about once a month to prevent odors from building up. Wipe up spills immediately.
Cleaning your refrigerator
- Unplug refrigerator or disconnect power.
- Remove all removable parts from inside, such as shelves, crispers, etc.
- Hand wash, rinse, and dry removable parts and interior surfaces thoroughly. Use a clean sponge or soft cloth and a mild detergent in warm water.
- Wash stainless steel and painted metal exteriors with a clean sponge or soft cloth and a mild detergent in warm water. Do not use abrasive or harsh cleaners. Dry thoroughly with a soft cloth. For additional protection against damage to painted metal exteriors, apply appliance wax (or auto paste wax) with a clean, soft cloth. Do not wax plastic parts.
- There is no need for routine condenser cleaning in normal home operating environments. If the environment is particularly greasy or dusty, or there is significant pet traffic in the home, the condenser should be cleaned every two to three months to ensure maximum efficiency.
- Plug in refrigerator or reconnect power.
Troubleshooting
| Trouble | Possible Cause |
|---|---|
| Operating Sound Level | See owners manual for explanation of normal operating sound |
| Freezer Warm - Compressor Off | Temperature Control defective or setting too warm |
| Too Cold in Refrigerator | Refrigerator damper control knob set too cold |
| Freezer Warm - Compressor Cuts Off on Overload | Heavy usage and/or high ambient |
| Freezer Too Warm - Compressor Operating | Control knob set too warm |
| Too Warm in Refrigerator | Refrigerator setting too warm |
| Freezer Too Cold | Freezer temperature control knob set too cold |
| Long Off Cycle - Too Warm at Start | Low ambient temperature |
| Short off Cycle | High ambient and/or heavy usage |
| Long or Continuous Operation | Heavy usage and/or high ambient |
| Short Run Cycle | Low ambient and/or light usage |
| Condensation on Cabinet Exterior | High humidity installation (design accepts bead of water onexterior of cabinet after 4 hours with a 0° to 5°F. (-18° to -17°C.)freezer food temperature and 38° to 40°F. (3°C to 4°C) refrig-erator food temperature in 84% R.H. conditions |
| No Ice/Low Ice Production | Freezer not cold enough |
| Over Production of Ice | Bail shut-off arm not in actuator |
| Hollow Ice Cubes | Water fill volume too low |
| Flooding or Ice Slabs in Bucket or Freezer | Thermostat out of calibration |