Common error codes in Ninja Airfryer devices are of great significance to users. These codes identify issues that can affect the device’s performance and safety. Users can find these codes in the user manual. Understanding and correctly addressing these error codes ensures the device operates efficiently and has a longer lifespan. Therefore, it is important to follow these codes for your Ninja Airfryer to function properly.
Codes List
| Error Messages | Solution |
|---|---|
| Add Food | The unit has completed its Grill preheating and it is now time to add your ingredients. |
| Shut Lid | The lid is open and needs to be closed for the selected function to start. |
| Add Pot | The pot is not installed in the unit. |
| E | E appears on the control panel display. The unit is not functioning properly. Please contact Customer Service. |
| Lid | LID error message appears on display screen and lid icon flashes. The incorrect lid is installed for your desired cooking function. Place the pressure lid on the unit if you want to use the Pressure, Slow Cook, Steam, Sear/Sauté, or Keep Warm functions and ensure it is in the closed position. |
| Vent | 1. When set to Slow Cook or Sear/Sauté, and the unit senses pressure building up, this message indicates the pressure release valve is in the SEAL position. 2. Turn the pressure release valve to the VENT position and leave it there for the remainder of the cooking function. 3. If you do not turn the pressure release valve to the VENT position within 5 minutes, the program will cancel and the unit will shut off. |
| Watr (Pressure function) | 1. Add more liquid to the cooking pot before restarting the pressure cook cycle. 2. Make sure the pressure release valve is in the SEAL position. 3. Make sure the silicone ring is installed correctly. |
| Watr (Steam function) | The water level is too low. Add more water to the unit for the function to continue. |
| Hot | 1. This indicates the unit has overheated. Let the unit cool down. 2. Once unit has cooled down, ensure there is no food caked on the bottom of the pot and there is enough liquid in the pot for the recipe you are preparing. |
| Cls | The CLS message means that the basket is not fully inserted. Press on both sides of the basket to ensure it is fully inserted. |
| E4 | Try removing the cooking container. Turned off the pressure cooker then turned it on again. |
| Err1, Err2, Err3, Err4, Err5, Err6, Err7, Err8 | The unit is not functioning properly. Please contact Customer Service. |
Cleaning and Mainteanance
Cleaning: Dishwasher and Hand-Washing
The unit should be cleaned thoroughly after every use.
- Unplug the unit from the wall outlet and ensure the unit is fully cool before washing.
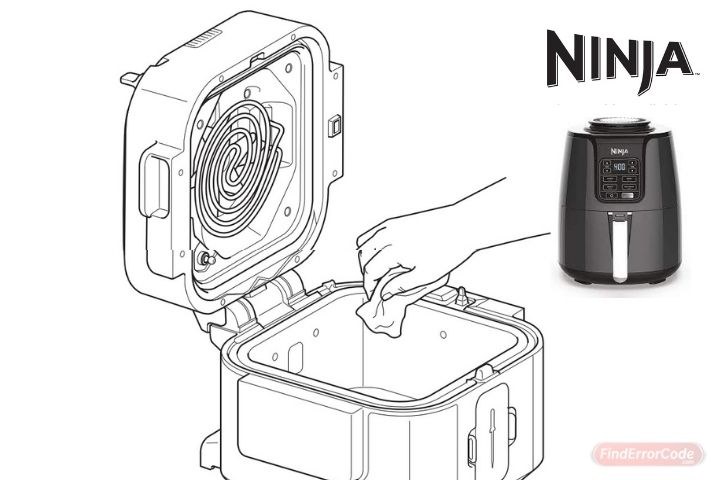
- To clean the cooker base and the control panel, wipe them clean with a damp cloth.
- The complete meal pot, crisper tray and condensation catch can be washed in the dishwasher. Never put the cooker base in the dishwasher, or immerse it in water or any other liquid.
- If the food residue is stuck on the pot, crisper tray, fill the pot with water and allow to soak before cleaning. Do not use scouring pads. If scrubbing is necessary, use a non-abrasive cleanser or liquid dish soap with a nylon pad or brush.
- Air-dry all parts after each use.
Avoiding Cross Contamination and Cleaning The Lid
We recommend inspecting the interior of the lid prior to cooking with “wet cooking functions,” which include Slow Cook, Sous Vide, Sear/ Sauté, and all Rapid Cooker functions. If you see any food residue or oil buildup on the heating element or fan, we recommend cleaning the unit (see instructions below), then wiping down the interior of the lid to avoid causing burning.
Cleaning Instructions
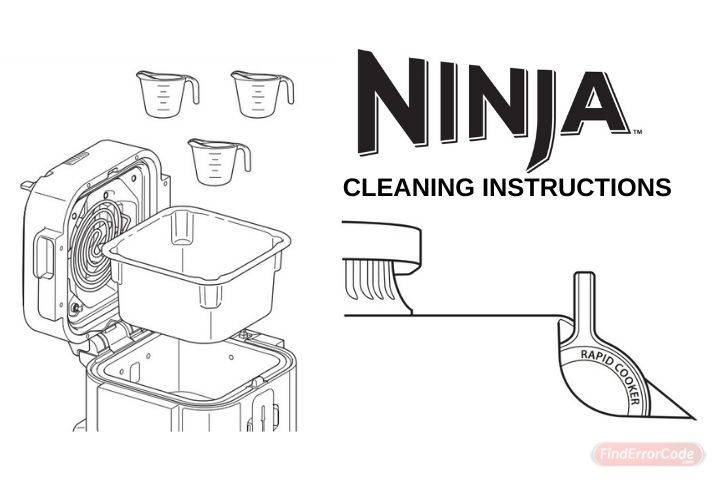
- Fill pot with 3 cups of water.
- Move smart switch to rapid cooker.
- Select STEAM and set time to 10 minutes. Close lid and press START/STOP.
- When time reaches zero and the unit has cooled down, use a wet cloth or sponge to wipe down the interior of the lid. Caution: When cleaning the interior of the lid, do not touch the fan.
- Remove water from pot and be sure to rinse both the cooking pot and crisper tray to ensure all residue has been removed.
Troubleshooting
| Trouble | Cause |
|---|---|
| Why is my unit taking so long to come to pressure? How long does it take to come to pressure? | Cooking times may vary based on the selected temperature, current temperature of the cooking pot, and temperature or quantity of the ingredients. |
| Why is the time counting down so slowly? | You may have set hours rather than minutes. When setting time, the display will show HH:MM and the time will increase/decrease in minute increments. |
| How can I tell when the unit is pressurizing? | The rotating lights will display on the screen to indicate the unit is building pressure. |
| Lights are rotating on the display screen when using the Pressure or Steam function. | This indicates the unit is building pressure or preheating when using STEAM or PRESSURE. When the unit has finished building pressure, your set cook time will begin counting down. |
| There is a lot of steam coming from my unit when using the Steam function. | It’s normal for steam to release through the pressure release valve during cooking. Leave the pressure release valve in the VENT position for Steam, Slow Cook, and Sear/Sauté. |
| Why can’t I take the pressure lid off? | As a safety feature, the pressure lid will not unlock until the unit is completely depressurized. To release pressure, turn the pressure release valve to the VENT position to quick release the pressurized steam. A quick burst of steam will spurt out of the pressure release valve. When the steam is completely released, the unit will be ready to open. Turn the pressure lid counterclockwise, then lift it up and away from you. |
| Is the pressure release valve supposed to be loose? | Yes. The pressure release valve’s loose fit is intentional; it enables a quick and easy transition between SEAL and VENT and helps regulate pressure by releasing small amounts of steam during cooking to ensure great results. Please make sure it is turned as far as possible toward the SEAL position when pressure cooking and as far as possible toward the VENT position when quick releasing. |
| The unit is hissing and not reaching pressure. | Make sure the pressure release valve is turned to the SEAL position. If you’ve done this and still hear a loud hissing noise, it may indicate your silicone seal is not fully in place. Press START/STOP to stop cooking, VENT as necessary, and remove the pressure lid. Press down on the silicone ring, ensuring it is fully inserted and lies flat under the ring rack. Once fully installed, you should be able to tug lightly on the ring to rotate it. |
| The unit is counting up rather than down. | The cooking cycle is complete and the unit is in Keep Warm mode. |
| How long does the unit take to depressurize? | Quick release is about 2 minutes or less. Natural release can take up to 20 minutes or more, depending on the type of food and/or the amount of ingredients in the pot. |
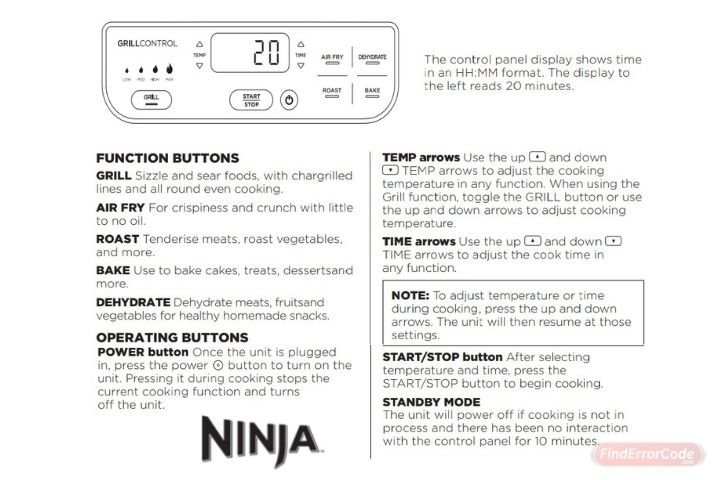
Control Panel