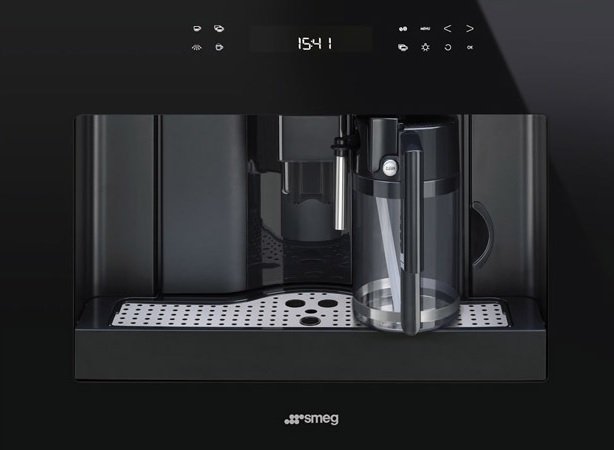
Smeg coffee machine malfunction codes serve as a vital tool for users in swiftly diagnosing issues with these devices. These codes typically appear on the screen, indicating which component is experiencing problems. This facilitates easier maintenance and repair of the machine, ensuring users can enjoy long-lasting and efficient performance from their Smeg coffee makers.
Most Common Codes
| Displayed Message | Solution |
|---|---|
| Fill Tank. | The water tank is empty or positioned incorrectly. Fill the tank with water and/or insert it correctly, pushing it as far as it will go. |
| Ground too fine adjust mill. Insert water spoutandpress OK (C5) | The grinding is too fine and the coffee is delivered too slowly. The machine cannot make coffee as there is air in the hydraulic circuit. Turn the grinding adjustment knob one click clockwise towards “7”. Insert the hot water spout, press the OK button (C5) and deliver water from the spout for a few seconds. |
| Insert Water Spout | The hot water spout is not inserted or is inserted incorrectly. Insert the hot water spout as far as it will go. |
| Insert Grounds Container | The grounds container (A4) is too full or more than 3 days have passed since you last made coffee (this guarantees correct hygiene of the machine). Empty the grounds container and clean, then replace. Important: when removing the drip tray, thegrounds container MUSTbeemptied, even if it is not completely full. If this is not done, when you make the next coffees, the grounds container may fill up more than expected and clog the machine. |
| Insert Grounds Container | After cleaning, the grounds container has not been replaced. Open the service door and insert the grounds container. |
| Insert Milk Container | The milk container is not inserted. Insert the milk container as far as it will go. |
| Add Pre-ground Coffee | With the pre-ground function selected, pre-ground coffee has not been poured into the funnel. The funnel (A17) is blocked. Extract the appliance and place preground coffee in the funnel. Empty the funnel with the help of a knife, as described in the section “Cleaning the pre-ground coffee funnel” |
| Descale! | The machine must be descaled. The descaling procedure described in the “Descaling” section needs to be performed as soon as possible. |
| Less Coffee | Too much coffee has been used. Select a milder taste or reduce the quantity of pre-ground coffee, then make the coffee again. |
| Fill Beans Container | The coffee beans have run out. Fill beans container. |
| Insertin Fuser Assembly | The infuser has not been replaced after cleaning. Insert the infuser as described in the section “Cleaning the infuser”. |
| Close Door | The service door is open. Close the service door. |
| General Alarm! | The inside of the appliance is very dirty. Clean the inside of the appliance thoroughly, as described in the section “Cleaning and maintenance”. If the message is still displayed after cleaning, contact a customer services. |
Parts and Meaning

Resetting Default Values
If you change the original values, the default values can be reset as follows:
- Press the MENU button (C2) then press the NEXT button (C3) repeatedly until the appliance displays “RESET TO DEFAULT NO”;
- press the CHANGE button (C4) and the appliance displays “RESETTO DEFAULT YES”;
- press the OK button (C5) to reset the default values;
- The appliance is now reset to the default settings and the “READY” message is displayed.
Cleaning the coffee grounds container
When “EMPTY GROUNDS CONTAINER” is displayed, the grounds container must be emptied and cleaned. Until the grounds container has been cleaned, the appliance continues to display the message and coffee cannot be made. To clean:
- Open the service door (A2) on the front of the appliance, extract the drip tray (A11), empty and clean.
- Empty the grounds container and clean thoroughly to remove all residues left on the bottom.
When removing the drip tray, the grounds container must be emptied, even if it is not completely full. If this is not done, when you make the next coffees, the grounds container may fill up more than expected and clog the machine.
Cleaning the milk container
Always clean the tubes inside the milk container (B) when you prepare milk. If there is still milk in the container, do not leave it out of the refrigerator for longer than strictly necessary. Clean the container each time you prepare milk as describedin Note3 in the section “Making cappuccino”.

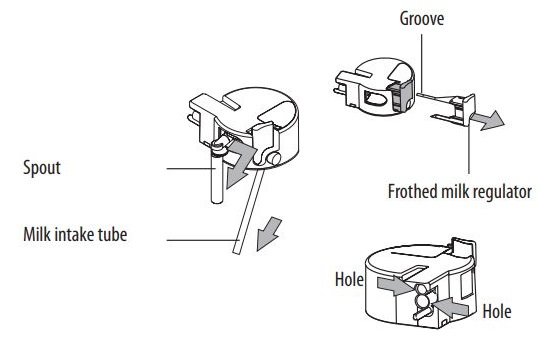
- Turn the milk container lid clockwise then remove it.
- Remove the milk spout and intake tube.
- Remove the frothed milk regulator by pulling it outwards.
- Wash all the components thoroughly with hot water and mild washing-up liquid. Make sure there are no milk residues left inside the holes and the groove on the fine end of the frothed milk regulator.
- Check that the intake tube and spout are not clogged with milk residues.
- Replace the frothed milk regulator, milk spout and intake tube.
- Replace the milk container lid.
Troubleshooting

If the problem cannot be resolved as described, contact Customer Services.
| Problem | Possible Cause |
|---|---|
| The coffee is not hot. | The cups were not preheated. The infuser has cooled down because 2/3 minutes have elapsed since the last coffee was made. Heat the cups by rinsing them in hot water or leaving them to rest for at least 20 minutes on the cup warmer tray. Before making coffee, heat the infuser by pressing the button (C4). |
| The coffee is not creamy enough. | The coffee is ground too coarsely. Wrong type of coffee. Turn the grinding adjustment knob one click anticlockwise towards “1” while the coffee mill is in operation. Use a type of coffee for espresso coffee makers. |
| The coffee is delivered too slowly or a drop at a time. | The coffee is ground too finely. Turn the grinding adjustment knob one click clockwise towards the 7 while the coffee mill is in operation. Continue one click at a time until coffee delivery is satisfactory. The effect is only visible after delivering two coffees. |
| The coffee is delivered too quickly. | The coffee is ground too coarsely. Turn the grinding adjustment knob one click anticlockwise towards “1” while the coffee mill is in operation. Avoid turning the grinding adjustment knob excessively otherwise when you select 2 cups, the coffee may be delivered a drop at a time. The effect is only visible after delivering two coffees. |
| Coffee does not come out of one of the spouts. | The spouts are blocked. Clean the spouts with a toothpick. |
| The coffee does not come out of the spouts, but from around the service door (A2). | The holes in the spouts are clogged with dry coffee dust. The coffee guide (A3) inside the service door is blocked and cannot swing. If necessary, remove coffee deposits with a toothpick, sponge or stiff bristled kitchen brush. Thoroughly clean the coffee guide (A3), particularly near the hinges. |
| Water comes out of the spouts instead of coffee. | The pre-ground coffee may be blocked in the funnel (A17). Clean the funnel (A17) with a wooden or plastic fork, clean the inside of the appliance. |
| The milk does not come out of the milk spout (B5). | The intake tube is not inserted or is inserted incorrectly. Insert the intake tube (B4) in the rubber washer in the milk container lid. |
| The milk is not well frothed. | The milk container lid is dirty. The frothed milk regulator is not positioned correctly. Clean the milk container lid as described in the section “Cleaning the milk container”. Adjust following the instructions in the section“Makingcappuccino”. |
| The milk contains bubbles or squirts out of the milk spout. | The milk is not cold enough or is not semi-skimmed. The frothed milk regulator is incorrectly adjusted. The milk container lid is dirty. You should ideally use skimmed or semiskimmed milk at refrigerator temperature (about 5°C). If the result is still disappointing, try another brand of milk. Move the frothed milk regulator slightly towards the word “CAFFELATTE” (see section“Makingcappuccino”). Clean the milk container lid as described in the section “Cleaning the milk container”. |

