Whirlpool is an all-American multinational manufacturer and marketer with right to work in Europe and Asia. Covering a large chunk of the world the company offers the world a taste of what they have to offer. With headquarters in Benton Charter Township, Michigan – the company mainly manufactures or assembles its products in the USA.
What started as a small business venture has now secured a spot in the Fortune 500 companies, and is featured right next to some of the best corporations the world has seen. Moreover, the company has more than 70 manufacturing and research centers that are based in leading cities all around the world.
Whirlpool is a reliable brand, but that does not mean you are free from error codes. These error codes are clearly visible on your device and can be noted down and matched to the issue. Once you know the issue we can easily fix it yourself or call in a professional to help you out.
Most Common Codes
| Error Codes | Solutions |
|---|---|
| 3 | Generator too hot (Generator thermoswitch has tripped. Reconnect by pressing button under oven.) |
| 4 | Oven too hot (Oven chamber thermoswitch has tripped. Reconnect by pressing button under oven.) |
| 5 | Fan too hot (Thermoswitch in motor has tripped. Wait for 10 minutes and try again. |
| 6 | Drain too hot (Drain temperature has been above 75°C for more than 5 min. Check that jet in drain is working.) |
| 7 | Oven sensor defective (Temperature sensor in oven chamber not working properly.) |
| 8 | Core temp. probe not connected (A program using core temp. probe has been selected but probe has not been connected.) |
| 9 | Generator sensor defective (Temperature sensor in generator not working.) |
| 10 | Drain sensor defective (Sensor in drain not working. Oven can still be used.) |
| 11 | Water shortage (Steam generator was not filled within two minutes. Check that the water has been turned on.) |
| 12 | SSR too hot (Solid-state relay too hot.) |
| 13 | Generator too hot (Temperature in steam generator higher than 130°C. If fault recurs, descale generator) |
| 14 | Fan running too slow. |
| 15 | CPU board too hot (> 60°C). |
| 16 | IO board too hot (> 60°C). |
| 18 | Error in set-up data. |
| 19 | Wrong language. |
| 20 | Internal defect (Failure in communication between computer and IO board.) |
| 22 | Restart not possible (Oven has been without power too long.) |
| 23 | Oven too hot at CombiWash start-up. |
| 24 | Draining failure (Drain blocked or failure of drain pump. Water level in generator still high after 10 seconds of draining.) |
| 25 | Core temperature probe defective (1, 2 or 3 of the elements in the core temperature probe defective.) |
| 28 | Configuration error in main alarms (3, 4, 5, 12) (warning) |
| 29 | Wrong door sensor signal (warning) |
| 34 | Water pressure too low (Check that water is turned on.) |
| 40 | Temperature in IO board critical (Warning after program run.) |
| 43 | Wrong software version (Visual Cooking I oven) |
| 44 | Failure during initialisation of exhaust at oven start-up. |
| 45 | 24 V missing or failure of main contactor output. |
| PF | There has been a power failure. Clear the display. On some models, reset the clock, if needed. |
| F9 E0 | The electrical outlet in the home may be miswired. Contact a qualified electrician to verify the electrical supply. |
| F5 E1 | self clean latch will not lock or unlock |
| F5 E0 | door open but latch is locked – latch switch communicates a locked door |
| F4 E1 | meat probe faulty/shorted |
| F3 E3 | oven temp too high in clean mode |
| F3 E2 | oven temp over 575C in bake mode |
| F3 E1 | oven temp sensor faulty |
| F3 E0 | open oven temp sensor circuit |
| F2 E6 | cancel key (button) is faulty |
| F2 E5 | cancel key (button) is faulty |
| F2 E0 | keypad wiring harness not connected |
| F1 | defective electronic oven control |
| F2 | oven temperature too high |
| F3 | open oven temperature sensor |
| F4 | oven temperature sensor shorted |
| F5 | control board fail |
| F7 | function key is stuck |
| F8 | control board fail |
| F9 | oven door locking fail |
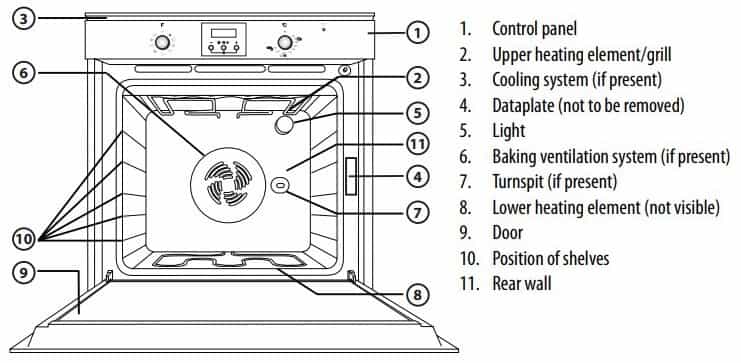
Parts Meaning

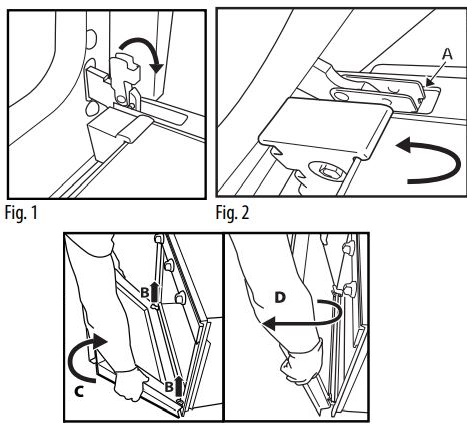
Removing Door
To remove the door:
- Open the door fully.
- Lift the catches and push them forwards as far as they will go (fig. 1).
- Close the door as far as it will go (A), lift it up (B) and turn it (C) until it is released (D) (fig. 2).
To refit the door:
- Insert the hinges in their seats.
- Open the door fully.
- Lower the two catches.
- Close the door.

Troubleshooting
| Problem | Possible Causes |
|---|---|
| Nothing will operate | Power supply cord is unplugged. Plug into a grounded outlet. |
| Household fuse is blown, or a circuit breaker is tripped. Replace the fuse or reset the circuit breaker. If the problem continues, call an electrician. | |
| The control displays an F9 or F9 E0 error code. The electrical outlet in the home may be miswired. Contact a qualified electrician to verify the electrical supply | |
| Cooktop will not operate | The control knob is not set correctly. Push in knob before turning to a setting. |
| On ceramic glass models, the oven control lockout is set. See the control lock keypad feature in the “Feature Guide.” | |
| Excessive heat around cookware on cooktop | Cookware is not the proper size. Use cookware about the same size as the surface cooking area, element or surface burner. Cookware should not extend more than ¹⁄₂" (13 mm) outside the cooking area. |
| Cooktop cooking results not what expected | Control knob set to incorrect heat level |
| Range is not level. Level the range. | |
| Cooktop element cycles on and off on High setting. | Element cycling due to a temperature limiter This is normal operation. The element may cycle on and off to keep the cooktop from overheating. |
| Oven will not operate | Delay start is set. |
| Control lock is on. Press and hold START for 3 seconds to unlock. | |
| Control is in Demo Mode. Press and hold START TIME for 10 seconds to exit Demo Mode. Demo Mode is used for display models in a showroom. | |
| Electronic oven control set incorrectly. | |
| Oven temperature too high or too low | Oven temperature needs adjustment. |
| Oven indicator lights flash | Power to range is turned on or restored. |
| Display shows messages | Power failure (display shows flashing time) Clear the display. On some models, reset the clock, if needed. See “Clock” keypad feature in the “Feature Guide” section. |
| Error code (display shows letter followed by number) Depending on your model, press CANCEL to clear the display. | |
| Start needs to be pressed so a cycle can begin (display shows “PUSH” or “PSH”). See the “Start” keypad feature in the “Feature Guide” section. | |
| Self-Cleaning Cycle will not operate | The oven door is not closed. Make sure the oven door is fully closed. |
| The Self-Cleaning function has not been entered correctly. See the “Self-Cleaning Cycle” section. | |
| A Timed Cooking function has been entered. See the “Cook Time” section. | |
| The range is in Sabbath Mode. See the “Sabbath Mode” section. | |
| Mineral deposits are left on the oven bottom after the Steam Clean cycle | Tap water was used in the Steam Clean cycle. Use distilled or filtered water in the Steam Clean cycle. To remove deposits, use a cloth soaked with vinegar. Then use a cloth dampened with water to thoroughly remove any vinegar residue. |
| Range is not level. Mineral deposits will collect on dry areas of the oven bottom during the Steam Clean cycle. Level the range. See the Installation Instructions. To remove deposits, use a cloth soaked with vinegar. Then use a cloth dampened with water to thoroughly remove any vinegar residue. | |
| Oven cooking results not what expected | Range is not level. Level the range. See the Installation Instructions. |
| The temperature set was incorrect. Double-check the recipe in a reliable cookbook. | |
| Oven temperature needs adjustment. See “Oven Temperature Control” in the “Electronic Oven Controls” section. | |
| Oven was not preheated. See “Baking and Roasting” section. | |
| Racks were positioned improperly. See “Positioning Racks and Bakeware” section. | |
| Not enough air circulation around bakeware. See “Positioning Racks and Bakeware” section. |

