Brother printers are popular brands that provide reliable and high-performance printing solutions. However, like any printer, you may occasionally encounter technical issues. One of these issues is the occurrence of error codes on Brother printers. Error codes can appear as messages or symbols that affect the printer’s functionality and provide users with information about the specific problem.
These error codes typically indicate a specific issue and offer users tips on how to resolve it. In this article, we will examine common error codes found in various models of Brother printers and share solutions to help you quickly troubleshoot any problems you may encounter with your Brother printer.
Most Common Codes
| Error Codes | Solution |
|---|---|
| E50 | There has been a malfunction of the fuser unit and the temperature, in particular. Switch the machine off for 5 minutes then on again. |
| E51 | There has been a malfunction of the laser unit and the laser beam is not being detected. Try switching the printer off and on again. |
| E52 | There has been a malfunction of the laser motor with the spinning mirror and motor itself developing a fault. |
| E54 | There has been a malfunction of the main motor which drives all of the printing functions. |
| E60 | There has been a malfunction of the fan. Try switching the printer off and on or seek a replacement fan if the problem persists. |
| 20 | Used to write the information to be printed onto the drum surfaces, there has been a laser diode failure. |
| 21 | Used to write the information to be printed onto the drum surfaces, there has been a laser diode failure. |
| 22 | Used to write the information to be printed onto the drum surfaces, there has been a laser diode failure. |
| 23 | Used to write the information to be printed onto the drum surfaces, there has been a laser diode failure. |
| 31 | Used to check the print density, the density sensor has developed a fault and can be resolved by switching the machine off and on. |
| 32 | An issue has arisen with the density sensor shutter. |
| 50 | The drum unit needs to be replaced as it's reach the end of it's life cycle. |
| 51 | The feed roller and separation pad for the manual feed tray may need to be replaced. |
| 52 | The feed roller and separation pad for the main feed tray may need to be replaced. |
| 54 | The fuser unit needs to be replaced as it's reached its life cycle end. An engineer will be able to assist you with this. |
| 55 | The laser unit needs to be replaced as it's reached it's life cycle end. To avoid deterioration of print quality, seek assistance from an engineer. |
| 57 | A paper jam has occurred in the duplex unit meaning the paper has jammed during double-sided printing. |
| 5E | The transfer belt is in need of replacement having reached the end of it's life cycle. |
| 68 | Whether the fuser unit is too hot or not hot enough, a fuser unit failure has occurred. |
| 69 | Whether the fuser unit is too hot or not hot enough, a fuser unit failure has occurred. |
| 6A | Whether the fuser unit is too hot or not hot enough, a fuser unit failure has occurred. |
| 6B | Whether the fuser unit is too hot or not hot enough, a fuser unit failure has occurred. |
| 6C | Whether the fuser unit is too hot or not hot enough, a fuser unit failure has occurred. |
| 6D | Whether the fuser unit is too hot or not hot enough, a fuser unit failure has occurred. |
| 6E | Whether the fuser unit is too hot or not hot enough, a fuser unit failure has occurred. Switch the printer off and on before attempting to print again. |
| 6F | Whether the fuser unit is too hot or not hot enough, a fuser unit failure has occurred. Switch the printer off and on before attempting to print again. |
| 7D | According to your printer, there is dirt on the drum unit and you should follow the drum cleaning steps included in your printer guide. |
| 71 | There is a problem with the laser unit in relation to the scanner motor. |
| 72 | There is a problem with the laser unit in relation to being able to detect the beam Detect signal. |
| 74 | The printer is informing you that you are out of toner. |
| 76 | There is an issue with the fuser unit in that there is a temperature issue affecting the performance of the machine. |
| 78 | There is an issue with the fuser unit in that there is a temperature issue affecting the performance of the machine. |
| 83 | A paper jam has been detected by the paper sensors inside the machine. Remove any paper from the paper path. |
| 84 | Within the body of the machine, a paper jam has been detected. Remove any obstructing paper. |
| 88 | A paper jam has been detected in the recording paper path. Check the paper path and remove any excess paper. |
| A2 | This error code relates to a paper jam when using an automatic document feeder. |
| A3 | This error code relates to a paper jam when using an automatic document feeder. |
| A5 | There is an issue where the scanner is unable to read the outgoing document. |
| B9 | This relates to an error with the scanning unit light. If the scan light doesn't illuminate after switching the printer off and on, it may need to be replaced. |
| 30 | A fault involving the movement of the print head has been detected. |
| 33 | A fault involving the movement of the print head has been detected. |
| 34 | A fault involving the movement of the print head has been detected. |
| 35 | A fault involving the movement of the print head has been detected. |
| 36 | A fault involving the movement of the print head has been detected. Remove any obstructions from the print head. |
| 37 | A fault involving the movement of the print head has been detected. Remove any obstructions from the print head. |
| 38 | A fault involving the movement of the print head has been detected. Remove any obstructions from the print head. |
| 41 | A fault has developed regarding the functionality of the print head. In this instance, you may need the help of an engineer. |
| 46 | During the printing process, waste toner is produced. This error code indicates the waste toner box is full and needs to be replaced. |
| 82 | A fault has occurred when trying to feed the recording paper. To resolve this, remove the paper tray and reseat the paper. |
| DF | An error has occurred with the modem when trying to communicate with other fax machines. |
| 26 | The printer is unable to detect one of the ink cartridges. |
| 27 | The printer is unable to detect one of the ink cartridges. |
| 28 | The printer is unable to detect one of the ink cartridges. |
| 29 | The printer is unable to detect one of the ink cartridges. |
| 1000 | Black ink level is too low. Prepare a new black ink cartridge. |
| 1001 | Magenta ink level is too low. Prepare a new magenta ink cartridge. |
| 1002 | Cyan ink level is too low. Prepare a new cyan ink cartridge. |
| 1003 | Yellow ink level is too low. Prepare a new yellow ink cartridge. |
| 1010 | The Waste Ink Cartridge is almost full. Prepare a new Waste Ink Cartridge. You can keep printing for a while, but replacement is soon required. |
| 1021 | The Print Head Wiper Blade needs to be replaced. Replace the Print Head Wiper Blade. |
| 1051 | The Carriage Motor is worn. Replace the Carriage Motor. Contact your dealer or Brother. |
| 1060 | The ambient temperature is below the range that maintains the print quality. “xxx” shows the current temperature. Raise the room temperature. |
| 1061 | The ambient temperature is above the range that maintains the print quality. “xxx” shows the current temperature. Drop the room temperature. |
| 1070 | The battery ran out. Replace the battery. |
| 1080 | The internal clock has not been set. Set time on GT-541 by using the service tool on the PC. |
| 2000 | The Black Ink Cartridge is not installed. |
| 2001 | The Magenta Ink Cartridge is not installed. |
| 2002 | The Cyan Ink Cartridge is not installed. |
| 2003 | The Yellow Ink Cartridge is not installed. |
| 2010 | The Waste Cartridge Tray is not installed. Install the Waste Ink Cartridge. If the error still occurs, check the sensor in the rear of the Waste Ink Cartridge and cables. |
| 2020 | The Black Ink Cartridge ran out of ink. |
| 2021 | The Magenta Ink Cartridge ran out of ink. |
| 2022 | The Cyan Ink Cartridge ran out of ink. |
| 2023 | The Yellow Ink Cartridge ran out of ink. |
| 2030 | The Waste Ink Cartridge is full. Replace the Waste Ink Cartridge. If the error still occurs, check the sensor, sensor position and cables. Also check the spring on the lower part of the Waste Ink Cartridge. |
| 2040 | The Wiper Cleaner Cassette is not installed. Install the Wiper Cleaner Cassette. If the error still occurs, check the sensor of the Wiper Cleaner Cassette, sensor position and cables. |
| 2050 | The ambient temperature is under the operative temperature rage. "xxx" shows the current temperature. Raise the room temperature. Check the offset of EEPROM (ID:0x8001, No31: thermistor A/D offset). The range of value is +/-10. |
| 2051 | The ambient temperature is over the operative temperature rage. "xxx" shows the current temperature. Drop the room temperature. Check the offset of EEPROM (ID:0x8001, No34: thermistor A/D offset). The range of value is +/-10. |
| 2062 | (1) Platen didn't return to the home position because Platen Motor stepped out. Or (2) Platen Org Sensor did not work while Platen returned correctly. |
| 2070 | GT-541 detected an obstacle on the Platen (or the media) when printing is started. |
| 2080 | Defect in FLASH ROM Check Sum on the SH side. When updating the firmware, no backup was made because of the defect of the current firmware. |
| 2090 | No individual information (the serial number etc.) is recorded in GT-541. This error will not occur by the use of a customer. |
| 2091 | The Print Head temperature is raised too high while printing. Wait until the head(s) cool down. Or contact your dealer or Brother. |
| 2092 | The Print Head temperature is raised too high while printing. Wait until the head(s) cool down. Or contact your dealer or Brother. |
| 2093 | The Print Head temperature is raised too high while printing. Wait until the head(s) cool down. Or contact your dealer or Brother. |
| 2094 | The Print Head temperature is raised too high while printing. Wait until the head(s) cool down. Or contact your dealer or Brother. |
| 2095 | The Print Head temperature is raised too high while printing. Wait until the head(s) cool down. Or contact your dealer or Brother. |
| 2100 | The CompactFlash is not inserted. Check whether the PC recognizes the CompactFlash. Check whether GT-541 recognizes another CompactFlash. |
| 2101 | The Compact Flash does not have enough area for storing logs. Check the free space of the Compact Flash with PC. Insert a Compact Flash with free area available. |
| 2102 | Failure in file reading / writing Check whether the file can be read on PC. Check whether the CompactFlash is formatted in FAT16. Use the recommended CompactFlash. |
| 3000 | GT-541 failed to receive the print data (time out). This error occurs when the USB cable is disconnected during data transmission, or data transmission is canceled on the PC. Check the connection between the PC and GT-541, and try again. If it has no effect, reboot both the PC and GT-541. Check whether there is a source of noise around the USB cable. If it has no effect, replace the USB cable. Check the USB connector. Replace the Main PCB if the USB connector is at fault. |
| 3001 | The PC will not receive the data sent from GT-541 (transmission buffer overflow). No error message appears. GT-541 can be used consecutively. |
| 3002 | PC Data Error GT-541 received the data that is not supported. |
| 3003 | No compatibility of communication command between the PC driver and the GT-541 firmware. The versions of he PC driver and the GT-541 firmware do not correspond. |
| 3004 | PC Data Error. The Check Sums of the received program data did not correspond when updating the firmware. |
| 3005 | The Check Sums of the received data did not correspond when updating EEPROM. Check whether there is a source of noise around the PC, USB cable and GT-541. Check the cable connection between the PC and GT-541. Check the USB connector. Notify the developer of the internal error. |
| 3006 | Received NG Data. Check the printer setting in the PC. Check the connection between the PC and GT-541 and try again. Check the connector. |
| 4000 | PC Data Error |
| 4007 | Blank Data |
| 4100 | The file cannot be opened. Check whether the file can be read on the PC. Check whether the CompactFlash is formatted in FAT16. Use a proper CompactFlash. |
| 4101 | No file can be created. The directory or FAT is wrong, or available memory of the CompactFlash is insufficient. Use another CompactFlash or format the current CompactFlash. |
| 4102 | Card Access Error. The file cannot be closed. |
| 4103 | Card Access Error. Failure in file seeking |
| 4104 | Card Access Error. Failure in file reading |
| 4105 | Card Access Error. Failure in file writing |
| 4106 | Card Access Error. File error |
| 4107 | Card Access Error. File size error |
| 4108 | Card Access Error. Failure in file size acquisition |
| 4109 | No Files. Failure in file search |
| 4200 | Language Error. Error in program of selected language |
| 5000 | Machine Error or SHBY: Send MSG TO Communication error inside the firmware. (SH detected the receipt notification time-out for the message sent to BY.) |
| 5080 | BYSH: Send MSG TO Communication error inside the firmware. (BY detected the time-out of the notification of receiving the message sent to SH.) |
| 6000 | Fail: PLTN Load. Platen loading error |
| 6004 | Fail: CLRNS SNSR. Clearance sensor error |
| 6021 | Fail: No Battery. Battery exhaustion of the real time clock |
| 7000 | PRG: SH SCER 1508. Carriage initialization failed. |
| 7001 | PRG: SH Exception Error inside the program (Exceptionally occurs in CPU of SH) |
| CA | Cap Driver Overheat. The operation stopped because the Cap Driver has overheated. Replace the Maintenance PCB. |
| CF | During the printing process, waste toner is produced. |
| CC | Wiper Cleaner Cassette error. Wiper Cleaner Cassette is coming off. Check the mounting status of Wiper Cleaner Cassette or the Sensor. |
| CE | Communication error. Communication error other than FE, OE and PE Check the communication cable between the Main PCB and the Maintenance PCB. |
| CI | Cap initialization error. The Cap initialization was not made before moving the Cap. Notify the developer of this unlikely error. |
| CO | Cap error. The Cap was in the raised position when moving the Wiper. Notify the developer of this unlikely error. |
| CP | Cap Sensor error. Failure of the Cap Sensor or Cap Motor. Check the Cap Sensor or Cap Motor. |
| FE | Data framing error. Serial communication/data framing error occurred. Check the communication cable between the Main PCB and the Maintenance PCB. |
| IE | Internal error. Incorrect program behavior. Notify the developer of this unlikely error. |
| OB | Cap obstacle error. An obstacle prevents the Cap from being raised. Check the stop position of the Cap Sensor, Motor or the Carriage. |
| OE | Data overrun error. Serial communication/buffer overrun occurred. Check the communication cable between the Main PCB and the Maintenance PCB. |
| PA | Pump Driver Overheat. The operation stopped because the Pump Driver has overheated. Replace the Maintenance PCB. |
| PE | Parity error. Serial communication/parity error occurred. Check the communication cable between the Main PCB and the Maintenance PCB. |
| PI | Pump initialization error. The Pump initialization was not made before operating the Pump. Notify the developer of this unlikely error. |
| PN | The number of arguments is different. The number of arguments is abnormal. Notify the developer of this unlikely error. |
| PS | Pump Sensor. Error Failure in the Pump sensor or Pump motor. Check the Pump Sensor or Pump Motor. |
| RT | Response timeout. Time-out of waiting for the Maintenance Unit response. Check the communization cable between the Main PCB and the Maintenance PCB. |
| SH | Ink Sensor error. Failure in the Ink Sensor harness. Check the Ink Sensor harness. |
| SR | Ink Sensor error. Defect in the Ink Sensor reading. Check the Ink Sensor harness or the Ink Sensor PCB. |
| VC | Valve error. The valve is closed when moving the Cap. Notify the developer of this unlikely error |
| VO | Valve error. The valve is open when operating the Pump. Notify the developer of this unlikely error. |
| WA | Wiper Driver Overheat. The operation stopped because the Wipe Driver has overheated. Replace the Maintenance PCB. |
| WI | Wiper initialization error. The Wiper initialization was not made before moving the Wiper. Notify the developer of this unlikely error. |
| WS | Wipe Sensor error. Failure in the Wiper Sensor or Wiper Motor. Check the Wiper Sensor or Wiper Motor. |
| Cartridge Error | The toner cartridge is not installed properly. |
| Drum End Soon | The drum unit is near the end of its life. |
| Size mismatch | The paper in the tray is not the correct size. |
| Comm.Error | Poor telephone line quality caused a communication error. |
| Connection Fail | You tried to poll a fax machine that is not in Polled Waiting mode. |
| Cooling Down Wait for a while | The temperature of the drum unit or toner cartridge is too hot. The machine will pause its current print job and go into cooling down mode. |
| Cover is Open | The front cover is not closed completely. |
| Disconnected | The other person or other person’s fax machine stopped the call. Try to send or receive again. |
| Document Jam | The document was not inserted or fed properly, or the document scanned from the ADF was too long. |
| DR Mode in Use | The machine is set to Distinctive Ring mode. You cannot change the Receive Mode from Manual to another mode. |
| Drum Error | The corona wire on the drum unit needs to be cleaned. The drum unit has reached the end of its life. |
| Fuser Error | The temperature of fuser unit does not rise at a specified temperature within specified time. The fuser unit is too hot. |
| Init Unable XX | The machine has a mechanical problem. |
| Jam Rear | The paper is jammed in the back of the machine. |
| Jam Inside | The paper is jammed inside the machine. |
| Jam Tray | The paper is jammed in the paper tray of the machine. |
| No Paper | The machine is out of paper or paper is not properly loaded in the paper tray. |
| No Response/Busy | The number you dialed does not answer or is busy. Verify the number and try again. |
| Not Registered | You tried to access a One Touch or Speed Dial number that is not programmed. Set up the One Touch or Speed Dial number. |
| Out of Memory | The machine’s memory is full. Fax sending or copy operation in progress. |
| Print Unable XX | The machine has a mechanical problem. |
| Scan Unable XX | The machine has a mechanical problem. |
| Toner Life End | The drum unit and toner cartridge assembly may have been installed improperly, or the toner cartridge is used up and printing is not possible. |
| Toner Low | If the LCD shows Toner Low, you can still print; however, the machine is telling you that the toner cartridge is near the end of its life and the toner will soon run out. |
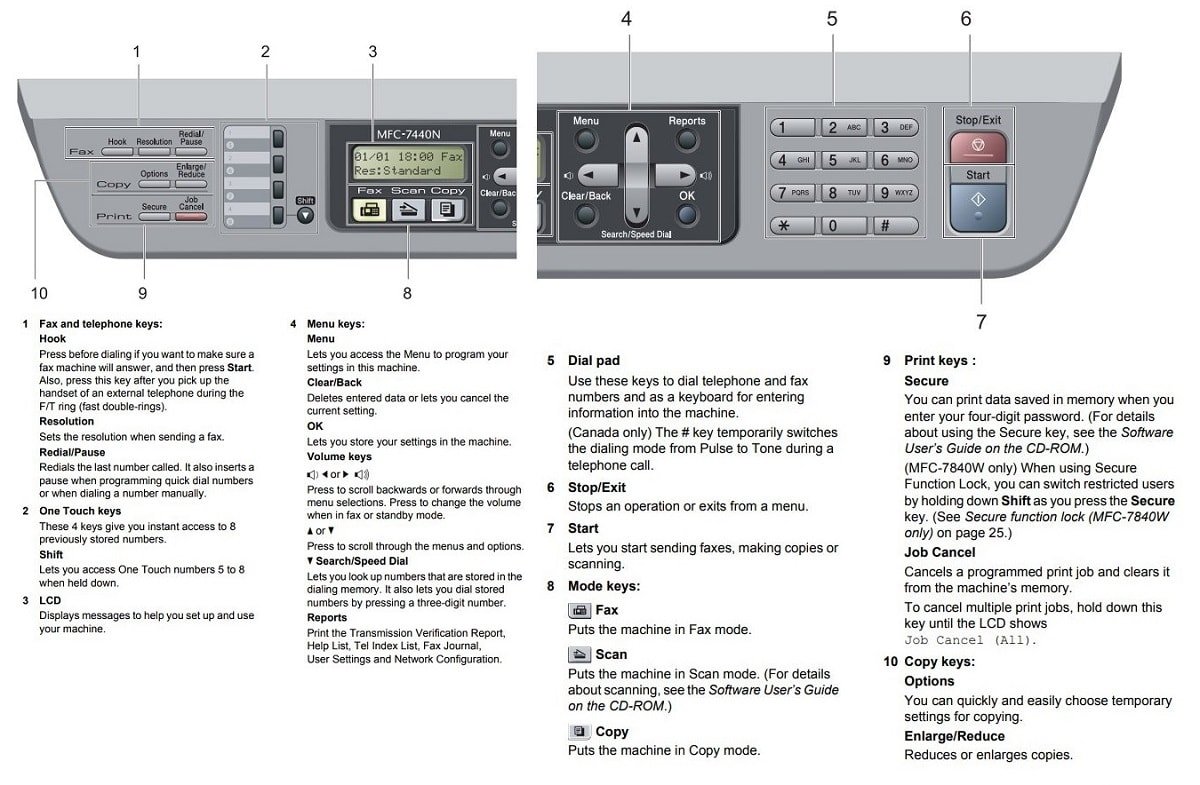
Control Panel
Troubleshooting
If you think there is a problem, check the chart below and follow the troubleshooting tips. You can solve most problems by yourself.
Printing or receiving faxes
Difficulties:
- Condensed print
- Horizontal streaks
- Top and bottom sentences are cut off
- Missing lines
Suggestions: Usually this is caused by a poor telephone connection. If your copy looks good, you probably had a bad connection, with static or interference on the telephone line. Ask the other party to send the fax again.
Difficulties: Vertical black lines when receiving
Suggestions:
- The corona wire for printing may be dirty. Clean the corona wire.
- The sender’s scanner may be dirty. Ask the sender to make a copy to see if the problem is with the sending machine. Try receiving from another fax machine.
Difficulties: Received faxes appear as split or blank pages.
Suggestions: If the received faxes are divided and printed on two pages or if you get an extra blank page, your paper size setting may not be correct for the paper you are using.
Telephone line or connections
Difficulties: Dialing does not work.
Suggestions:
- Check for a dial tone.
- Change Tone/Pulse setting.
- Check all line cord connections.
- Check that the machine is plugged in and switched on.
- Send a manual fax by pressing Hook or by lifting the handset of an external telephone and dialing the number. Wait to hear fax receiving tones before pressing Start.
Difficulties: The machine does not answer when called.
Suggestions: Make sure the machine is in the correct receive mode for your setup.
Sending faxes
Difficulties: Poor sending quality.
Suggestions: Try changing your resolution to Fine or S.Fine. Make a copy to check your machine’s scanner operation. If the copy quality is not good, clean the scanner.
Difficulties: Transmission Verification Report says ‘RESULT:NG’.
Suggestions: There is probably temporary noise or static on the line. Try sending the fax again. If you are sending a PC Fax message and get ‘RESULT:NG’ on the Transmission Verification Report, your machine may be out of memory. To free up extra memory, you can turn off fax storage.
Difficulties: Vertical black lines when sending.
Suggestions: Black vertical lines on faxes you send are typically caused by dirt or correction fluid on the glass strip.
Handling incoming calls
Difficulties: The machine ‘Hears’ a voice as a CNG Tone.
Suggestions: If Easy Receive is set to on, your machine is more sensitive to sounds. It may mistakenly interpret certain voices or music on the line as a fax machine calling and respond with fax receiving tones. Deactivate the machine by pressing Stop/Exit. Try avoiding this problem by turning Easy Receive to off.
Difficulties: Sending a Fax Call to the machine.
Suggestions: If you answered on an external or extension telephone, press your Fax Receive Code. When your machine answers, hang up.
Scanning difficulties
Difficulties: TWAIN errors appear while scanning.
Suggestions: Make sure that the Brother TWAIN driver is chosen as the primary source. In PaperPort™ 11SE, click File, Scan or Get Photo and choose the Brother TWAIN driver.
Difficulties: OCR does not work
Suggestions: Try increasing the scanning resolution.
Print quality difficulties
Difficulties:
- Printed pages are curled.
- Printed pages are smeared.
- Printouts are too light.
Suggestions:
- Low quality thin or thick paper or not printing on the recommended side of the paper could cause this problem. Try turning over the stack of paper in the paper tray.
- The Paper Type setting may be incorrect for the type of print media you are using, or the print media may be too thick or have a rough surface.
- If this problem occurs when making copies or printing received faxes, turn Toner Save mode to off in the machine menu settings.
Cleaning the scanner glass

- Turn off the machine’s power switch. Unplug the telephone line cord first, disconnect all cables and then unplug the power cord from the AC power outlet.
- Lift the document cover (1). Clean the white plastic surface (2) and scanner glass (3) underneath it with a soft lint-free cloth moistened with water.
- In the ADF unit, clean the white bar (1) and the scanner glass strip (2) underneath it with a soft lint-free cloth moistened with water.
- Plug the machine’s power cord back into the AC power outlet first, and reconnect all cables and telephone line cord. Turn on the machine’s power switch.
In addition to cleaning the scanner glass and glass strip with a soft lint-free cloth moistened with water, run your finger tip over the glass to see if you can feel anything on it. If you feel dirt or debris, clean the glass again concentrating on that area. You may need to repeat the cleaning process three or four times. To test, make a copy after each cleaning.