Sewing machine malfunctions can be a significant issue for users. Unexpected issues with the machine can decrease productivity and negatively impact the user experience. In this article, we will provide essential information on understanding and resolving common error codes to ensure the smooth operation of the sewing machine.
Error Messages
If (start/stop button) is pressed before the sewing machine is correctly set up or if an operation is performed incorrectly, an icon indicating the error appears in the LCD. Follow the instructions that appear. The icon will disappear if (OK key) or (Cancel/clear key) is pressed while the icon is displayed.
| Error Messages | Solutions |
|---|---|
| E1 | The motor locked up because the thread is tangled. |
| E2 | The start/stop button or reverse/reinforcement stitch button was pressed while the presser foot was raised. |
| E3 | The reverse/reinforcement stitch button or needle position button was pressed, or the foot controller was operated while the bobbin winder shaft is moved to the right. |
| E4 | The start/stop button was pressed while the foot controller was connected. |
| E5 | A stitch other than the buttonhole or bar tack stitch was selected and the start/stop button was pressed while the buttonhole lever is lowered. |
| E6 | The buttonhole or bar tack stitch was selected and the start/stop button was pressed while the buttonhole lever is raised. |
| E7 | The start/stop button or reverse/reinforcement stitch button was pressed after a stitch has been deleted. |
| E8 | The bobbin winder is winding the bobbin. |
| E9 | You tried to combine more than 35 character stitches and utility decorative stitches. |
| E10 | The start/stop button was pressed without connecting the foot controller while the setting for adjusting the stitch width using the sewing speed controller is set to [ON]. |
| E11 | The twin needle setting is selected while a pattern that cannot be sewn with the twin needle is selected. |
| E12 | The stitch mode was changed. This icon appears when the current pattern is to be deleted. |
| E13 | The selected setting cannot be changed with the selected pattern. |
| E14 | A pattern is being saved. Otherwise, the stitch settings are being saved. |
| E050 | Machine head is detected as being tilted back when start sewing. 1. Turn off the power, and then return the machine head to its original position. 2. Turn off the power and check the connection of connector P2. |
| E051 | Machine head is detected as being tilted back during sewing. Turn off the power and check the connection of connector P2. |
| E055 | Machine head is detected as being tilted back when power was turned on. 1. Turn off the power, and then return the machine head to its original position. 2. Turn off the power and check the connection of connector P2. |
| E065 | A disabled key was being pressed when the power was turned on. Turn the power off and then back on again. Do not press a disabled key while turning on the power. |
| E066 | The hand switch was being pressed when the power was turned on. Turn the power off and then back on again. Do not press the hand switch when turning on the power. |
| E090 | Connection of treadle was not detected when power was turned on. Turn off the power and check the connection of connector P7. |
| E095 | Treadle or standing operation pedal was being pressed when power was turned on. Return treadle unit or standing up operation pedal to original portion. Do not press the treadle or the standing operation pedal when turning on the power. |
| E111 | The needle up stop position exceeded the specified value when the sewing machine motor stopped. Turn off the power and check if the sewing machine motor or thread trimming mechanism is stiff or not. |
| E112 | The needle up or needle down stop position did not reach the specified value when the sewing machine motor stopped. Turn off the power and check if the sewing machine motor or thread trimming mechanism is stiff or not. |
| E113 | The needle down stop position exceeded the specified value when the sewing machine motor stopped. Turn off the power and check if the sewing machine motor or thread trimming mechanism is stiff or not. |
| E130 | Sewing machine motor did not operate at sewing start or during sewing. 1. Turn off the power and check if the sewing machine motor is stiff or not. 2. Turn off the power and check the connections of the sewing machine motor connector and connector P4. |
| E131 | Sewing machine motor encoder connection was not detected when power was turned on. Turn off the power and check the connection of connector P4. |
| E132 | Abnormal sewing speed of sewing machine motor was detected during sewing. Turn off the power and check the connection of connector P4. |
| E133 | Abnormal signal of sewing machine motor encoder was detected during sewing. Turn off the power and check the connection of connector P4. |
| E140 | Sewing machine motor ran in opposite direction to the direction specified during sewing. Turn off the power and check the connection of connector P4. |
| E150 | Abnormal overheating detected in sewing machine motor. Turn off the power and check the sewing conditions. |
| E151 | Motor overheating sensor connection was not detected. Turn off the power and check the connection of connector P4. |
| E161 | Sewing machine motor overload was detected during sewing. Turn off the power and check the sewing conditions. |
| E190 | Sewing machine motor was running continuously for too long during sewing. Turn the power off and then back on again. |
| E191 | Thread trimming solenoid operation was not completed within the specified period. Turn off power and check if the thread trimming mechanism is stiff. |
| E210 | Feed motor origin is not detected when power is turned on. ・ Turn off the power and check that the feed mechanism is not abnormal. ・ Turn off the power and check the feed motor connector and connector P3. |
| E211 | Abnormal feed motor operation detected during sewing. 1. Turn off the power and check that the feed mechanism is not abnormal. 2. Turn off the power and check the feed motor connector and connector P3. |
| E251 | Abnormal feed motor overheating detected or feed motor overheating sensor was not detected. 1. Turn off the power and check the sewing conditions. 2. Turn off the power and check the connection of connector P3. |
| E410 | Communication error with panel occurred when power was turned on. Turn off the power and check the connection of connector P2. |
| E440 | Data could not be written to the backup memory (main internal P.C. board). Turn the power off and then back on again. |
| E441 | Data could not be read from the backup memory (main internal P.C. board). Turn the power off and then back on again. |
| E442 | Back up memory (main internal P.C. board) data was abnormal, so settings were initialized. Turn the power off and then back on again. |
| E450 | Model settings could not be read from machine head memory (internal panel). Turn the power off and then back on again. |
| E451 | Data backup cannot be written to machine head memory (internal panel). Turn the power off and then back on again. |
| E700 | Abnormal rise in power supply voltage was detected when power was turned on. Turn off the power and check the power supply voltage. |
| E701 | Abnormal rise in sewing machine motor power supply voltage was detected. 1. Turn off the power and check the power supply voltage. 2. Turn off the power and check the connection of connector P5 |
| E705 | Abnormal drop in power supply voltage was detected. Turn off the power and check the power supply voltage. |
| E709 | Power supply signal could not be detected when power was turned on. Turn the power off and then back on again. |
| E710 | Abnormal sewing machine motor current was detected. Turn off the power and check the connection of connector P4 |
| E711 | Abnormal feed motor current was detected. Turn off the power and check the connection of connector P3. |
| E791 | Abnormal solenoid mechanism current detected when solenoid was activated. Turn off the power and check the connection of connector P1. |
| E882 | No USB medial connected when power was turned on. Turn off the power and check the connection of the USB media. |
| E883 | Version update file could not be detected in USB media when power was turned on. Turn off the power and then check that the version update file is contained in the USB media. |
| E884 | Problem with version update file detected during version updating. Turn off the power, and then repeat the version update procedure. |
| E885 | Version update file could not be read from USB media during version updating. Turn off the power and check the connection of the USB media. |
| E886 | Problem with version update file detected during version updating. Turn off the power, and then repeat the version update procedure. |
| E887 | Version update file could not be written during version updating. Turn off the power, and then repeat the version update procedure. |
| E889 | Incorrect data written to flash memory. Turn off the power, and then repeat the version update procedure. |
| E890 | Error occurred during version update. Turn off the power, and then repeat the version update procedure. |
If an error code that is not listed above appears or if carrying out the specified remedy does not solve the problem, contact the place of purchase.
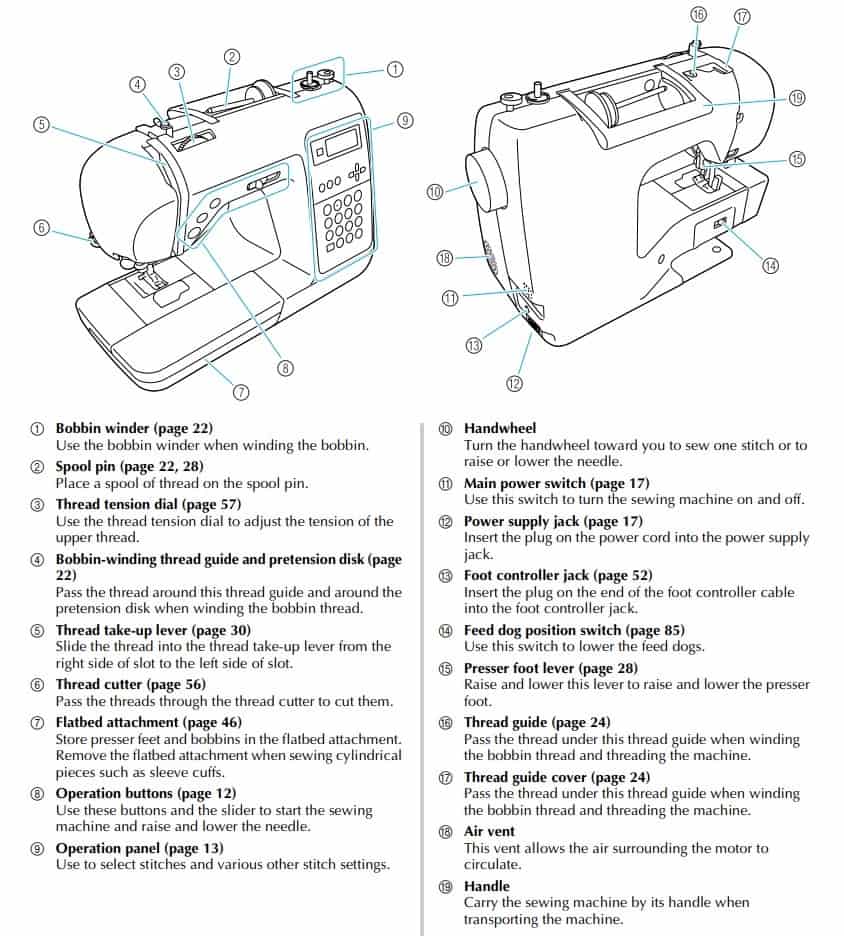
Parts and Their Functions
Troubleshooting
If the machine stops operating correctly, check the following possible problems before requesting service. If the problem persists, contact your dealer or the nearest authorized service center.
| Trouble | Probable Cause-Remedy |
|---|---|
| The sewing machine does not operate. | The machine is not turned on. Turn on the machine. |
| The start/stop button was not pressed. Press the start/stop button. | |
| The presser foot lever is raised. Lower the presser foot lever. | |
| The start/stop button was pressed, even though the foot controller is connected. Do not use the start/stop button when the foot controller is connected. To use the start/stop button, disconnect the foot controller. | |
| The needle breaks. | The needle is incorrectly installed. Correctly install the needle. |
| The needle clamp screw is loose. Use the screwdriver to firmly tighten the screw. | |
| The needle is bent or blunt. Replace the needle. | |
| The combination of fabric, thread and needle is not correct. Select a thread and needle that are appropriate for the type of fabric being sewn. | |
| The presser foot that is used is not appropriate for the type of stitch that you wish to sew. Attach the presser foot that is appropriate for the type of stitch that you wish to sew. | |
| The upper thread tension is too tight. Loosen the upper thread tension. | |
| The fabric is pulled too much. Lightly guide the fabric. | |
| The spool is incorrectly installed. Correctly install the spool. | |
| The area around the hole in the needle plate is scratched, or has a burr on it. Replace the needle plate. Contact your dealer or the nearest authorized service center. | |
| The area around the hole in the presser foot is scratched, or has a burr on it. Replace the presser foot. Contact your dealer or the nearest authorized service center. | |
| The bobbin case is scratched, or has a burr on it. Replace the bobbin case. Contact your dealer or the nearest authorized service center. | |
| A bobbin designed specifically for this machine is not used. Incorrect bobbins will not work properly. Only use a bobbin designed specifically for this machine. | |
| The upper thread breaks. | The upper thread was not threaded correctly (for example, the spool is not installed correctly, the spool cap is too big for the spool being used, or the thread has come out of the needle bar thread guide). Correct the upper threading. |
| There are knots or tangles in the thread. Remove any knots or tangles. | |
| The selected needle is not appropriate for the thread being used. Select a needle that is appropriate for the type of thread being used. | |
| The upper thread tension is too tight. Loosen the upper thread tension. | |
| The thread is tangled, for example, in the bobbin case. Remove the tangle thread. If the thread is tangled in the bobbin case, clean the race. | |
| The needle is bent or blunt. Replace the needle. | |
| The needle is incorrectly installed. Correctly install the needle. | |
| The area around the hole in the needle plate is scratched, or has a burr on it. Replace the needle plate. Contact your dealer or the nearest authorized service center. | |
| The area around the hole in the presser foot is scratched, or has a burr on it. Replace the presser foot. Contact your dealer or the nearest authorized service center. | |
| The bobbin case is scratched, or has a burr on it. Replace the bobbin case. Contact your dealer or the nearest authorized service center. | |
| A bobbin designed specifically for this machine is not used. Incorrect bobbins will not work properly. Only use a bobbin designed specifically for this machine. | |
| The lower thread is tangled or breaks. | The bobbin thread is incorrectly installed. Correctly install the bobbin thread. |
| The bobbin is scratched or does not rotate smoothly, or has a burr on it. Replace the bobbin. | |
| The thread is tangled. Remove the tangled thread and clean the race. | |
| A bobbin designed specifically for this machine is not used. Incorrect bobbins will not work properly. Only use a bobbin designed specifically for this machine. | |
| The thread tension is incorrect. | The upper thread was not threaded correctly. Correct the upper threading. |
| The bobbin thread is incorrectly installed. Correctly install the bobbin thread. | |
| The combination of fabric, thread and needle is not correct. Select a thread and needle that are appropriate for the type of fabric being sewn. | |
| The presser foot holder is incorrectly installed. Correctly install the presser foot holder. | |
| The thread tension is incorrect. Adjust the tension of the upper thread. | |
| A bobbin designed specifically for this machine is not used. Incorrect bobbins will not work properly. Only use a bobbin designed specifically for this machine. | |
| The fabric is wrinkled. | The upper thread was not threaded correctly, or the bobbin is incorrectly installed. Correctly thread the upper thread and correctly install the bobbin thread. |
| The spool is incorrectly installed. Correctly install the spool. | |
| The combination of fabric, thread and needle is not correct. Select a thread and needle that are appropriate for the type of fabric being sewn. | |
| The needle is bent or blunt. Replace the needle. | |
| If thin fabrics are being sewn, the stitch is too long. Shorten the stitch length or sew with stabilizer material under the fabric. | |
| The thread tension is incorrect. Adjust the tension of the upper thread. | |
| Stitches are skipped. | The upper thread was not threaded correctly. Correct the upper threading. |
| The combination of fabric, thread and needle is not correct. Select a thread and needle that are appropriate for the type of fabric being sewn. | |
| The needle is bent or blunt. Replace the needle. | |
| The needle is incorrectly installed. Correctly install the needle. | |
| Dust has accumulated under the needle plate or in the bobbin case. Remove the needle plate cover and clean the race. | |
| A high-pitched noise is made while sewing. | Dust has accumulated in the feed dogs or in the bobbin case. Clean the race. |
| The upper thread was not threaded correctly. Correct the upper threading. | |
| The bobbin case is scratched, or has a burr on it. Replace the bobbin case. Contact your dealer or the nearest authorized service center. | |
| A bobbin designed specifically for this machine is not used. Incorrect bobbins will not work properly. Only use a bobbin designed specifically for this machine. | |
| The needle threader cannot be used. | The needle has not been raised to the correct position. Press the needle position button. |
| The needle is incorrectly installed. Correctly install the needle. | |
| The stitch is not sewn correctly. | The presser foot that is used is not appropriate for the type of stitch that you wish to sew. Attach the presser foot that is appropriate for the type of stitch that you wish to sew. |
| The thread tension is incorrect. Adjust the tension of the upper thread. | |
| The thread is tangled, for example, in the bobbin case. Remove the tangle thread. If the thread is tangled in the bobbin case, clean the race. | |
| The fabric does not feed. | The feed dogs are lowered. Slide the drop feed lever to the right. (as seen from the rear of the machine) |
| The stitch is too short. Lengthen the stitch length. | |
| The presser foot that is used is not appropriate for the type of stitch that you wish to sew. Attach the presser foot that is appropriate for the type of stitch that you wish to sew. | |
| The thread is tangled, for example, in the bobbin case. Remove the tangle thread. If the thread is tangled in the bobbin case, clean the race. | |
| The sewing lamp does not come on. | The sewing lamp is damaged. Contact your dealer or the nearest authorized service center. |
| Nothing appears in the LCD. | The brightness of the LCD is either too light or too dark. Adjust the brightness of the LCD. |
| Cannot change the configuration of the characters. | This message is displayed when there are too many characters and the curved character configuration is impossible. |
| Cannot change the font since some letters are not included to the selected font. | This message appears when the font of the embroidery character pattern is changed to one that does not include characters used in the pattern. |
| Check and rethread the upper thread. | This message is displayed when the upper thread is broken or not threaded correctly, and the “Start/Stop” button, etc. is pressed. |
| Data volume is too large for this pattern. | This message is displayed when the patterns you are editing take up too much memory, or if you are editing too many patterns for the memory. |
| Lower the buttonhole lever. | This message is displayed when the buttonhole lever is up, a buttonhole stitch is selected, and the “Start/Stop” button, etc. is pressed. |
| Lower the presser foot lever. | This message is displayed when a button, such as the “Start/Stop” button, was pressed while the presser foot was raised. |
| No more patterns can be added to this combination. | This message is displayed when you tried to combine more than 70 decorative stitches. |
| Not enough available memory to save. | This message is displayed when the memory is full and the stitch or pattern cannot be saved. |
| Pattern extends to the outside of embroidery frame. | This message appears when the selected embroidery pattern is larger than the embroidery frame selected when [Embroidery Frame Identification View] is set to [ON]. |
| Raise the buttonhole lever. | This message is displayed when the buttonhole lever is down, a stitch other than a buttonhole is selected, and the “Start/Stop” button, etc. is pressed. |
| This pattern cannot be used. | This message appears when you try to retrieve a pattern that cannot be used with this machine. |
| his USB media cannot be used. | This message is displayed when you try to use incompatible media. |
| USB media is not loaded. Load USB media. | This message is displayed when you try to recall or save a pattern while no or USB flash drive is loaded. |
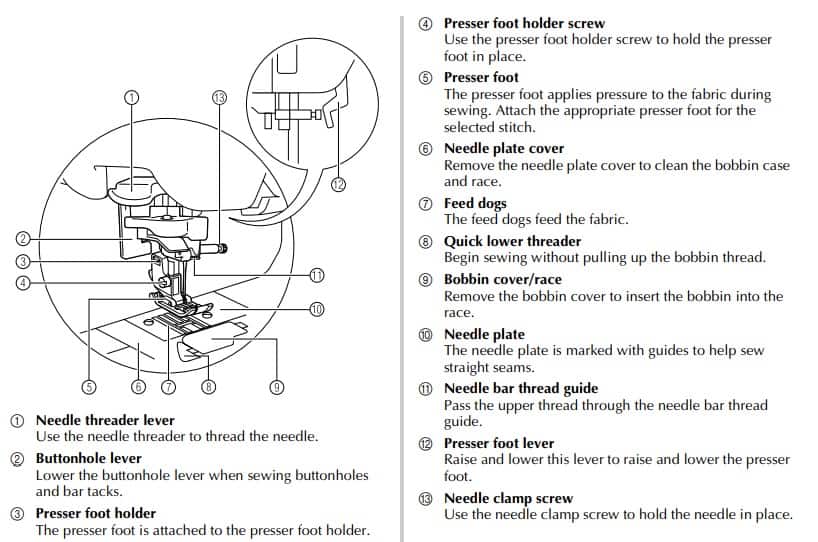
Needle and Presser Foot Section
Nothing appears in the LCD
If nothing appears in the LCD when the sewing machine is turned on, the brightness of the LCD is either too light or too dark. If this is the case, perform the following operation.
- Turn off the sewing machine.
- While pressing (Cancel/clear key) in the operation panel, turn on the sewing machine.
- Press < or > (Stitch width keys). Adjust the brightness of the LCD so that the screens can be seen.
- Turn off the sewing machine, then turn it on again.
Operation beep
Each time a key is pressed or an incorrect operation is performed, a beep is sounded.
- For a correct operation: One beep is sounded.
- If an incorrect operation is performed: Two or four beeps are sounded.
- If the machine locks up, for example, because the thread is tangled: The sewing machine continues to beep for four seconds. The machine automatically stops. Be sure to check for the cause of the error, and correct it before continuing to sew.
Cleaning the machine surface
If the surface of the machine is dirty, lightly soak a cloth in neutral detergent, squeeze it out firmly, and then wipe the surface of the machine. After cleaning it once with a wet cloth, wipe it again with a dry cloth.
Cleaning the race: Sewing performance will suffer if dust collects in the bobbin case; therefore, it should be cleaned periodically.
- Turn off the sewing machine.
- Unplug the power cord from the power supply jack on the right side of the sewing machine.
- Remove the flat bed attachment.
- Loosen the presser foot holder screw and remove the presser foot holder, and then loosen the needle clamp screw and remove the needle.
- Grasp both sides of the needle plate cover, and then slide it toward you.
- Remove the bobbin case. Grasp the bobbin case, and then pull it out.
- Use the cleaning brush or a vacuum cleaner to remove any lint and dust from the race and its surrounding area.
- Insert the bobbin case so that the projection on the bobbin case aligns with the spring.
- Insert the tabs on the needle plate cover into the needle plate, and then slide the cover back on.
- Install the flat bed attachment in its original position.
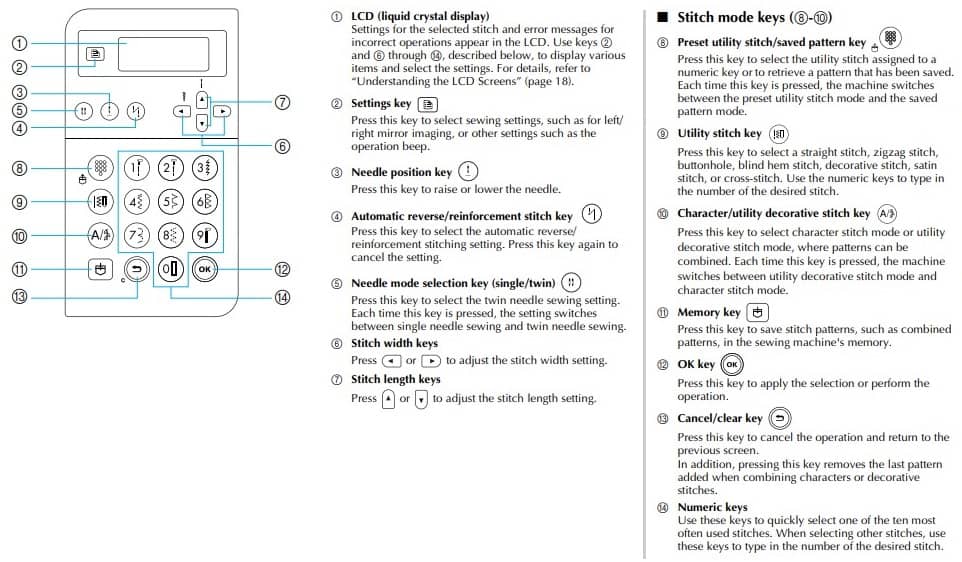
Operation Panel and Buttons

Manual Pdf
Computerized Embroidery and Sewing Machine – Operation Manual PDF – Product Code 885-V31/V32/V33