Dexter washing machines are equipped with error codes that help users identify potential issues with their appliances. These codes facilitate quicker and more accurate repairs by technical service personnel. Each code signifies a specific problem or component, making it easier for users to understand the nature of the issue. This results in time and cost savings. Dexter washing machine error codes assist users in smoothly maintaining their household laundry tasks.
Codes List
| Error Codes | Solutions |
|---|---|
| F1 | The door failed to close and lock or The door failed to remain locked during the cycle. Check VFD fault code before turning off. Check to hear if door solonoid engaged. Turn off the power to the washer. Check wire connections to door /lock switches. Check wire connections from switches to controller. Check P-4 wire connections at PCB controller. Adjust the door lock mechanism. |
| F2 | The washer tub does not fi ll with water within 7 minutes. The wash cycle will continue. The F 2 will fl ash three times, then wait for 30 seconds. The error will clear at the end of the cycle. Turn off the power to the washer. Check the operation of the water valves. Check the incoming water pressure. Check for blocked or restricted water fl ow. Check to ensure the drain valve is functioning properly. This error will occur on 18# washers when water level is set for high (the pressure switch in 18# washer is only one level). |
| F3 | Memory error in controller. The memory checksum is wrong. Check VFD fault code before turning off power. Try to clear the fault with the Palm. Try a soft Reset of the controller with the white button. If problem. Replace PCB controller. |
| F4 | Washer controller communication error Check VFD fault code before turning off power. Try the data cable fi rst. Move around cable and remove any side loading tension from data cable connector ends. Check connection P25/24/23 to P15. Turn power back on to the washer. If the problem returns, replace the PCB washer controller. |
| F5 | Pressure Switch error (only OPL) - when the high level sensor indicates full but the lower one indicates empty. The wash cycle will continue. The F 5 will fl ash three times, then wait for 30 seconds. The error will clear at the end of the cycle. Check VFD fault code before turning off power. Check the pressure switch.(Ohm out contacts). Check pressure switch connections to ensure they are all making good contact. Check the Molex type harness connector to ensure no wire been pushed out of the Molex type housing that it is shorting or not connecting. |
| F6 | Wrong washer size for drive type. Check VFD fault code before turning off power. If the controller was installed in a different size machine before being installed in this machine, a problem can occur. If someone has been doing repairs on the washer, check for the correct size drive. It can also be caused by pressure switch harness. Check to ensure the correct harness in installed. The control can be reset by holding program button on controller during startup (soft reset). Check orange wire at Molex connector on controller coming from pressure switch or replace pressure switch harness. |
| F7 | Wrong size drive installed. Check VFD fault code before turning off power.Check to ensure all the harnesses are properly connected to the controller. Check to ensure the VFD drive horsepower is proper for this size of washer. The control can be reset by holding program button on controller during startup (soft reset) Check orange wires at molex connector on controller coming from pressure switch. |
| F8 | The washer tub does not empty within 7 minutes. The wash cycle will continue. The F 8 will fl ash three times, then wait for 30 seconds. The error will clear at the end of the cycle. Check VFD fault code before turning off power. Check to ensure the drain valve is operating properly (slow drain has potential to cause this code). Check to ensure the pressure switch tube is clear of any blockage, and the pressure switch is operating properly. Check the pressure switch harness. |
| F9 | The washer tub does not reach the spin target frequency within 150 seconds. The wash cycle will continue. The F9 will fl ash three times, then wait for 30 seconds. The error will clear at the end of the cycle. Check VFD fault code before turning off power. Check to ensure the drain valve is operating properly (slow drain has potential to cause this code). Check to ensure the pressure switch tube is clear of any blockage, and the pressure switch is operating properly. Check the pressure switch harness. |
| F10 | After a spin the washer tub does not stop within 150 seconds. Check VFD fault code before turning off power. Inspect the braking resistors and measure the resistance. Check connecting wiring from braking resistor to the drive mounted in the top of the washer. Reset the drive and try again. Possibly incorrectly programmed drive. |
| F11 | The drive size setting has changed. Check VFD fault code before turning off power. Check to ensure all the harnesses are properly connected to the controller. Check to ensure the drive horsepower is proper for this size of washer. If no one has worked on machine very recently then PCB controller or VFD may need to be replaced. Do a soft reset before and after either VFD replaced. |
| F12 | Washer controller internal error. Check VFD fault code before turning off power. Turn off the power to the washer. Wait one to two minute. Turn on the power to the washer. If problem reappears, contact your Dexter Authorized Representative |
| F13 | The variable frequency drive (VFD) and the washer computer are not communicating. Check the data communication cable between the washer computer and the variable frequency drive (VFD). |
| F14 | Over-current on the drive or motor. |
| F15 | The variable frequency drive (VFD) senses that the internal voltage is too high. The source of the problem can originate from two different areas. Area 1: The input voltage can be too high, or there may be a high level of electrical noise. Area 2: The motor can be generating a voltage that is acting like an input to the VFD output motor terminals. |
| F16 | The temperature sensor inside of the variable frequency drive detects that the internal temperature is too high. Step 1: Make sure the cooling fi ns on the VFD heatsink and the ventilation louvers on the VFD cooling fan cover are clean. Step 2: Start a washer cycle and make sure the VFD cooling fan operates after the cylinder starts turning. |
| F17 | Overload of the drive or motor (Check drive fault code before powering down). Check the washer motor to ensure it turns freely. Check the wiring for loose connections to the drive and motor. Measure the braking resistor values. Check for damaged motor wires. Check V-Belt tension and adjust to 1” defl ection at center. Check braking resistors. |
| F18 | Ground Fault to the drive. Check VFD fault code before turning off power. Check the wiring connections to the drive and motor. Check the ground wiring of the drive, motor and incoming connection to ensure a proper ground is present. Check for damaged motor wires. |
| F19 | Low Voltage to the drive. Check VFD fault code before turning off power. Turn the power off to the washer. Check the wiring connections to the drive and motor. If no problem is observed, turn on power to the washer and test. (See Note) Measure the incoming line voltage. |
| F20 | Internal drive error. Check VFD fault code before turning off power. Turn the power off to the washer. Wait one minute. Turn the power on to the washer. If problem reappears, contact your Dexter representative. |
| F21 | Data error on communications between the controller and drive Internal drive error # 32. This error also has CEXX errors associated with it that are presented on the drive display. The CE errors are communications errors. Data Cable noise can cause the majority of these errors.Check VFD fault code before turning off power. Check the data cable between the controller and the drive. Replace data cable if it appears damaged and fault appears again. Please note that this fault will occur if you turned main power off and on to quickly. |
| F22 | Future use. No action required. |
| F23 | VFD has been replaced, disconnected, or removed. Soft reset control. |
| F24 | Injection relay PCB has been removed or loose connection. Soft reset control. |
| F25 | Optional water valve PCB removed or water valve has been replaced . Soft reset control. |
| F26 | VFD unit has been added or loose connection. Soft reset control. |
| F27 | Injection relay PCB has been added to machine or loose connection. Soft reset control. |
| F28 | Optional water valve PCB has been added or loose connection. Soft reset control. |
| CE1 | VFD received an illegal command. Possible controller problem. Reset drive. |
| CE2 | Illegal data address, VFD received an address not available to the controller. Reset drive. |
| CE3 | Illegal data value received at VFD. Possible controller problem. Reset drive. |
| CE4 | VFD unable to perform the requested action. Possible controller problem. Reset drive. |
| CE6 | Time frame between commands is to short. Possible controller problem. Reset drive. |
| CE9 | Internal checksum error. VFD problem. Reset drive. |
| CE10 | Watch dog timer. Command not received from the controller every 6 seconds. Reset drive. |
| CE11 | Frame error. Possible Baud rate issues between VFD and controller. Reset drive. |
| CE12 | Command message is to short. Possible controller problem. Reset drive. |
| CE13 | Command message is to long. Possible controller problem. Reset drive. |
| CE14 | Command message includes unused characters. Possible controller problem. Reset drive. |
| DOOR LOCK ERROR | The door failed to close and lock or The door failed to remain locked during the cycle. When the error occurs, the Door Lock Solenoid will be turned off; all other outputs will be turned off. |
| SLOW FILL ERROR | Slow Fill Error. Turn off the power to the washer. Check the operation of the water valves. Check the incoming water pressure. Check for blocked or restricted water fl ow. Check to ensure the drain valve is functioning properly. |
| MEMORY ERROR | Checksum or Out of Range Error. Stop the washer and turn off all the outputs. Check VFD fault light before turning off power. Try a soft Reset of the controller with the white button. If problem persist replace PCB controller. |
| PCB ERROR 1 | Controller Internal Fault. Stop the machine and clear the cycle. Keep the door locked until the machine has stopped moving and then unlock the door. Check VFD fault light before turning off power. Try a soft Reset of the controller with the white button. If problem. Replace PCB controller. |
| PCB ERROR 2 | Controller Internal Fault. Stop the machine and clear the cycle. Keep the door locked until the machine has stopped moving and then unlock the door. The washer will not restart until the power is removed and re-applied. |
| SLOW DRAIN ERROR | Drain Error. The washer cycle will continue. Do not spin the tumbler with out reaching an empty water level. If empty water level is not reached, agitate during the normal spin time. Check VFD fault light before turning off power. Check to ensure the drain valve is operating properly (slow drain has potential to cause this code). Check to ensure the pressure switch tube is clear of any blockage, and the pressure switch is operating properly. Check the pressure switch harness. |
| SPIN STOP ERROR | Stop Error. Keep the door locked until the machine has stopped moving and then unlock the door. Check VFD fault light before turning off power. Inspect the braking resistors and measure the resistance. Check connecting wiring from braking resistor to the drive mounted in the top of the washer. Reset the drive and try again. Possibly incorrectly programmed drive. |
| DRIVE ERROR 1 | Washer size/ VFD size mismatch. Stop the machine and clear the cycle. Keep the door locked until the machine has stopped moving and then unlock the door. Check VFD fault light before turning off power. If the controller was installed in a different size machine before being installed in this machine, a problem can occur. If someone has been doing repairs on the washer, check for the correct size drive. It can also be caused by pressure switch harness. Check to ensure the correct harness in installed. The control can be reset by holding program button on controller during startup (soft reset). Check orange wire at Molex connector on controller coming from pressure switch or replace pressure switch harness. |
| DRIVE OC | VFD Over-current Fault. This error is an over-current on the VF drive. Stop the machine and clear the cycle. Keep the door locked until the machine has stopped moving and then unlock the door. |
| DRIVE OV | VFD Over-voltage Fault. This error is over-voltage on the VF drive. Delay time is 35 seconds. Stop the machine and clear the cycle. Keep the door locked until the machine has stopped moving and then unlock the door. |
| DRIVE OH | VFD Over heat Fault. This error is over-heating on the VF drive. Occurs following the “DELAY” error. Stop the machine and clear the cycle. Keep the door locked until the machine has stopped moving and then unlock the door. The washer will not restart until the power is removed and re-applied. |
| DRIVE OL | VFD Overload Fault. The washer will not restart until the power is removed and re-applied. |
| DRIVE GFI | VFD Ground Fault. Stop the machine and clear the cycle. Keep the door locked until the machine has stopped moving and then unlock the door. The washer will not restart until the power is removed and re-applied. |
| DRIVE LV | VFD Low Voltage. Stop the machine and clear the cycle. Keep the door locked until the machine has stopped moving and then unlock the door. The washer will not restart until the power is removed and re-applied. |
| DRIVE IF | VFD Internal Fault. Stop the machine and clear the cycle. Keep the door locked until the machine has stopped moving and then unlock the door. The washer will not restart until the power is removed and re-applied. |
| INVALID DRIVE | Drive is not the correct Dexter version of the Delta E-drive. |
| SECONDARY FUSE ERROR | Factory program error. The control must be re-programmed with the factory programming tool. |
| MAIN FUSE ERROR | Factory program error. When detected, the washer control shall not be operational. The control must be re-programmed with the factory programming tool. |
| DELAY | Communication loss. No exit strategy. Either communication is reestablished or the specifi c Error Code eventually occurs. |
| CRC ERROR | Firmware corrupted. When detected, the dryer control shall not be operational. The error is fatal. The control must be replaced. |
F22 – F28: These codes indicate that a component (VFD, relay PCB, injection relay PCB, water valve) has been replaced, added, or removed and you will need to soft reset the PCB controller board to reset the main controller to operate properly.
Note: Whenever power is turned off to the washer, it must remain off for three minutes for drive to reset. The washer will not operate correctly if this is done improperly. This will allow most fault codes to reset that are displayed at washer front. A fault code F-13 or F-21 will appear on front display if this procedure has not been reset correctly. Note: Should a power loss occur during cycle and then power returns, P U S H will be displayed and customer must push a temperature selection button to continue the cycle.
Normal operation of the VFD: VFD display shows operating frequency fi rst very quickly then changes to F0.0 at time power is returned. This will stay displayed until the VFD receives a command from main control PCB. (Pushing start button) A CE-10 fault will display at drive if improper communication between PCB and VFD has occurred.
Note: Resetting a fault code on front of washer: Turn the power off to machine (machine will need to remain off for up to three minutes ).
SOFT RESET : is accomplished by pushing the white button located on the Main controller PCB board and simultaneously turning power on to machine. This will reset main controller to factory default settings. Please record any modifi ed information that has been inserted in memory before attempting to Soft Reset the PCB. CE5, CE7 and CE8—Reserved by DELTA
Emergency Stop / Safety Door Lock
This machine is equipped with a Safety Door Lock that locks the door closed from when the cycle is started until the cycle is complete. The door lock prevents opening the door for up to 3 minutes if the power is interrupted during the cycle.
The Emergency Stop button pauses the washer and allows the door to be opened during the cycle after the Safety Door Lock releases. When the Emergency Stop button is pressed an alarm will sound and the display will begin counting down from “3”. If the button is released before 3 seconds elapse, the alarm will stop and the cycle will continue normally. If the Emergency Stop is held down for 3 seconds, the display will count down to “0” and the washer will begin stopping movement and water flow and begin draining water from inside the washer. Though the machine may stop wash movement quickly, it may take up to 3 minutes for the door to unlock. During that time the alarm will continue to sound. When the alarm stops, the door may be opened. The washer may be restarted by closing and latching the door, and pressing the Start button. If the washer was stopped during final extract, the cycle will be ended. If the washer is stopped for more than 1 hour, the cycle will be terminated. If the emergency stop is triggered a second time during the cycle, the cycle will be terminated.
Troubleshooting
If any of the following symptoms occur on this washer, check the suggested remedies listed below. If all probable causes have been eliminated and the symptom still exists, contact your local Dexter agent for further troubleshooting assistance.
Displayed on front of washer.
| Trouble | Probable Cause |
|---|---|
| Machine does not start | Power Supply. Check these areas: Circuit breakers, Voltage, Power leads, Power connections. Is front display LED showing a dollar amount. |
| Door Switch. Check for continuity through door switch when door is closed. If no continuity, adjust or replace door switch. | |
| Control Breaker or Fuse. Check 1.5 amp breaker or fuse for continuity. If no continuity, replace breaker or fuse. | |
| Control Transformer. Check voltage output from control transformer for 120VAC. If voltage is incorrect, replace transformer. | |
| Coin Acceptor. Check coin acceptor to make surethere is no blockage or damage. clean or replace acceptor. | |
| Check PCB board. Check all wire connections for sure contacts. | |
| Check wiring between PCB Check data cable. This is the cable with the phone type connectors on the main PCB control and the VFD. With the power removed unplug and check for damage, replug and retry washer. | |
| Check Relay PCB. Check all wire connections for sure contact. | |
| Check Door Motor. Check that 120 v power is at Motor after start button is pushed. | |
| Machine will not accept and count coins | Coin Acceptor. Check coin acceptor switch for any type of blockage or damage. Clean, adjust or replace the acceptor. |
| Power Supply. Check these areas: Circuit breakers, Voltage,Power leads, Power connection. | |
| Door Closed Safety Switch. Check door closed switch at door hinge for proper operation. | |
| Door Handle Closed Switch. Check single door closed switch at left side of door handle to close when handle is vertical. | |
| Main PCB. Replace. | |
| Door does not lock | Check display for fault code. Does Door Lock Error show on the front of display. If yes follow tests described in fault code section. |
| Door locking Motor. Check to insure that Motor is receiving 120VAC from main relay PCB. If it is, replace solenoid. | |
| Door Switch. Check for continuity through door latch switch when door closed. If no continuity, adjust or replace door switch. | |
| Door will not open | Thermoactuator. Check to see if thermoactuator(s) and/or its mechanism is stuck or binding and not allowing the door lock solenoid to open. Check to be sure that the locking thermoactuator is not receiving 120VAC during the last 1 1/2 minutes of the cycle. Also check to see that the unlocking thermoactuator is receiving 120VAC during the last minute of the cycle. If the thermoactuators do not receive voltage at the correct times, change the timer. If the timing and voltage are correct, replace the thermoactuator. |
| Door Rod. Check to see that door rod from solenoid to lock ass’y is long enough to allow lock ass’y to disengage. If not, adjust rod. | |
| Gear Motor. Check the door lock motor. Make sure the motor is not stuck or in a bind. If motor does not move freely, replace locking motor | |
| No hot water in detergent dispenser | Water Valve Coil. Check coil continuity at terminals and replace if no continuity. 120 V power only on for 20 second in wash bath. |
| Water Inlet. Check water inlet screens for blockage and clean screens if necessary. | |
| Water. Check to insure that water is turned on and operating. | |
| P-20 Wire Harness. Check black & white harness. | |
| Hot water does not enter tub in wash | Water Valve Coil. Check coil continuity at terminals and replace if no continuity. Check for 120 V power from main relay PCB |
| Water Inlet. Check water inlet screens for blockage and clean if necessary screens | |
| Water. Check to insure that water is turned on and operating. | |
| Blk or Wht wire at main controller. Check black or white wires at Molex plug on PCB at main controller and at relay PCB. | |
| Pressure Switch. Check pressure switch continuity between terminals . If no continuity, check pressure switch hose for obstruction. If hose okay, change pressure switch. | |
| No cold water to tub in wash | Water Valve Coil. Check coil continuity at terminals and replace if no continuity. |
| Water Inlet Screens. Check water inlet screens for blockage and clean if necessary. | |
| Water. Check to insure that water is turned on and operating. | |
| Blk or whit wire at controller and main relay PCB. Check black or white wires at Molex plug on PCB at main controller and at relay PCB. | |
| Pressure Switch. Check pressure switch continuity between terminal contacts. If no continuity, check pressure switch hose for obstruction. If hose okay, change pressure switch. | |
| Water comes in but level does not rise | Drain Valve (open) |
| Blk or whit wire at controller. Check black and white wires at molex plug on main PCB controller and at main relay PCB. | |
| Water does not flush softener compartment. | Water Valve Coil. Check coil continuity at terminals and replace if no continuity. |
| Water Inlet Screens. Check water inlet screens for blockage and clean if necessary. | |
| Water. Check to insure that water is turned on and operating. | |
| Water level too high | Pressure Switch. Check for blockage in pressure switch hose. Check for pressure switch opening circuit across terminals . Replace switch if contacts do not open. |
| Water drains slowly | Drain System. Check hoses and drain valve for blockage. Clean of inadequate size. if necessary. Check building drains for blockage. |
| Machine does not turn | Check VFD by removing top panel and record power or fault lights are iluminated. If the fault light is on, turn power off to machine at breaker for 2 minutes and turn poiwer back on to reset. If still no display replace VFD. |
| Machine tumbles in one direction | Remove Top cover record if power light of fault lights are displayed, wee front control for related codes. See fault code section for more info. |
| Inspect yellow enable wires from main relay PCB and at VFD. | |
| Excessive vibration | Mounting System. Check these areas: -Strength of mounting structure, concrete or base. -Mounting bolts may be loose and need tightening. |
| Drive Belt. Worn drive belt can cause vibration and noise. | |
| Loading. Note: Small loads contribute to out of balance loading and increase vibration. | |
| Machine does not spin | Check pressure switch for continuity across terminals #21 & #22 indicating pressure switch has reset to the empty position. If no continuity, change pressure switch. |
| Machine starts and does not operate | Check yellow enable wires from relay PCB P13 & motor P14to VFD advances through cycle are connected. Check fault code on VFD before removing power from the drive. Check orange P-15 wire for signal from door switches. |
| Machine does not stop | Main PCB controls time cycle at end of cycle. |
| Check braking resistors for continuity. Verify ohms resistance by Molex. | |
| Water leakage around loading door | Door may need adjustment due to abuse or wear. Check tightness around perimeter using a dollar bill. Adjust left to right tightness by shims at door lock or hinge side. It is important to center gasket to tub opening before tightening door to hinge bolts. Chalk may be used on tub front to show point of contact with tub. If gasket is deformed, worn, or damaged, replace. Refer to parts section for door gasket expander kit. |
| Machine Starts goes Directly to end of cycle | E-Stop buttor or switch. If machine says PUSH then goes directly to “0” or “00” may be bad stop Button or switch. Replace switch assembly |
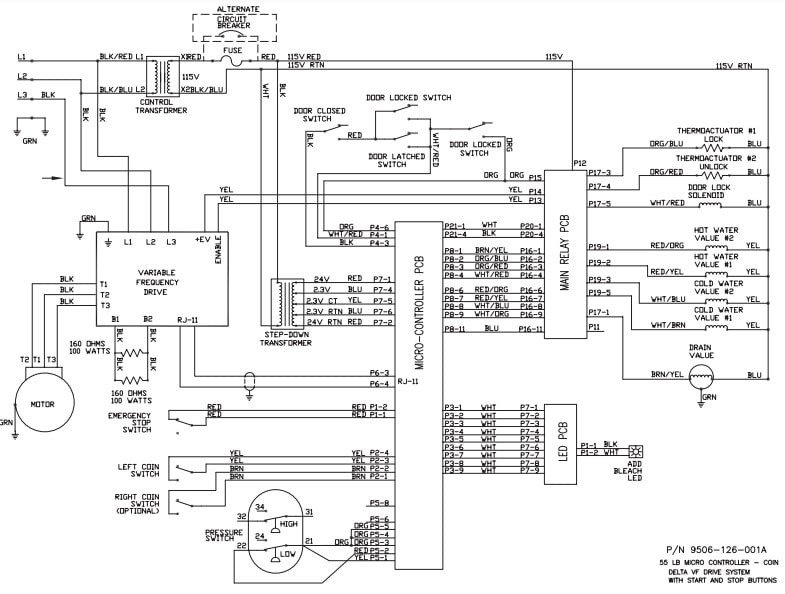
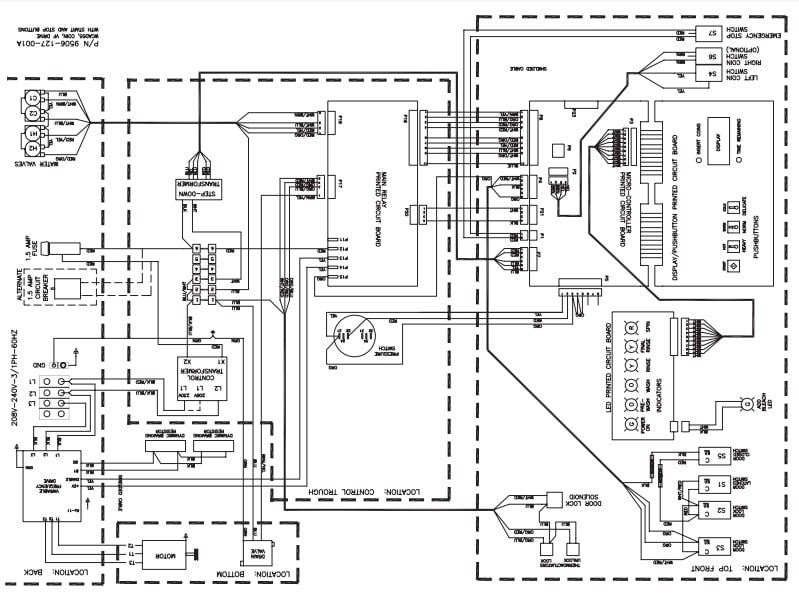
Wiring Diagrams