The cooktop operates a self-diagnostic mode when power is applied. The touch board has error codes that can be utilized by the service technician in order to quickly identify failed or improper operation of certain cooktop components. To access failure codes, simultaneously press the TIMER ON/OFF and CONTROL LOCK pads for approximately 10 seconds. Error codes will blink in the window of the corresponding element. The replacement of the failed component will clear the error code.
Whenever a failure code is encountered and before attempting to replace any components: 1. Turn off the power supply for 30 seconds, then reset it to see if this clears the failure code. 2. Verify proper voltage and orientation of the power supply wiring connections.
Most Common Codes
| Fault Codes | Possible Fixes / Service Checks |
|---|---|
| Er31 | One fi lter board not confi gured to work with the other fi lter board. Press and hold timer up key. Press and release RF on/off key. Press and release LF key. Release timer up key. Allow display to scroll horizontal bars and beep or Replace filter board. |
| Er47 | Bad communication in the ribbon cable between touch board and fi lter board. Visually check ribbon cable connection from touch board to fi lter board or Replace filter board. |
| Er39 | Internal electronic failure on touch board. Replace touch board. |
| Er20 | Internal electronic failure on touch board. Replace touch board. |
| Er22 | Internal electronic failure on touch board. Replace touch board. |
| Ec | Touch board is perceiving water or food on keypanel. Clean keypanel area. Replace touch board. |
| Eo | Rate of temperature increase is too fast or temperature at element is too high. Check if an empty pan is being heated. Check for obstruction in fan, wire connections to board. Check fan vents for air blockage. Replace element. |
| E5 | Internal electronic failure on fi lter board. Check AC coming to home >208 VAC. Replace fi lter board. |
| E6 | Internal electronic failure on generator board. Replace generator board. |
| E7 | Unknown error in system. Visually check for loose wires/connections. Replace generator module. |
| E9 | Rate of temperature increase is too fast or open sensor. Visually check sensor connection to generator board. Replace element. Replace generator board. |
| SEt | Model number not programmed into UI. Program model number via service tools. |
| F10 | Problem with LED’s on user interface. Check Power. Replace UI Board. |
| F11 | Problem with LED’s on user interface. Check Power. Replace UI Board. |
| F61 | Cannot communicate with induction module that powers left coils. Check wires connecting UI to induction Tray. Replace UI. Replace induction Tray. |
| F62 | Cannot communicate with Induction Module that powers right coils. Check wires connecting UI to induction Tray. Replace UI. Replace induction Tray. |
| F63 | Cannot communicate with induction module that powers right coils. Check wires connecting UI to induction Tray. Replace UI. Replace induction Tray. |
| F70 | User Interface key fault. Clean UI. Cycle power. Replace UI Board. |
| F76 | User Interface key fault. Clean UI. Cycle power. Replace UI Board. |
| FA0 | Fan Harness(is) not connected. Check wires connecting UI to Induction Tray. Check Fan, UI and induction Tray. Replace fan. |
| FA1 | Fan1 is not running at the correct Low speed. Check wires connecting UI to Induction Tray. Check Fan, UI and induction Tray. Replace fan. |
| FA2 | Fan1 is not running at the correct High speed. Check wires connecting UI to Induction Tray. Check Fan, UI and induction Tray. Replace fan. |
| FA3 | Fan2 is not running at the correct Low speed. Check wires connecting UI to Induction Tray. Check Fan, UI and induction Tray. Replace fan. |
| FA4 | Fan2 is not running at the correct High speed. Check wires connecting UI to Induction Tray. Check Fan, UI and induction Tray. Replace fan. |
| FA5 | Bad coil thermistor reading. Check coil thermistor and induction Tray. Replace coil. |
| FA9 | Bad coil thermistor reading. Check coil thermistor and induction Tray. Replace coil. |
| FAA | Bad coil thermistor reading. Check coil thermistor and induction Tray. Replace coil. |
| FA6 | Low or high line voltage. Check line voltage. Replace Induction Tray. |
| FA7 | Missing line frequency. Check line voltage/frequency. Replace Induction Tray. |
| FA8 | Bad induction driver (IGBT). Replace Induction Tray. |
| FAB | Bad induction driver (IGBT). Replace Induction Tray. |
| FAC | Induction microprocessor fault. Replace Induction Tray. |
Fault Codes for Electronic Control Cooktop
User Interface
F1x: UL “On” Indicator Light/LED failure. Replace Display Board (under Touch Board)
F7x: User Interface (UI) Button Matrix Error. Replace Touch Board.
F82: User Interface (UI) Microprocessor Error. Replace Display Board (under Touch Board)
Machine Control (MC)
F6x: UI cannot communicate with Machine Control. Check wires connecting UI to MC. Replace Machine Control. Replace Display Board (under Touch Board).
F81: Machine Control (MC) Microprocessor Error. Replace Machine Control.
“x” in above chart represents a number 0-9. The number represents a failed component on the board .
Flashing “F” in the Display
If a pan is removed or moved off-center from the cooking ring during the cooking process, the control will flash “F” along with the power setting. The flashing “F” indicates that the pan is no longer detected. After 30 seconds, the element will be deactivated and the display will turn off. If the pan is returned to the surface element within 30 seconds, the flashing “F” will disappear and cooking will resume.
Error Alerts (Flashing “E”/”c” and “E” “o”)
Error alerts indicate a temporary problem that may be corrected by the user.
Clear Keypad — If the display flashes “E” alternating to “c”, the keypad is sensing continuous activation of one or more keypads. Clean or clear any obstructions on the keypad area. Obstructions may be water, food spills, a utensil or other objects. To resume cooking, touch the ON/OFF pad, then select the power level.
Over Temperature — If the display flashes “E” alternating to “o”, the cooktop sensor indicates that the induction element or electronics have overheated.
Overheating of the element is caused by placing an empty pan on the element and selecting a high power level. The element sensor detects very high temperatures (above normal cooking temperatures), turns off the power and displays the error. A second potential cause of this error is a lack of cooling air to the bottom of the cooktop, which can cause overheating of the electronics. If this situation occurs, make sure the air inlet below the cooktop is unobstructed.
Touch the ON/OFF pad and allow the cooktop to cool for 30 to 45 minutes before operation can begin again. If either of these conditions persist, call for service.
IMPORTANT: If the “E” flashes alone, without alternating to a “c” or “o”, a hardware error has occurred. Call for service.
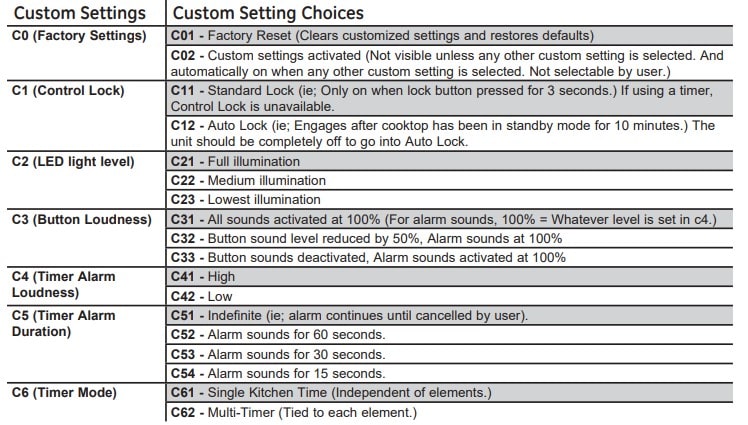
Control Lock: To unlock the cooktop: Touch and hold the CONTROL LOCK pad again for 5 seconds. A two-beep signal will sound, and the CONTROL LOCK light will go out, indicating that the cooktop is unlocked.
Troubleshooting
| Problem | Possible Cause |
|---|---|
| Surface elements will not maintain a rolling boil or cooking is slow | Improper cookware being used. Use pans that are recommended for induction, have flat bottoms and match the size of the surface element. |
| Surface elements do not work properly | Cooktop controls improperly set. Check to be sure the correct control is set for the surface element you are using. |
| Power arc ON indicator blinking | Wrong pan type. Use a magnet to check that cookware is induction compatible. |
| Scratches on cooktop glass surface | Incorrect cleaning methods being used. Use recommended cleaning procedures. |
| Areas of discoloration on the cooktop | Food spillovers not cleaned before next use. |
| Plastic melted to the surface | Hot cooktop came into contact with plastic placed on the hot cooktop. |
| Pitting (or indentation) of the cooktop | Hot sugar mixture spilled on the cooktop. |
| Unresponsive keypad | 1. Keypad is dirty. Clean the keypad. 2. A fuse in your home may be blown or the circuit breaker tripped. Replace the fuse or reset the circuit breaker. |
| Pan detection/sizing not working properly | 1. Improper cookware being used. 2. Pan is improperly placed. 3. Cooktop control improperly set. |
| Noise | Sounds you may hear: Buzzing, whistling and humming. These sounds are normal. |
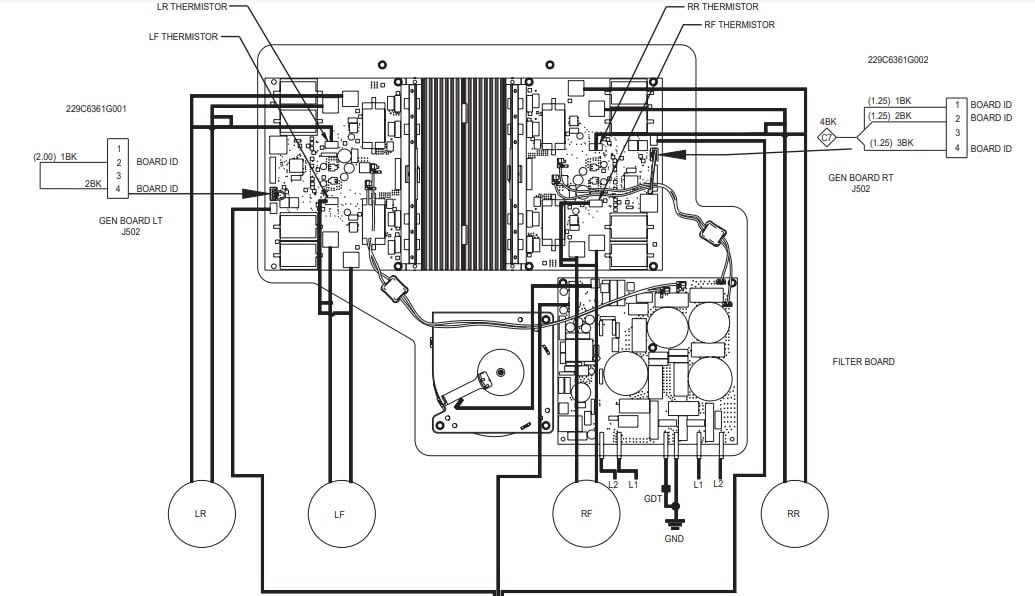
Wiring Diagram
Manual Pdf
Owner’s Manual PDF 30” and 36” Induction Cooktops For Models: ZHU30 ZHU36
Electronic Touch Control Cooktop JP950 JP980 Manual PDF
see more: geappliances.com