GE ovens, which deliver a contemporary cooking experience, can sometimes display malfunction codes that disrupt their functionality. Grasping these frequently occurring malfunction codes in GE ovens is vital, as they aid users in pinpointing the specific issue the oven is facing. This awareness empowers users to quickly and effectively address these issues, ensuring a smooth cooking experience. Here’s what you need to know about GE oven malfunction codes.
Codes List
| Error Codes | Meaning |
|---|---|
| F0 | Shorted OFF key. Determine if problem is with key panel or control by disconnecting ribbon cable and measuring flat cable pins 13-14. Should be open. Should be 100-150 ohms while pressing OFF key. |
| F1 | Oven cavity thermistor shorted. |
| F2 | Over temperature. 1-Inside oven cavity as measured by sensor over 650F unlatched or 915F latched. 2-Cooling fan stall while oven above 650F open thermal switch in yellow leads. Correction: -Welded relay contacts. -Cooling fan stalled or blocked. -Air flow to rear of unit. -High resistance in oven sensor leads/connectors. |
| F3 | Open oven sensor. (Over 2900 ohms) -Disconnect power. Disconnect sensor harness from control. Measure sensor resistance (white leads) to be 1080 ohms at room temperature with 2 ohms per deg change. -Look for damaged harness terminals if not a bad sensor. |
| F4 | Shorted oven sensor (under950 ohms). -Disconnect power. Disconnect sensor harness from control. Measure sensor resistance (white leads) to be 1080 ohms at room temperature with 2 ohms per deg change. -Separate sensor from harness to determine fault. |
| F5 | Sensor circuit supervisor failure. Replace control. |
| F6 | High cavity temperature detected during microwave oven cooking. |
| F7 | Shorted matrix or start key. Determine if problem is with key panel or control by disconnecting ribbon cable and power up control. If no F code problem is with key circuit. |
| F8 | EEPROM data shift failure. If repeated, replace control. |
| F9 | Cooling fan stall while oven above 650F open thermal switch in yellow leads. Cooling fan or air flow to control area. |
| FF | Loss of door motor safety circuit. Replace control. |
| F76 | Touch control panel has failed. |
| SF | Oven control pads were not pressed properly. The BAKE and BROIL HI/LO pads must be pressed at the same time and held for 3 seconds. |
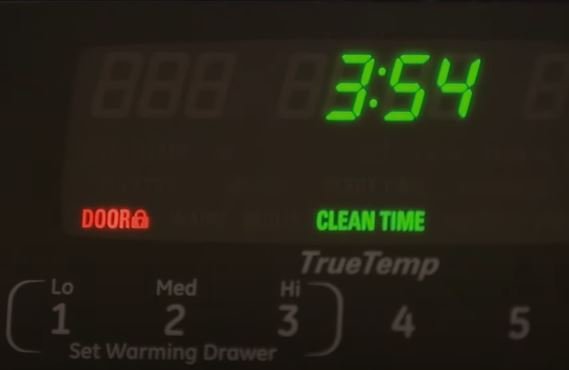
| LOCK DOOR | The self-clean cycle has been selected but the door is not closed. Close the oven door. |
Self Clean Instructions
- Press the SELF CLEAN STD/LOW pad once for a 4-hour clean time or twice for a 3-hour clean time. A 3-hour self-clean time is recommended for use when cleaning small, contained spills. A self-clean time of 4 hours or longer is recommended for a dirtier oven.
- If a time other than 4 hours or 3 hours is needed, use the HOUR and MIN + or – pads and enter the desired clean time. You can change the clean time to any time between 3 hours and 5 hours, depending on how dirty your oven is.
- Press the START pad.
The door locks automatically. The display will show the clean time remaining. It will not be possible to open the oven door until the temperature drops below the lock temperature and the LOCKED light goes off. When the LOCKED light goes off, you will be able to open the door.
The word LOCK will flash and the oven control will signal if you set the clean cycle and forget to close the oven door.
To stop a clean cycle, press the CLEAR/OFF pad. When the LOCKED light goes off indicating the oven has cooled below the locking temperature, you will be able to open the door.
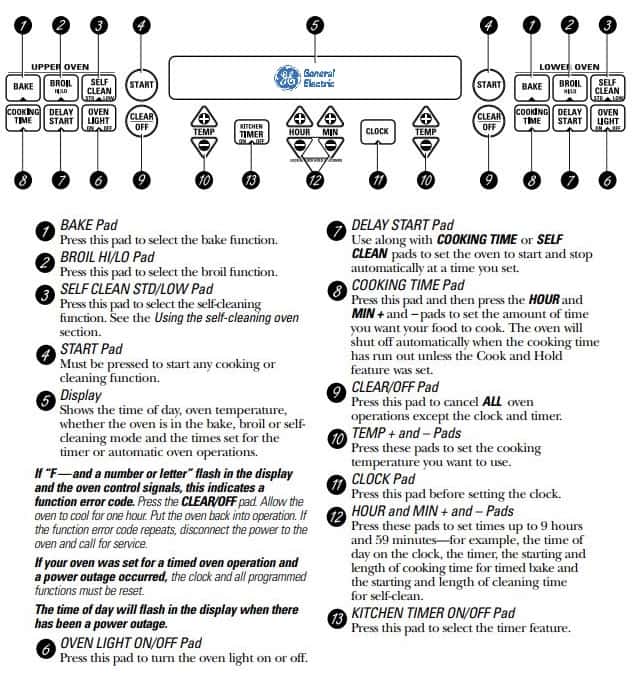
Control Panel
Troubleshooting
| Trouble | Possible Causes |
|---|---|
| Control signals after entering cooking time or delay start. | You forgot to enter a bake temperature or cleaning time. Press the BAKE pad and desired temperature or the SELF CLEAN STD/LOW pad and desired clean time. |
| Food does not bake or roast properly. | -Oven controls improperly set. -Shelf position is incorrect or the shelf is not level. -Incorrect cookware or cookware of improper size being used. -Oven thermostat needs adjustment. |
| Food does not broil properly | -Oven controls improperly set. -Improper shelf position being used. -Food being cooked in a hot pan. -Cookware not suited for broiling. -Aluminum foil used on the the broiling pan and grid has not been fitted properly and slit as recommended. -In some areas the power (voltage) may be low. Preheat the broil element for 10 minutes. |
| Clock and timer do not work | -A fuse in your home may be blown or the circuit breaker tripped. Replace the fuse or reset the circuit breaker. -Oven controls improperly set. |
| Oven light does not work | -Light bulb is loose or defective. Tighten or replace the bulb. -Pad operating light is broken. |
| Oven temperature too hot or too cold | Oven thermostat needs adjustment. |
| Oven will not work | -A fuse in your home may be blown or the circuit breaker tripped. Replace the fuse or reset the circuit breaker. -Oven controls improperly set. |
| Oven will not self-clean | -The oven temperature is too high to set a self-clean operation. Allow the oven to cool and reset the controls. -Oven controls improperly set. |
| “Crackling” or “popping” sound | This is the sound of the metal heating and cooling during both the cooking and cleaning functions. This is normal. |
| Excessive smoking during clean cycle | Excessive soil. Press the CLEAR/OFF pad. Open the windows to rid the room of smoke. Wait until the LOCKED light goes off. Wipe up the excess soil and reset the clean cycle. |
| Oven door will not close open after a clean cycle | Oven too hot. Allow the oven to cool below locking temperature. |
| Oven not clean after a clean cycle | -Oven controls improperly set. -Oven was heavily soiled. Clean up heavy spillovers before starting the clean cycle. Heavily soiled ovens may need to self-clean again or for a longer period of time. |
| LOCKED light is on when you want to cook | The oven door is locked because the temperature inside the oven has not dropped below the locking temperature. Press the CLEAR/OFF pad. Allow the oven to cool. |
| Display goes blank | -A fuse in your home may be blown or the circuit breaker tripped. Replace the fuse or reset the circuit breaker. -The clock is in the black-out mode. |
| Display flashes | Power failure. Reset the clock. |
| Power outage, clock flashes | Power outage or surge. Reset the clock. If the oven was in use, you must reset it by pressing the CLEAR/OFF pad, setting the clock and resetting any cooking function. |
| “Burning” or “oily” odor emitting from the vent | This is normal in a new oven and will disappear in time. To speed the process, set a self-clean cycle for a minimum of 3 hours. |
| Strong odor | An odor from the insulation around the inside of the oven is normal for the first few times the oven is used. This is temporary. |
| Fan noise | A cooling fan may automatically turn on. This is normal. The cooling fan will turn on to cool internal parts. It may run for up to 1-1/2 hours in 30″ models and up to 2 hours in 27″ models after the oven is turned off. |