Hoover oven error codes are essential for users as they provide quick insights into the appliance’s operational status. Each code can help identify potential issues with your oven, making it crucial for Hoover oven owners. In this article, we will delve into Hoover oven error codes and provide guidance on troubleshooting them.
Codes List
| Error Codes | Solution |
|---|---|
| ER01 | Faulty communication between PCBs |
| ER02 | Faulty programme selector switch |
| ER03 | Faulty programme selector switch |
| ER04 | NTC Temp sensor on mother board open circuit |
| ER05 | NTC Temp sensor on mother board short circuit |
| ER06 | Temperature on mother board exceeded 85C |
| ER07 | NTC food temp probe short circuit |
| ER08 | NTC food temp probe open circuit |
| ER09 | NTC food temp probe exceeded 85c |
| ER10 | NTC oven probe open circuit |
| ER11 | NTC oven probe short circuit |
| ER12 | Oven case temp exceeded 300C |
| ER13 | Preset temp of cooking was not reached within 105 minutes |
| ER14 | Mechanical timer open circuit |
| ER15 | Door sensing switch open circuit |
| ER16 | NTC temp probe on display board open circuit |
| ER17 | NTC temp probe on display board short circuit |
| ER18 | Display board temp exceeded 75C |
| ER19 | Severe malfunction of EPROM on mother board |
| ER20 | Software error on cooking recipe file |
| STOP | Some Hoover ovens have a child safety lock feature, depending on the specification. This is a safety lock to prevent children from switching on the oven and burning themselves when it gets hot. If this is active then the oven will not switch on and a lock symbol will be flashing. Child Lock function is deactivated by touching touchpad Set (+) again for a minimum of 5 seconds until the Child Lock symbol switches off. From this moment on all functions are selectable again. |
Control Panel


Troubleshooting
| Trouble | Possible Cause and Solution |
|---|---|
| The oven does not heat up | The clock is not set. Set the clock. |
| No reaction of the touch user interface | Steam and condensation on the user interface panel. Clean with a microfiber cloth the user interface panel to remove the condensation layer. |
| The oven does not heat up | The child lock is on. Deactivate the child lock. |
| The oven does not heat up | A cooking function and temperature has not been set. Ensure that the necessary settings are correct. |
Steam Cleaning

This procedure uses steam to help remove remaining fat and food particles from the oven.
- Pour 300 ml of water into the bottom of the oven.
- Set the oven function to Static or Bottom heater.
- Set the temperature at 90°C.
- Allow the program to operate for 30 minutes.
- After 30 minutes switch off the program and allow the oven to cool down.
- When the appliance is cool, clean the inner surfaces of the oven with a cloth.
Warning: Make sure that the appliance is cool before you touch it. Care must be taken with all hot surfaces as there is a risk of burns. Use distilled or drinkable water.
Removal And Cleaning Of The Side Racks
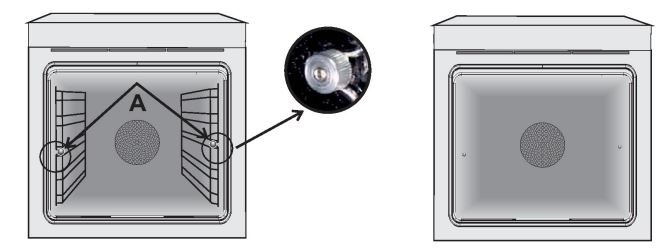
- Unscrewthe bolt in an anti-clockwise direction.
- Remove the side racks by pulling them to wards you.
- Clean the side racks in a dishwasher or with a wet sponge and then dry them immediately.
- Having cleaned the side racks, put them back in and reinsert the bolts, ensuring that they are fully tightened.

Removal Of The Oven Window
- Open the front window.
- Open the clamps of the hinge housing on the right and left side of the front window by pushing them down wards.
- Replace the window by carrying out the procedure in reverse.
Changing The Bulb
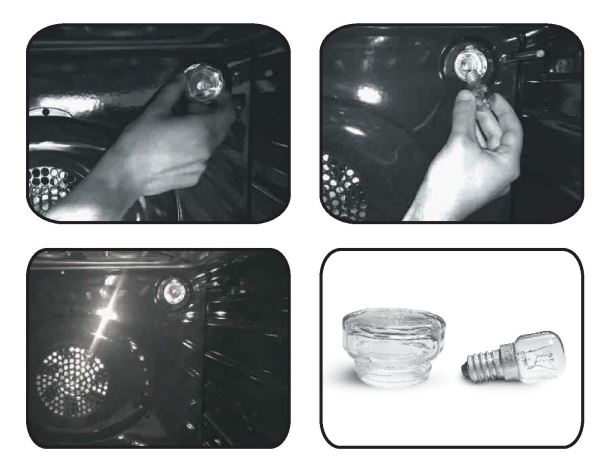
- Disconnect the oven from the mains supply.
- Undothe glass cover, unscrew the bulb and replace it with a new bulbof the same type.
- Once the defective bulb is replaced, replace the glass cover.


