The Instant Pot is a popular multi-cooker appliance that can be used for various cooking tasks. While it is generally reliable, there are instances where error codes may appear on the display. Here are some common Instant Pot error codes and their meanings.
Codes List
| Error Codes | Meaning |
|---|---|
| C1 | Faulty temperature sensor. |
| C2 | Faulty temperature sensor. |
| C5 | 1. Temperature is too high because inner pot is not placed into the cooker base. Insert the inner pot properly. 2. Temperature is too high because there is no water in inner pot. Put food and water in the inner pot. |
| C6 | Faulty pressure sensor. |
| C7 | 1. Heating element has failed. 2. Not enough liquid. Add thin, water-based liquid to the inner pot according to its size. 3. Quick release switch is in the Vent position. Move the quick release switch to the Seal position. |
| C8 | Incorrect inner pot is used. Only use a stainless-steel Pro Series inner pot with easy grip handles with the Pro. |
| C9 | If the power and sensor parts are not fully connected, you may get a Lid message or C9 error. Failure to ensure a proper connection could result in damage to the cooker. |
| C6H | Faulty HIGH pressure sensor. |
| C6L | Faulty LOW pressure sensor. |
| Lid | Lid is not in the correct position for the selected program. Close the lid for pressure cooking or open the lid for sauteing. |
| burn | Indication of overheating. The cooker has reduced the heating temperature, and may not reach cooking pressure. Starch deposits at the bottom of the inner pot might have clogged heat dissipation. Stop the cooker and inspect the bottom of the inner pot. |
| noPr | Working pressure is not reached during pre-heating cycle. If the lid leaks steam, please see Problems 3, 4, 5 and 6. If there is no steam leaking and you have frozen food in the cooker, please run the current program again. |
| Ovht | Overheating is detected on the inner pot. Please stop the program and check if the food at the bottom of the inner pot is burnt. |
| PrSE | Pressure has accumulated during a non-pressure cooking programme. Move the quick release switch to the Vent position. |
| C3-C4 | Faulty sensor. |
Control Panel
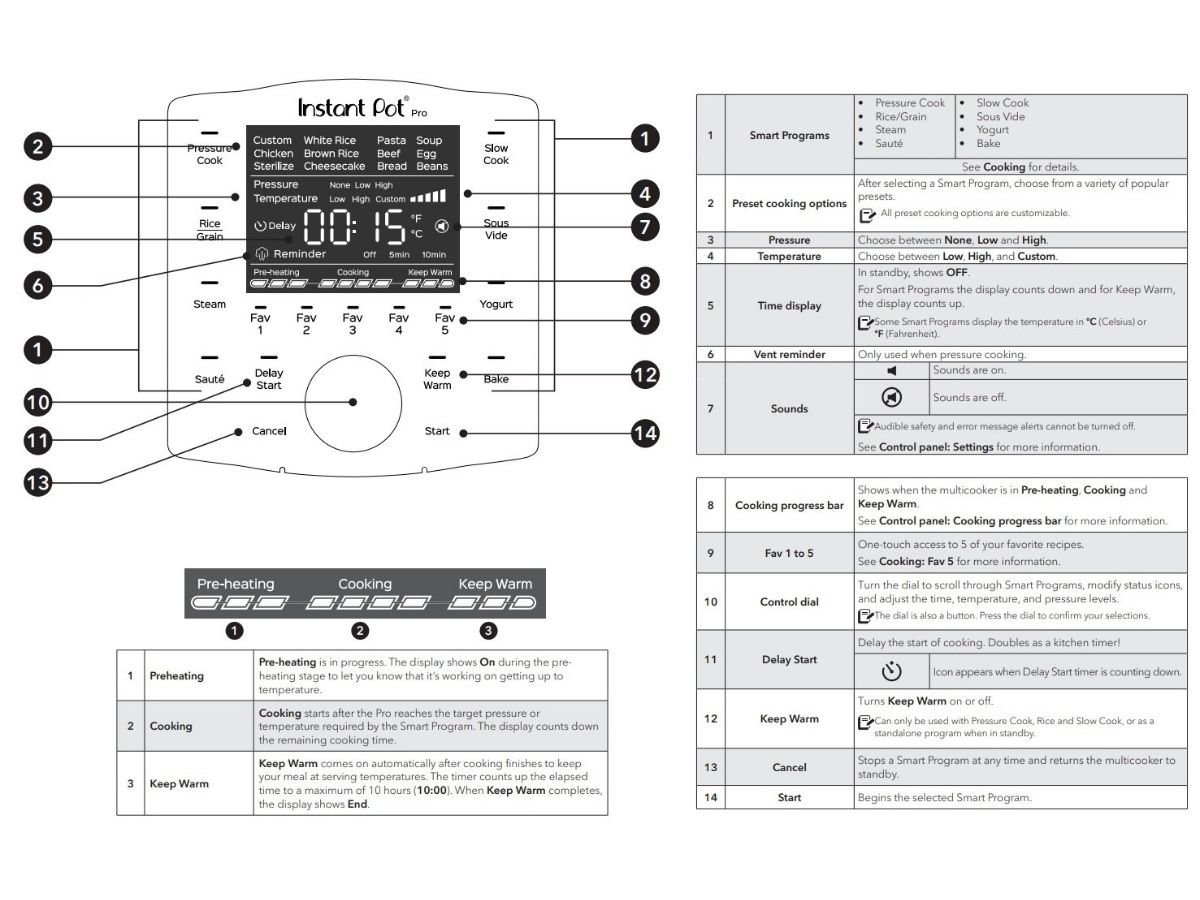
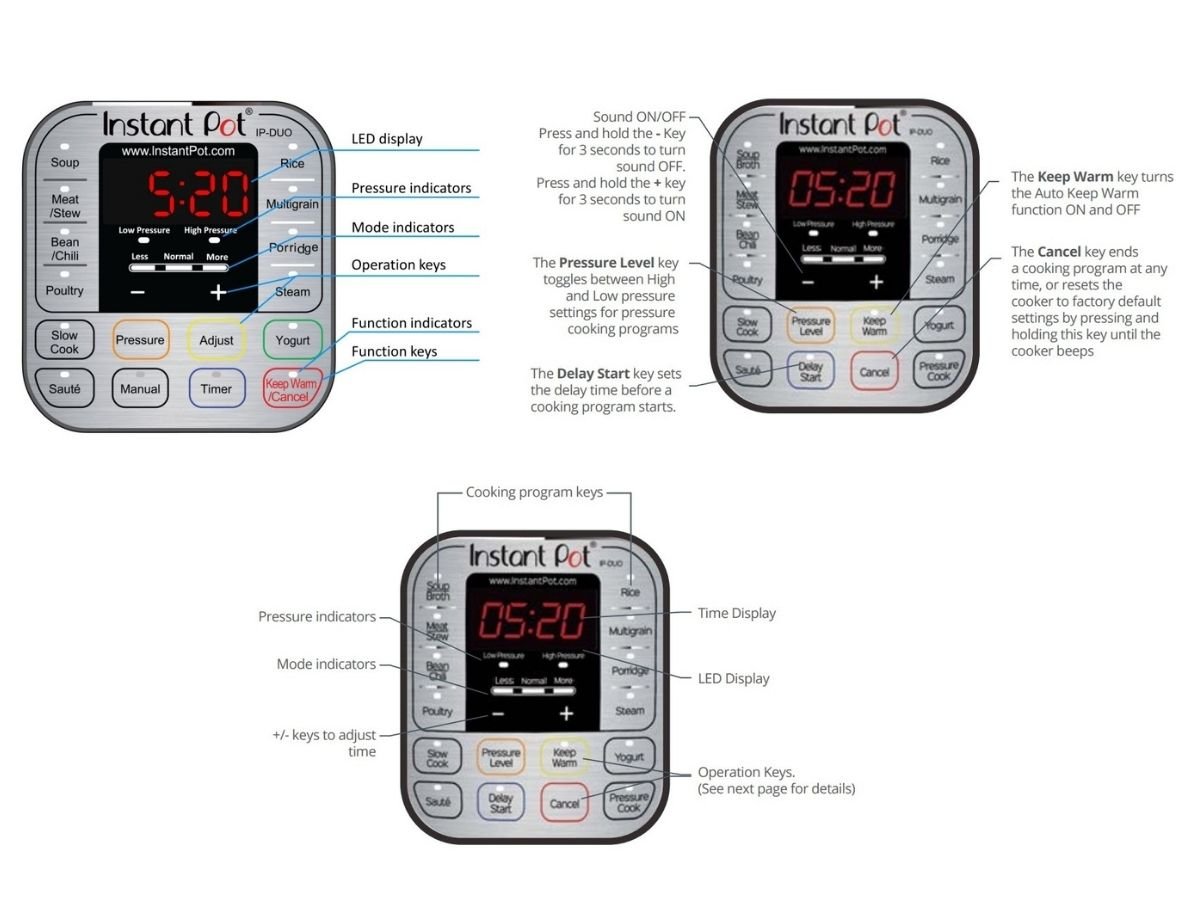
Care, Cleaning and Maintenance
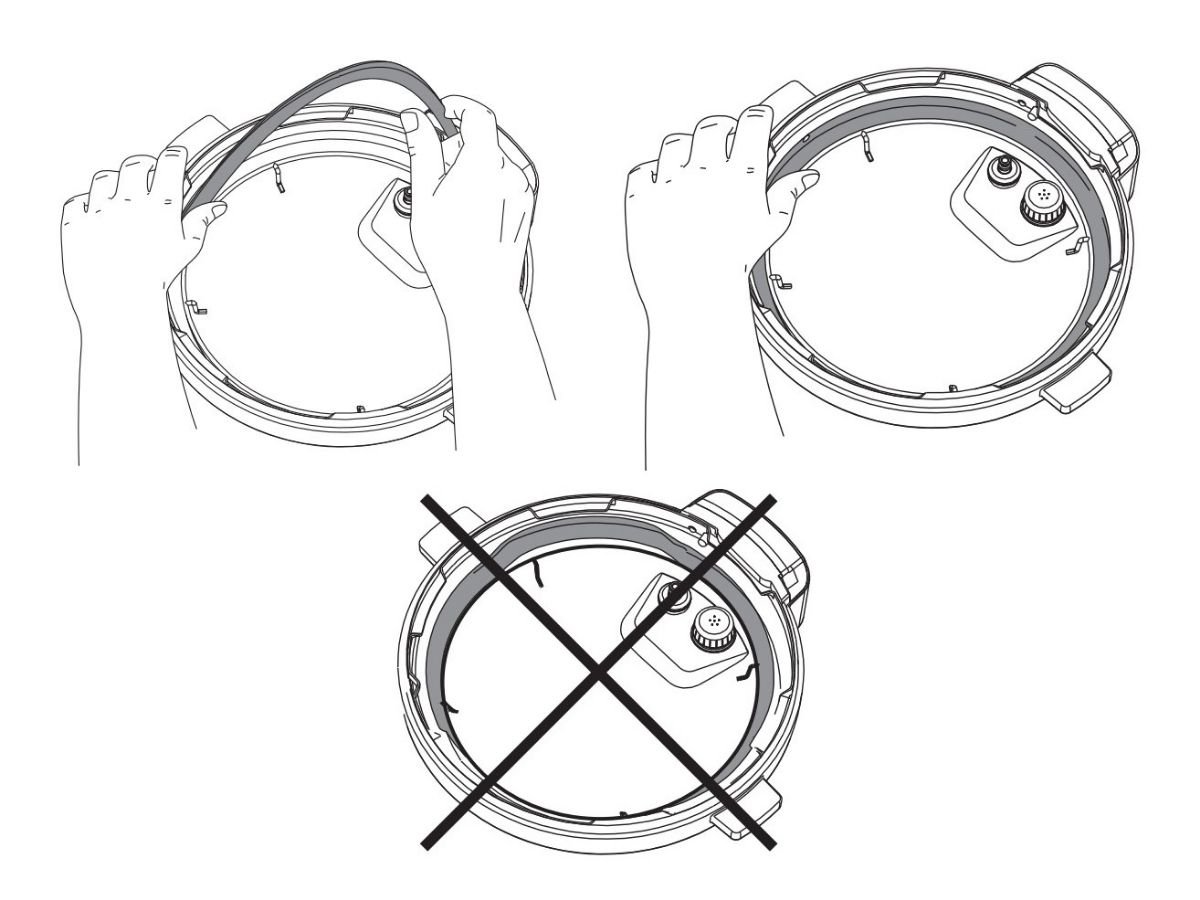
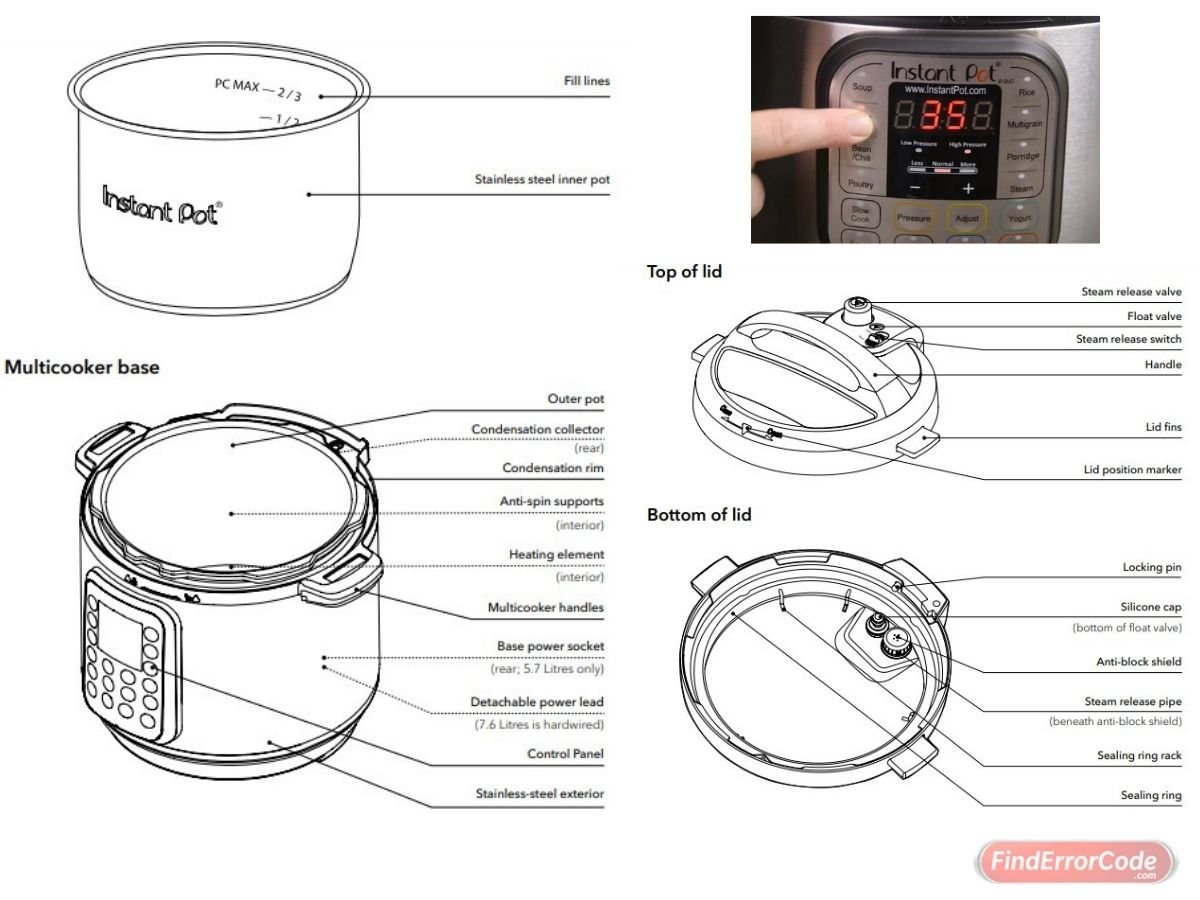
Remove the sealing ring: Grip the edge of the silicone and pull the sealing ring out from behind the circular stainless-steel sealing ring rack. With the sealing ring removed, check the ring rack to make sure it is secured, centered, and an even height all the way around the lid. Do not attempt to repair a deformed ring rack. The sealing ring is easiest to remove and install when it is wet and soapy.
Install the sealing ring: Place the sealing ring over the sealing ring rack and firmly press it into place. Make sure there’s no puckering. It should be snug behind the sealing ring rack. It may wiggle a bit but shouldn’t fall out when you turn over the lid.
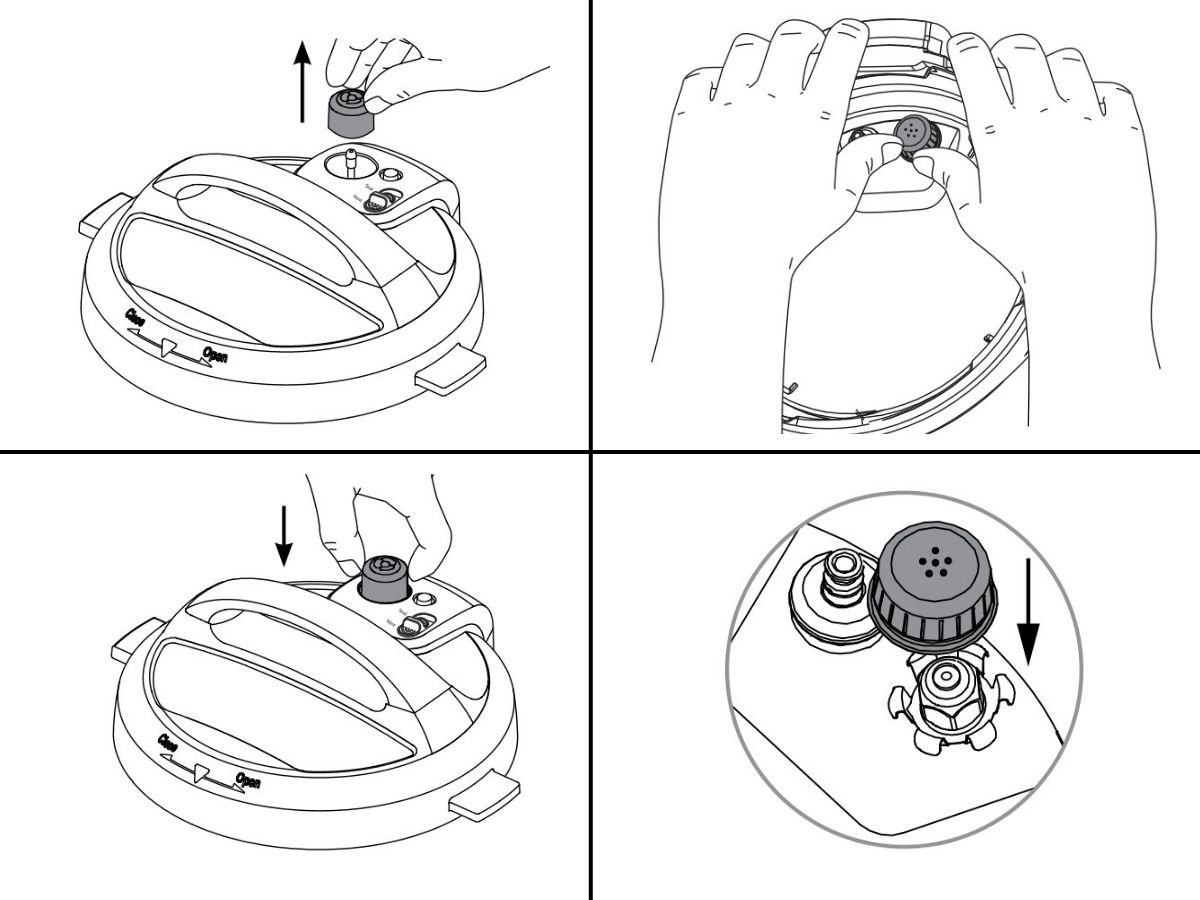
Remove the steam release valve: Pull the steam release valve up and off the steam release pipe. The steam release valve must be installed before using the cooker.
Install the steam release valve: Place the steam release valve on the steam release pipe and press down firmly. The steam release valve sits loosely on the steam release pipe when installed properly but should remain in place when the lid is turned over.
Remove the anti-block shield: Grip the lid like a steering wheel and use your thumbs to press firmly against the side of the anti-block shield (pressing towards the side of the lid and up) until it pops off the prongs underneath.
Install the anti-block shield: Place the anti-block shield over the prongs and press down until it snaps into position. Do not attempt to operate the pressure cooker without the anti-block shield installed.
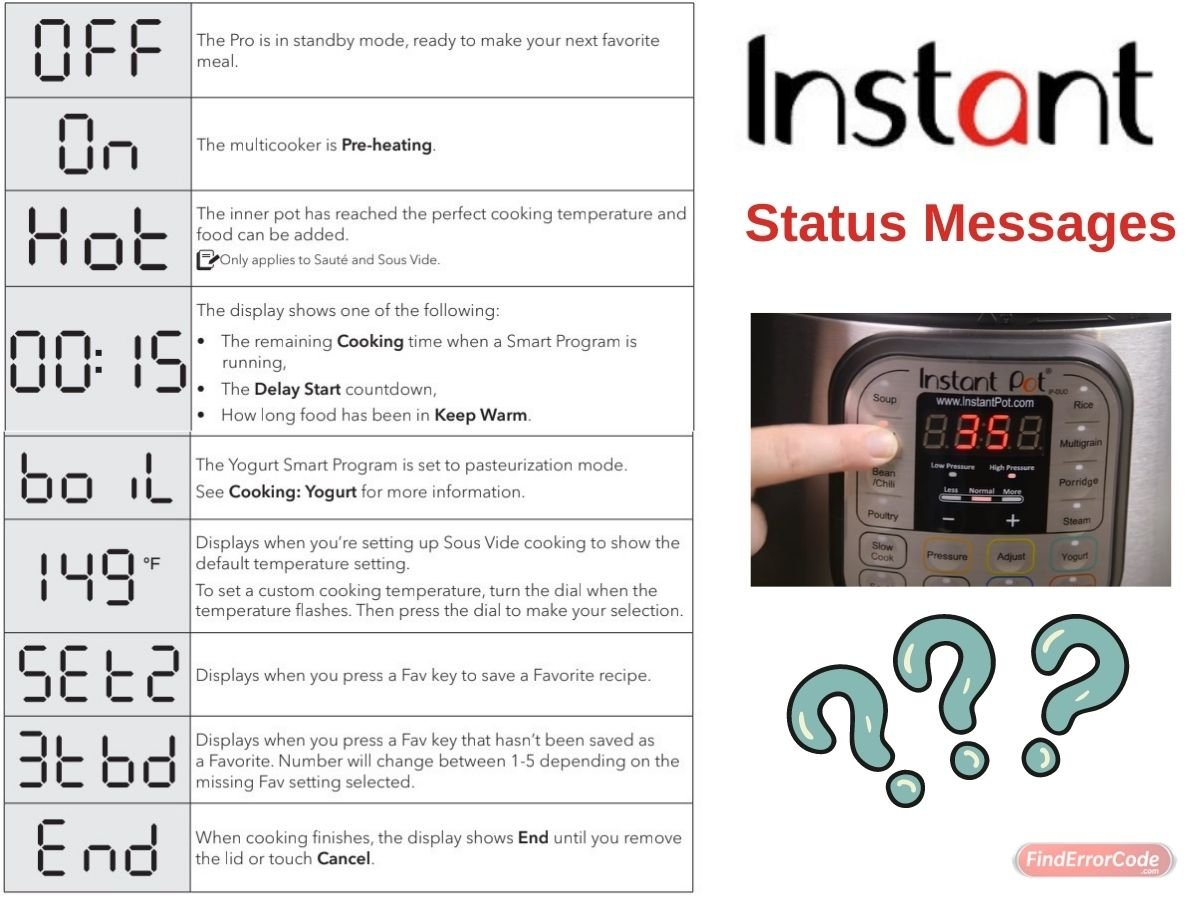
Status Messages Meaning
Troubleshooting
| Problem | Possible reason and Solution |
|---|---|
| Occasional clicking or light cracking sound. | 1. The sound of power switching and expanding pressure board when changing temperatures. This is normal; no action needed. 2. Bottom of the inner pot is wet. Wipe exterior surfaces of the inner pot. Make sure the heating element is dry before inserting the inner pot back into the multicooker base. |
| Difficulty closing the lid. | 1. Sealing ring is not properly installed. Reposition the sealing ring. Make sure it is snug behind the sealing ring rack. 2. Float valve is in the popped-up position. Gently press the float valve downward with a long utensil. 3. Contents in multicooker are still hot. Hold the quick release switch in the Vent position as you lower the lid onto the multicooker base slowly, allowing heat to dissipate. |
| Difficulty opening the lid. | Contents may be under pressure. To avoid scalding injury, Do not attempt to force the lid open. 1. Pressure inside the multicooker. Release pressure according to recipe. Only open the lid after the float valve has dropped down. 2. Float valve stuck in the popped-up position due to food debris or residue. Release pressure completely, then tap the float valve gently with a long utensil. You may need to allow the multicooker to cool slightly so all pressure can be released. Open the lid cautiously, then thoroughly clean the float valve, surrounding area, and lid before next use. |
| The inner pot is stuck to the lid when the multicooker is opened. | Cooling of the inner pot may create suction, causing the inner pot to adhere to the lid. To release the vacuum, move the quick release switch to the Vent position. |
| Steam leaks from side of lid. | 1. No sealing ring in the lid. Install a sealing ring. 2. The sealing ring is damaged or not installed properly. Replace the sealing ring. 3. Food debris attached to the sealing ring. Remove the sealing ring and clean it thoroughly. 4. The lid is not closed properly. Open, then close the lid. 5. The sealing ring rack is warped or off-center. Remove the sealing ring from the lid, then check the sealing ring rack for bends or warps. Contact Customer Care. 6. The inner pot rim may be misshapen. Check for deformation and contact Customer Care. |
| Rice too soft. | Too much water. Adjust dry-rice and water ratio according to recipe. |
| Intermittent beeping after the cooker starts for a while. | Indication of overheating. The cooker has reduced the heating temperature, and may not reach cooking pressure. Possibly starch deposits at the bottom of the inner pot, which have clogged heat dissipation. Stop the cooker and inspect the bottom of the inner pot. |
| Steam leaks from float valve for over 2 minutes. | 1. Food debris on the float valve silicone seal. Clean the float valve silicone seal. 2. Float valve silicone ring wornout. Replace the float valve silicone ring. |
Parts and Accessories
Manual Pdf
Instant Pot Pro Duo Plus Multi Use Pressure Cooker Manual PDF
Contact Helpdesk
If you experience any problems with the cooker, need technical assistance or product return information, please contact the Instant Pot support team using the methods below:
Create a support ticket: www.InstantPot.com/support/
Email: support@instantpot.com
Call 1-800-828-7280 for the customer care team.

