KitchenAid ovens are equipped with various error codes to provide functionality and safety to users. These codes monitor the oven’s operation and detect potential issues. Users can use these codes to diagnose problems more quickly while monitoring their oven’s performance. Error codes can indicate issues related to the oven’s temperature controls, fan operation, door lock, and other critical functions. By utilizing these codes, users can ensure the longer-lasting and more reliable use of Kitchenaid ovens.
Most Common Codes
| Fault Codes | Solutions |
|---|---|
| f0 | Default F code-No failure. Will only be displayed if user presses and holds “0” key for 5 seconds and there are no preexisting faults. Press CANCEL to clear display |
| f1e | Electronic control malfunction. Replace control. |
| f2e0 | Key held down too long, or key is shorted. 1. Check keypad connector for firm connection. 2. Press CANCEL. If error code returns after 60 sec., replace keypad. 3. Replace control. |
| f2e1 | Keypad keytail not connected. 1. Check keypad connector for firm connection. 2. Press CANCEL. If error code returns after 60 sec., replace keypad. 3. Replace control. |
| f2e5 | Cancel key drive line open. 1. Check keypad connector for firm connection. 2. Press CANCEL. If error code returns after 60 sec., replace keypad. 3. Replace control. |
| f3e0 | Temperature sensor opened. 1. Check sensor connection. 2. Measure sensor resistance (1080Ω at 21°C [70°F]; add 2Ω per degree). If resistance is not valid, replace sensor. 3. If sensor resistance and connections are good, then the oven cavity temperature must have exceeded a safe level. Check for welded-closed relays on the control. |
| f3e1 | Temperature sensor shorted. 1. Check sensor connection. 2. Measure sensor resistance (1080Ω at 21°C [70°F]; add 2Ω per degree). If resistance is not valid, replace sensor. 3. If sensor resistance and connections are good, then the oven cavity temperature must have exceeded a safe level. Check for welded-closed relays on the control. |
| f3e2 | Oven temp too high (over 301°C [575°F] in Cook mode). 1. Check sensor connection. 2. Measure sensor resistance (1080Ω at 21°C [70°F]; add 2Ω per degree). If resistance is not valid, replace sensor. 3. If sensor resistance and connections are good, then the oven cavity temperature must have exceeded a safe level. Check for welded-closed relays on the control. |
| f3e3 | Oven temp too high (over 510°C [950°F] in Clean mode). 1. Check sensor connection. 2. Measure sensor resistance (1080Ω at 21°C [70°F]; add 2Ω per degree). If resistance is not valid, replace sensor. 3. If sensor resistance and connections are good, then the oven cavity temperature must have exceeded a safe level. Check for welded-closed relays on the control. |
| f4e1 | Meat probe malfunction - shorted. 1. Disconnect meat probe and measure probe resistance: (78kΩ at 15.6°C [60°F]; 37kΩ at 32.2°C [90°F] ). If resistance is not valid, replace probe. 2. Insert probe and check for a firm connection between probe and jack (in oven cavity). 3. Check connection between jack and harness (in rear of oven). |
| f5e0 | Door is open, but latch is locked (condition exists when door switch is closed indicating an open door, and latch switch is closed indicating a locked door) 1. Check the latch assembly. 2. Check the Latch Solenoid. 3. Check the Latch Switch: Disconnect it and use a continuity tester. 4. Check Door Open/Closed Switch. Disconnect it and use a continuity tester. 5. Check power and element connections. |
| f5e1 | Self clean latch will not lock. 1. Check the latch assembly. 2. Check the Latch Solenoid. 3. Check the Latch Switch: Disconnect it and use a continuity tester. 4. Check Door Open/Closed Switch. Disconnect it and use a continuity tester. 5. Check power and element connections. |
| f5e5 | Self clean temperature (288°C [550°F] ) not reached within 45 minutes. 1. Check the latch assembly. 2. Check the Latch Solenoid. 3. Check the Latch Switch: Disconnect it and use a continuity tester. 4. Check Door Open/Closed Switch. Disconnect it and use a continuity tester. 5. Check power and element connections. |
| f5e7 | Self clean latch will not unlock. 1. Check the latch assembly. 2. Check the Latch Solenoid. 3. Check the Latch Switch: Disconnect it and use a continuity tester. 4. Check Door Open/Closed Switch. Disconnect it and use a continuity tester. 5. Check power and element connections. |
| f6e0 | Return line not connected. If switch pulse return line is not connected, electronic control will display F6 within 60 seconds after power up. Replace control. |
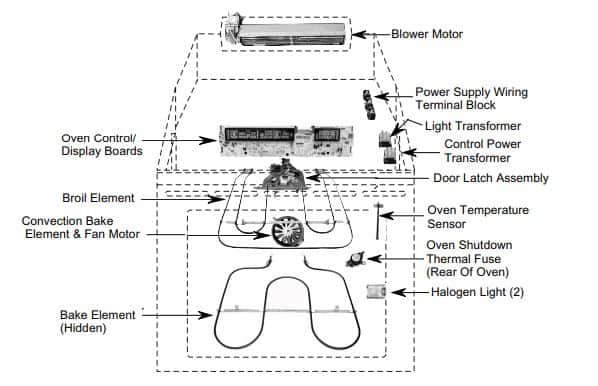
Parts Meaning
Removing & Reinstalling The Oven Door
Do not remove the shipping base or the shipping feet at the front lower corners of the oven. The shipping feet will protect the lower oven trim until the oven is inserted into the cabinet cutout.
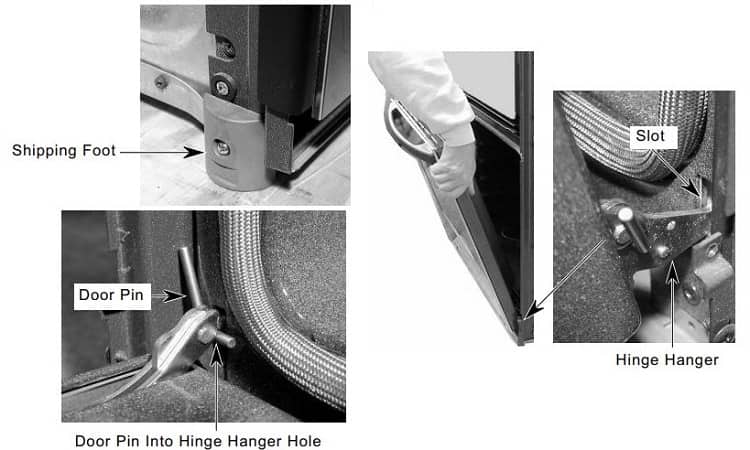
To remove the oven door:
1. Install a pin in the hole of each oven door hinge hanger.
2. Close the oven door as far as the two pins will allow.
3. Grasp the sides of the door and lift the door until it stops, then pull the hinge hangers out of the slots.
To reinstall the oven door:
1. Grasp the sides of the door and tilt it back at a slight angle, then insert the hinge hangers into the hinge slots as far as they will go.
2. Rotate the top of the door towards the oven so the hinge hangers fit onto the support pins.
3. Close the oven door as far as the pins will allow, and make sure that the hinge hangers are fully seated on the support pins. If they are not seated properly, the door will not close tightly and may be off-center. To seat the hinge hangers, open the door slightly, and push in on the bottom until the hangers are fully seated.
4. Open the oven door to its fully open position and remove the two hinge hanger pins.
5. Close the oven door completely and check it for proper operation and alignment.
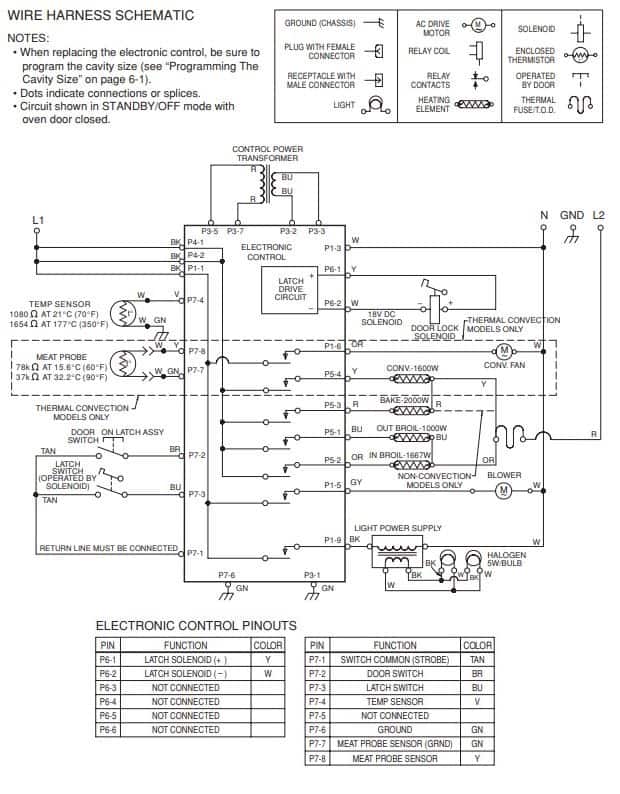
Wiring Diagram & Strip Circuits
Fahrenheit (°F) To Celsius (°C) Conversion
The default is Fahrenheit (° F).
1. Press the BROIL pad for 5 seconds. The temperature will be displayed in degrees Celsius indicated by the “C” in the temperature display.
2. To return the display to degrees Fahrenheit press the BROIL pad again for 5 seconds. “F” will show in the temperature display.
Troubleshooting
Always disconnect the power to the unit before touching the internal parts of the oven. Upon replacement, immediately return the old electronic oven control. Use the mailing label that is supplied with each new control.
| Trouble | Cause |
|---|---|
| Nothing will operate | Has a household fuse blown, or has a circuit breaker tripped? Replace the fuse or reset the circuit breaker. If the problem continues, call an electrician. |
| Is the appliance wired properly? See Installation Instructions. | |
| Display shows messages | Is the display showing a letter followed by a number? Clear the display. See “Display(s)” section. If a letter followed by a number reappears, call for service. |
| Self-Cleaning cycle will not operate | Is the oven door open? Close the oven door all the way. |
| On double oven models, is one oven self-cleaning? When one oven is self-cleaning, the other oven cannot be set to self-clean. | |
| Oven will not operate | On double oven models, is one oven self-cleaning? When one oven is self-cleaning the other oven cannot be set or turned on. |
| On double oven models, has the correct oven been selected? Choose UPPER OVEN or LOWER OVEN first. | |
| Oven cooking results not what expected | Is the proper temperature set? Double-check the recipe in a reliable cookbook. |
| Is the batter evenly distributed in the pan? Check that batter is level in the pan. | |
| Are baked items too brown on the bottom? Move rack to higher position in the oven. | |
| Are pie crust edges browning early? Use aluminum foil to cover the edge of the crust and/or reduce baking temperature. | |
| Warm air coming from oven vent | Warm air coming from the oven vent is normal. During a selfclean cycle the air stream is increased. |
| Is the proper length of time being used? Adjust cooking time. | |
| Has the oven door been opened while cooking? Oven peeking releases oven heat and can result in longer cooking times. |
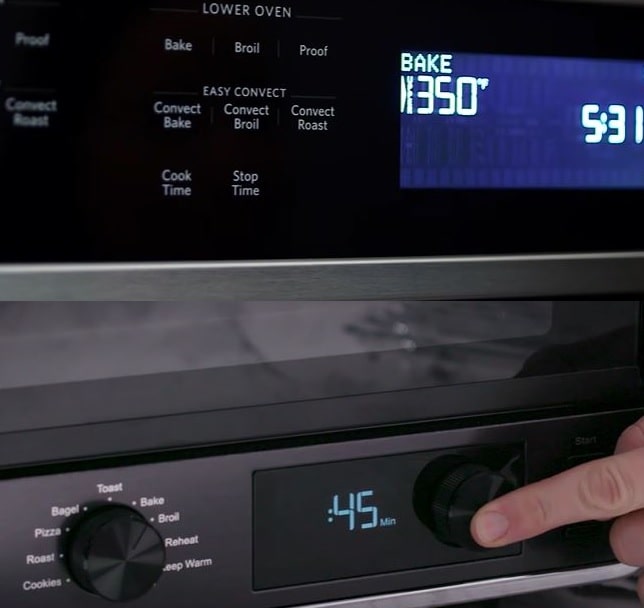
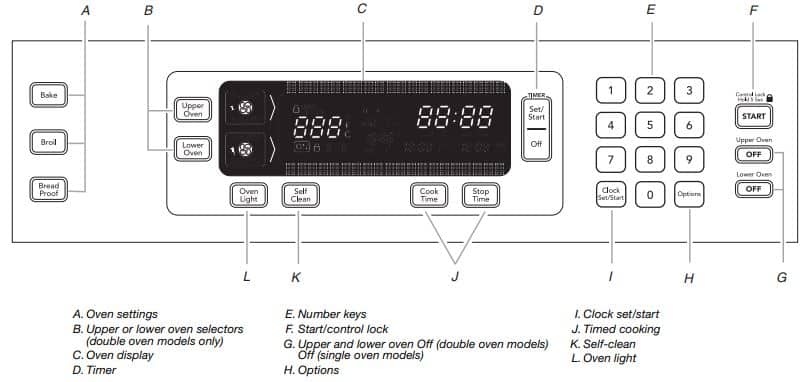
Control Panel Buttons Meaning
Manual Pdf
KitchenAid Built-in Electric Single And Double Ovens Use & Care Guide PDF