Westinghouse Electric Corporation was founded in 1886, by Geroge Westinghouse. Originally called Westinghouse Electric & Manufacturing Company – was renamed in 1945. While the company went through a great deal of transactions, it is still standing strong. Offering a range of staggering built-in and freestanding dishwashers.
The Westinghouse dishwasher is a family-friendly choice that offers you a quick and easy solution. Allowing you to cut down your time and efforts in the kitchen, it focuses on offering smart solutions. Available in various sizes and models these dishwashers are an easy addition to your kitchen.
Dishwashers are a lifesaver, but one that needs at least minimal upkeep or you will face errors. For those of you who are unable to run the next load due to an error, we have exactly what you need. To help you out we have listed down some of the most common error codes for Westinghouse Dishwashers.
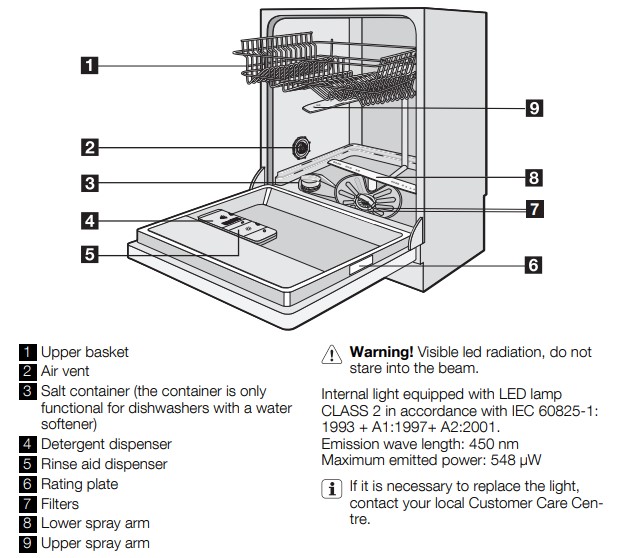
The appliance does not start or stops during operation. If there is a fault, first try to find a solution to the problem yourself. Refer to following charts. If you cannot find a solution to the problem, contact your dealer or the Customer Care Centre. Switch the appliance off before you do the suggested corrective actions.
Codes Table
| Error Codes | Meaning |
|---|---|
| F1 | Leak detection. Switch off the dishwasher and close the tap. |
| F2 | Draining fault |
| F3 | Water overfill. Close the tap. |
| F5 | Water supply fault. |
| F6 | Faulty heater sensor. |
| F7 | Overheating (water temperature too high) |
| F8 | Not heating |
| F9 | Flow control position error |
| FE | Power supply fault. Restart the dishwasher. |
| H01 – H24 | Delay has been selected. Cancel the delay setting. |
| 10 | The appliance does not fill with water |
| 20 | The appliance does not drain the water |
| 30 | The anti-flood device operates |
After the check, switch on the appliance. The program continues from the point of interruption. If the malfunction occurs again, contact your Customer Care Centre. If the display shows an alarm code, not described in the chart, contact your Customer Care Centre. When you contact the Customer Care Centre you will need to give some details of the appliance that can be found on the rating plate (e.g. model number, serial number, product number). We recommend that you record these details.
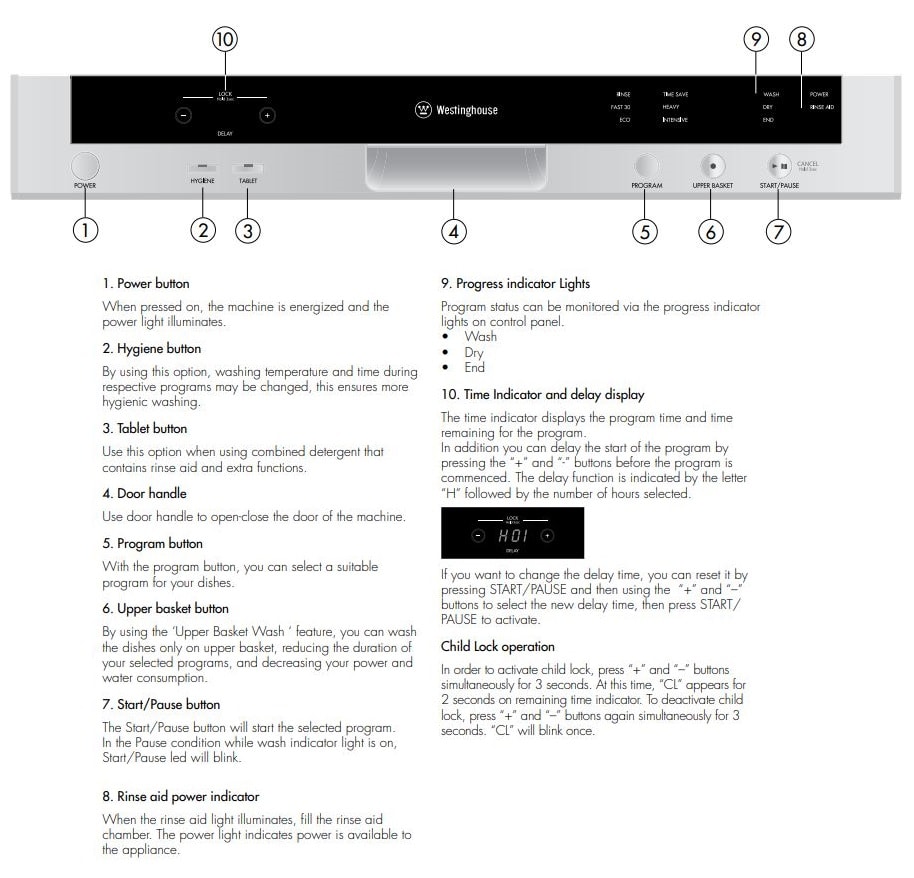
Control Panel
Troubleshooting
| Problem | Solution |
|---|---|
| If one of program monitor lights is on and start/pause light is flashing | Your machine’s door is open, shut the door. |
| If the program won’t start | • Check if the plug is connected. Check your indoor fuses. Be sure that the water inlet tap is turned on. |
| If detergent residues are left in the detergent compartment | Detergent has been added when the detergent compartment was wet. |
| If water is left inside the machine at the end of the program | The water drain hose is clogged or twisted. The filters are clogged. The program is not finished yet. |
| If the machine stops during a wash operation | Power failure. Water inlet failure. Program can be on standby mode. |
| If shaking and hitting noises are heard during a wash operation | Dishes placed incorrectly. Spray arm hitting the dishes. |
| If there are partial food wastes left on the dishes | • Dishes placed incorrectly into the machine, sprayed water did not reach related places. |
| If there are whitish stains on the dishes | A very small amount of detergent is being used. Rinse aid dosage setting at a very low level. |
| If the dishes won’t dry up | A program without a dry operation selected. Rinse aid dosage set too low. Dishes unloaded too fast. |
| If there are rust stains on the dishes | Stainless-steel quality of the dishes washed is insufficient. Unhealthy mains grounding. |
Maintenance And Cleaning
Spray arms
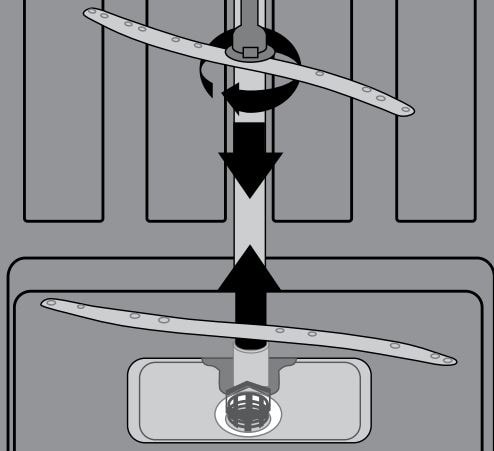
Check whether the holes for the upper and lower spray arms are clogged. If there is any clogging, remove the spray arms and clean them under water. You can remove the lower spray arm by pulling it upwards, while the upper spray arm can be removed by turning the lock nut to the left. Be sure that the nut is perfectly tightened when refitting the upper spray arm.
Hose filter
The inlet hose filter reduces contamination (sand, clay, rust etc.) that might be occasionally carried in through the main’s water supply or the indoor plumbing, and avoids damage to dishwasher components. Check the filter and the hose from time to time and clean them if necessary. To clean the filter, first turn off your tap and then remove the hose. After removing the filter from the hose, clean it under the tap. Insert the cleaned filter back into its place inside the hose. Refit the hose and check that there are no leaks.
Filters
Check if any food wastes have remained on the coarse and fine filters. If any food waste is found, remove the filters and clean them thoroughly with water under the tap.
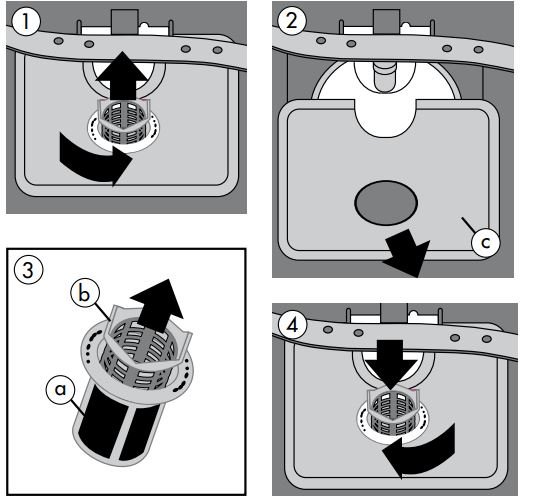
- a.Micro Filter
- b.Coarse Filter
- c.Metal
- To remove and clean the filter combination (a+b), turn it counter clockwise and remove it by lifting upwards.
- Pull and remove the metal filter (c).
- Then pull the coarse filter out of the micro filter. Rinse it with water under the tap and reassemble.
- Relocate the Coarse/Micro filter combination into the metal filter and turn it in the direction of the arrow It is locked when the arrows on the micro filter can be seen on either side.
- Reposition the metal filter in the machine.
- Never use your dishwasher without any filter.
- Incorrect fitting of the filter will reduce the washing effectiveness.
- Clean filters are very important in terms of the proper running of the machine

