Philips is a Dutch multinational conglomerate company that was founded by Eindhoven in 1891. Since 1997 the corporation has moved its primary headquarters to Amsterdam, getting a better hold of the corporation’s image and its market. While their original headquarters in Eindhoven are still working, their main staff works from the Amsterdam office.
What was once a light bulb production house now has more than eighty thousand people working for them around the world. A household name Philips has come a long way since its inception and is constantly working on various fields that include advanced technology.
Philips robot vacuum cleaners are used in many commercial and residential spaces, making them a top choice for everyone. While being one of the most reliable brands in the world they are known to face an error every now and then. While it may sound like a huge setback, you can easily find the issue and have it resolved in no time. Here is a list of Philips robot vacuum cleaner error codes that can help you get back on track in no time.
Codes List
| Error codes | Solution |
|---|---|
| E0 | Rechargeable battery is empty Charge the robot. |
| E1 | Wheel lifted. The robot is stuck on a threshold or another height difference. Move it to a flat area. |
| E2 | Floor detection error. Move the robot to a flat area. |
| E3 | Dust container error. The dust container is not properly inserted. Insert the dust container properly. |
| E4 | Wheel motor overload. Check if there is any dirt (hair, fluff etc.) attached to the wheels. Remove the dirt. |
| E5 | Brush motor overload. Check if there is any dirt (hair, fluff etc.) attached to the roller brush or side brushes. Remove the dirt. |
| E6 | Robot motor overload. Clean the filters and empty the dust container. |
| E7 | Inner system error. Set the on/off switch to OFF and then set it to ON again. |
| E8 | Front wheel slipping or not moving. Check if the robot can move forward freely and if there are any objects that block its movements. Check if the front wheel can turn freely by turning the robot upside down and moving the wheel with your hand. If the wheel jams, the wheel may be dirty. Clean the front wheel. |
FC8822, FC8812 Model Codes
| Error codes | Solution |
|---|---|
| E1 | Wheels stuck. Remove robot from the obstacle and press the starts/stop button to resume cleaning. |
| E2 | Top cover or dust container not placed properly. Place the dust container in and the top cover on the robot properly. The error code disappears from the display automatically. |
| E3 | Bumper stuck. Remove the robot from the obstacle. The error code disappears from the display automatically. |
| E4 | Robot lifted from floor. Put the robot back on the floor to make the error code disappear. |
| E5 | Color of floor too dark. Place robot on a lighter area of the floor. Clean the drop-off sensors. |
| E6 | Battery not inserted properly. Read the instructions in ‘Inserting the rechargeable battery into the robot’ in chapter ‘Before first use’. |
| E7 | Charging error. Check if the power switch is in ‘on’ position when the robot is on the docking station. |
Troubleshooting
Model: FC9910
This chapter summarises the most common problems you could encounter while using your HomeRun. If you are unable to solve the problem with the information below, please contact the Consumer Care Centre in your country.
| Trouble | Cause |
|---|---|
| The cleaning performance has decreased. | The dust container is full. Empty the dust container. |
| The roller brush is dirty. Clean the roller brush. | |
| The mesh filter, exhaust filter or motor protection filter is dirty. Clean the dirty filter or filters. | |
| The robot suddenly stops cleaning. | You have selected the SPOT cleaning mode. In this mode, the robot stops when it has finished cleaning the set area. If you want to clean the rest of the room, select the AUTO cleaning mode and press the start/pause button. |
| An error code is shown on the display. Check the error codes table in chapter ‘Error codes’ to identify the problem and solve it. | |
| The robot switches itself off when I press the POWER button to switch it on. | The rechargeable battery is almost empty. Recharge the robot manually on the base station or by connecting it directly to the mains. |
| The robot does not respond. | You forgot to set the on/off switch to ON. Set the on/off switch to ON and then press the POWER button on the robot. |
| The rechargeable battery is empty. Recharge the robot manually on the base station or by connecting it directly to the mains. | |
| You have not placed the rechargeable battery in the robot correctly. Remove the rechargeable battery and reinsert it. | |
| The non-rechargeable batteries of the remote control are empty. Replace the batteries with batteries of the same type. | |
| The infrared signal generator and/or the infrared signal emitter is/are covered or dirty. Make sure nothing covers the infrared signal generator and emitter. When the infrared signal generator and emitter are dirty, clean them with a soft clean cloth. | |
| The remote control is too close to the base station. Move further away and then operate the remote control again while pointing it in the direction of the base station. | |
| The robot does not charge. | The base station or robot is not properly connected to the mains. Make sure you insert the small plug into the socket on the base station or robot properly. Also make sure that you insert the small plug of the mains cord into the adapter properly and that you insert the mains plug into the wall socket properly |
| The robot does not return to the base station after cleaning. | You started cleaning in AUTO cleaning mode from another place in the room than the base station. If you start the robot from another place in the room, it returns to the place where it started cleaning. |
| The base station or robot is not properly connected to the mains. Make sure you insert the small plug into the socket on the base station or robot properly. Also make sure that you insert the small plug of the mains cord into the adapter properly and that you insert the mains plug into the wall socket properly. | |
| The infrared signal generator or emitter on the base station or one or more sensors on the robot are covered. Remove the object that covers the infrared signal generator or emitter or the object that covers one or more sensors of the robot. | |
| The base station is located behind a wall or other obstacle that blocks its signal. Put the base station in a different place. Make sure that there are no obstacles within 0.5m on both sides of the base station. | |
| You cleaned a small area in SPOT cleaning mode. When the robot has cleaned the area, it automatically stops. You can press the BASE button on the remote control to make the robot return to the base station or you can press the MODE button to switch to AUTO cleaning mode. In AUTO cleaning mode, the robot returns to the base station automatically |
Model: FC8822, FC8812
This chapter summarizes the most common problems you could encounter with the appliance. If you are unable to solve the problem with the information below, visit www.philips.com/support for a list of frequently asked questions or contact the Consumer Care Center in your country
| Trouble | Cause |
|---|---|
| The robot does not start cleaning when I press the start/stop button. | The rechargeable battery is empty. Charge the rechargeable battery. |
| The small plug is still inserted in the socket on the robot. The robot does not work on mains power. It only works on its rechargeable battery. Therefore, always disconnect the adapter from the robot and the mains before use. | |
| The power switch is not set to 'on' (I) position. Press the power switch. Press the start/stop button on the robot or on the remote control to start cleaning. | |
| The warning indicator flashes quickly. | One or both wheels are stuck. Set the power switch to 'off'. Remove the fluff, hair, thread or wire that is caught around the wheel suspension. |
| One or both side brushes are stuck. Clean the side brushes. | |
| The top cover is not present or is not closed properly. When the top cover is not present or is not closed properly, the robot does not work. Place the top cover on the robot properly. | |
| The bumper is stuck. Press the start/stop button. Lift the robot so that its bumper comes free. Place the robot at some distance from the obstacle and press the start/stop button to make it resume cleaning. | |
| The robot was lifted while it was cleaning. Press the start/stop button. Place the robot on the floor. Then press the start/stop button to make the robot resume cleaning. | |
| The robot does not clean properly. | The bristles of one or both side brushes are crooked or bent. Soak the brush or brushes in warm water for a while. If this does not restore the bristles to their proper shape, replace the side brushes. |
| The filter in the dust container is dirty. Clean the filter in the dust container with a cloth or a toothbrush with soft bristles.You can also clean the filter and dust container with a regular vacuum cleaner at a low suction power setting. | |
| The suction opening in the bottom of the dust container is clogged. Clean the suction opening. | |
| The robot is cleaning a floor that reflects sunlight quite strongly. This triggers the drop-off sensors and causes the robot to move in an unusual pattern. Close the curtains to block sunlight from entering the room. You can also start cleaning when the sunlight is less bright. | |
| The rechargeable battery can no longer be charged or runs empty very fast. | The rechargeable battery has reached the end of its life. Replace the rechargeable battery. |
| The battery of the remote control runs empty too fast. | Perhaps you did not insert the correct type of battery. For the remote control, you need a CR2025 coin-shaped battery. If the problem persists, go to www.philips.com/support or contact the Consumer Care Center in your country. |
| The robot is moving in circles. | The robot is in spot-cleaning mode. This is normal behavior. The spiral mode can be activated when a lot of dirt is detected on the floor for a thorough clean. It is also part of the auto cleaning mode. After approximately one minute the robot resumes its normal cleaning pattern. You can also stop the spiral mode by selecting a different cleaning mode on the remote control. |
| The robot cannot find the docking station. | There is not enough room for the robot to navigate towards the docking station. Try to find another place for the docking station. |
| The robot is still actively searching. Give the robot around 20 minutes to return to the docking station. | |
| The robot was not started from the docking station. If you want the robot to return to the docking station after a cleaning run, start it from the docking station. | |
| The robot beeps when it is on the docking station. | You try to charge the robot with the power switch is in off position. Press the power switch to switch on the robot. |
Replacing the side brushes
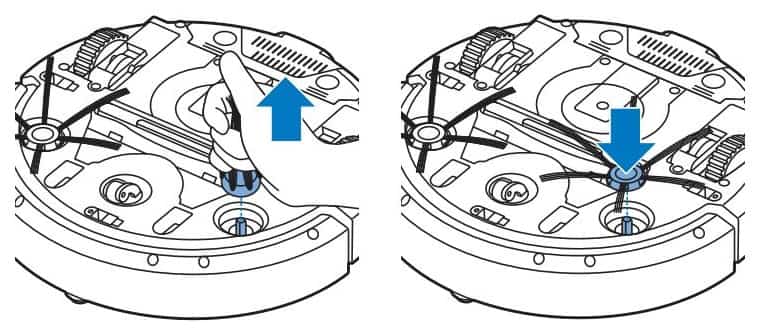
Replace the side brushes after some time to ensure proper cleaning results. Always replace the side brushes when you notice signs of wear or damage. We also recommend that you replace both side brushes at the same time. You can order spare side brushes as part of replacement kit FC8068. This kit also contains two filters and three dry wipes.

- Make sure that the power switch is in ‘off’ position.
- To replace the side brushes, grab the old side brushes by the bristles and pull them off their shafts.
- Push the new side brushes onto the shafts.
Replacing the battery of the remote control
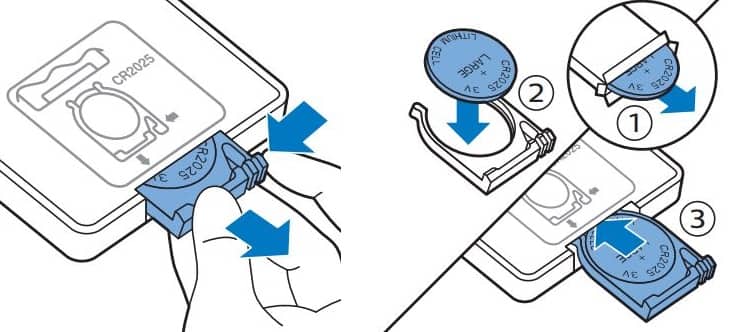
The remote control works on a CR2025 coin-shaped battery. Replace the battery when the robot no longer responds when you press the buttons on the remote control.

- Hold the remote control upside down. Push the release button on the battery holder and at the same time slide the battery holder out of the remote control.
- Remove the empty battery from the battery holder and place a new battery in the battery holder. Then slide the battery holder back into the remote control.

