Zanussi ovens offer users a highly functional cooking experience. However, like any electronic device, they can occasionally encounter malfunctions. This is where Zanussi oven error codes become valuable, helping swiftly and effectively identify issues. These codes are used to pinpoint the specific component causing the problem, expediting the repair process and providing users with substantial convenience.
Most Common Codes
| Error Codes | Solutions |
|---|---|
| EPt1 | Oven chamber probe (located internally at the centre of the left-hand oven chamber wall), interrupted or in short circuit. |
| EPt2 | Boiler probe (situated within the heating element assembly interrupted or in short circuit (ignored in ISG ovens and present in all ovens with a boiler). |
| EPt3 | Meat probe interrupted or in short circuit. |
| EPt4 | Bypass probe located on the piping which joins the rear part of the oven chamber (below the motor) and the drainage collector, interrupted or in short circuit. |
| EPt7 | Oven chamber temperature setting potentiometer is damaged (only on levels 2 and 3 with the p.c.b card UIA) |
| EPt8 | Damaged temperature sensor for the electronic components |
| ESCH | Electronic control circuit cooling device malfunctioning. |
| Etuc | Oven chamber temperature limit switch activated (320°C) (on all ovens). |
| Etub | Boiler temperature limit switch activated (180°C) (not in ISG models). |
| EFLP | Oven chamber motorised drainage valve failure (only level 6) |
| F9 | Switch your oven off at the mains and switch back on to see if this clears the fault. |
| C | 1. Set both the function selector and temperature knob to the “0” position and turn the power to the appliance off for a few minutes. 2. If "--- C" continues to appear on the display after the power is on again. |
| F21 | Error code E21 indicates too high starting temperature. Turn the control panel off and on again. |
| F81 | F81 error indicate that there is a moisture problem in the product. |
| PYR | The oven is equipped with a “cleaning reminder” feature. Press the [+] and [-] buttons simultaneously when the message appears on the display. |
| CATA | The oven is equipped with a “cleaning reminder” feature. Press the [+] and [-] buttons simultaneously when the message appears on the display. |
| 400 | Check if the appliance is correctly connected to the electrical supply. |
| PERFECT 2 | If the clock icon appears on the display all the time, the oven / cooker is likely to be in DEMO mode. When the clock icon (Green box) appears on the display, DEMO mode is enabled. The oven must be switched off. Press the on / off button and hold it down until the oven comes on and switches off again. |
| BL | Check the light bulb in the oven. Replace if it is faulty |
| C1 | Telescopic rails during pyrolytic treatment. Remove the telescopic rails and all accessories from the oven compartment before activating the pyrolytic function. |
| C2 | The cooking thermometer is in the connector during the pyrolytic treatment. Remove the cooking thermometer before activating the pyrolytic function. |
| C3 | Open door during the pyrolytic treatment. If the door is open, you cannot perform the pyrolytic treatment. Close the oven door before the pyrolytic function is activated. |
| C4 | The Plus steam button is activated while switching on the pyrolytic treatment. Press the Plus steam button again to unselect Plus steam before switching on the pyrolytic function. |
| E0020 | Check the light bulb in the oven. Replace if it is faulty |
| F1 | 1.For appliances without pyrolytic cleaning: if the oven's display shows error message f1 the possible cause is an electronic fault. 2.For appliances with pyrolytic cleaning:if the oven's display shows error message f1 it indicates that the oven door cannot close because the pyrolytic function is on. -check if the top part of the door is intact and secured properly to the door. -another possible cause: the door was recently cleaned or detached. refer to the user manual to find out the correct assembly instructions for the door. |
| F11 | Connect the roasting thermometer properly. Replace the faulty roasting thermometer. |
| F111 | Connect the roasting thermometer properly. Replace the faulty roasting thermometer. |
| F129 | Connect the roasting thermometer properly. Replace the faulty roasting thermometer. |
| Safe Or Padlock | Oven displays SAFE or padlock symbol. It indicates that the child safety lock is activated. Deactivate the safety lock. |
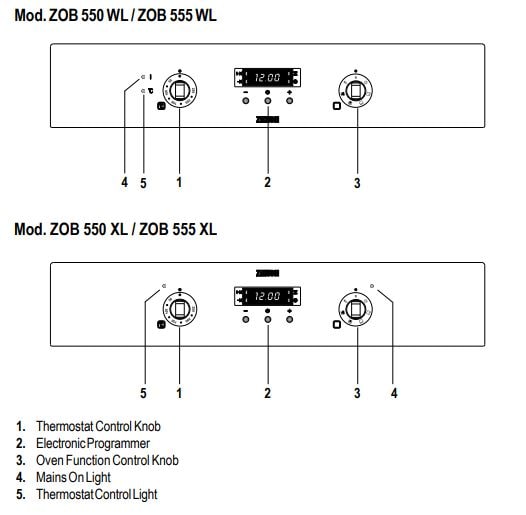
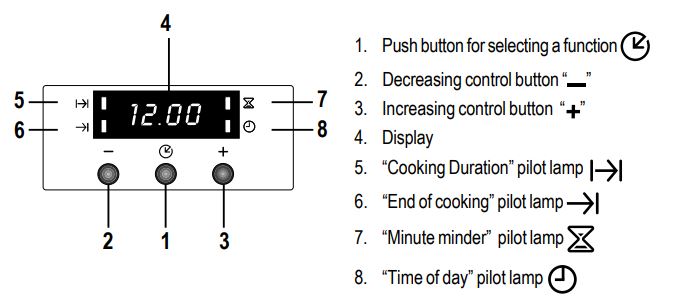
Control Panel
How to clean the Zanussi Oven Door?
The following instructions explain how to disassemble the oven door as it is supplied by the Manufacturer. Please note that the references to the right or left side have to be switched depending on the oven model.
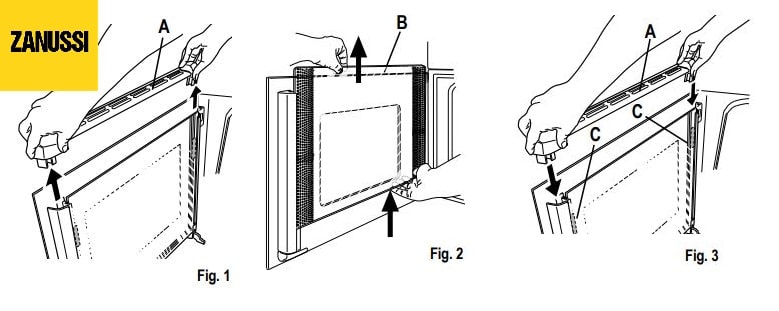
- Figure 1. With both hands hold the perforated plate A in position and push it out upwards.
- Figure 2. Hold the inner glass B tightly with both hands and remove it from its original position by sliding it upwards.
Make sure that glass B is firmly held to avoid that the glass heel over and fall down.
After removing the inner glass, clean the oven door and the glass. We recommend to clean the oven door using only a wet sponge and dry it after cleaning with a soft cloth. Never use steel wool, acids or abrasive products as they can damage the surface.
After cleaning, place the inner glass back in its original position by inserting it in the rubber distance holders C.
The inner pane B (with side decors) must be arranged with the decorated surface to the inner side of the door. The slight roughness of the printing must not be discernible when you stroke your fingers over the visible surface.
After placing the inner glass back:
- Figure 3. Insert the perforated plate A back in its original position and check that everything is securely fastened and firm.
DO NOT clean the oven door while the glass panels are warm. If this precaution is not observed the glass panel may shatter. If the door glass panel becomes chipped or has deep scratches, the glass will be weakened and must be replaced to prevent the possibility of the panel shattering. Contact your local Service Force Centre who will be pleased to advise further. It is not possible to reverse the oven door.
Troubleshooting
If the oven is not working correctly, please carry out the following checks, before contacting your local Service Centre. If you call out an engineer to a fault listed below, or to repair a fault caused by incorrect use or installation, a charge will be made even if the appliance is under guarantee.
| Problem | Possible Cause |
|---|---|
| The oven does not come on. | -Check that the current time of day has been set on the programmer (see chapter "Setting the time of day"). -Check that both a cooking function and temperature have been selected. -Check the oven is wired in properly, and the socket switch or the switch from the mains supply to the oven are ON. |
| The oven temperature light does not come on. | Select a temperature with the thermostat control knob or Select a function with the oven function control knob. |
| The oven light does not come on. | Select a function with the oven function control knob or Check the light bulb and replace it if necessary |
| It takes too long to cook the dishes or they cook too quickly. | The temperature may need adjusting or Follow the advice contained in these instructions, especially the section “Using the Oven“. |
| Steam and condensation settle on the food and in the oven cavity. | When the cooking process is completed, do not leave the dishes standing in the oven for longer than 15-20 minutes. |
| The oven fan is noisy. | Check that shelves and bakeware are not vibrating in contact with the oven back panel. |
| The display shows "12.00". | Set the time of day (see chapter "Setting the time of day"). |